Do you have a question about the Hioki RM3544 and is the answer not in the manual?
Guidance on safety and operating precautions for the instrument.
Guides users to the troubleshooting section for problem resolution.
Instructions for checking instrument and accessory contents upon receipt.
Essential checks before first use to ensure instrument integrity and safety.
Guidance on proper placement and environmental conditions for instrument installation.
Precautions for safe handling, modification, and use of the instrument.
Safety guidelines for handling power cords and measurement leads to prevent shock.
Safety instructions for connecting the power cord to the instrument.
Safety precautions for connecting to the EXT I/O connector.
Precautions to take before initiating any measurement.
Details the RM3544's capabilities, specifications, and key features.
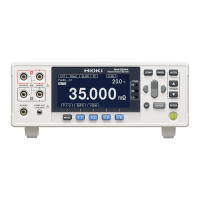
Identifies and explains the functions of the instrument's front and rear panel components.
Step-by-step guide for setting up and performing measurements with the instrument.
Explains the instrument's screen layout, key lock states, and display information.
Procedure for safely connecting the instrument's power cord.
Instructions for connecting measurement leads to the instrument's terminals.
Steps for powering the instrument on, off, and managing standby mode.
Procedure to inspect the instrument and peripherals before operation.
How to set the measurement range, including manual and auto-ranging options.
Guidance on setting measurement speed (FAST, MED, SLOW) for precision.
How to check measured values and switch display information.
Explains how to interpret and diagnose measurement fault indicators.
Procedure for performing zero adjustment to correct residual errors.
How to use temperature correction to convert resistance values to standard temperature.
Applying corrections and units for physical properties beyond resistance.
How to set up and use the comparator function for judging measured values.
Setting upper and lower thresholds for absolute value judgment mode.
Setting reference values and tolerances for relative value judgment mode.
Procedure for saving current instrument settings as a panel.
Procedure for loading previously saved panel settings.
How to enable or disable front panel key operations using the key-lock function.
Procedures for resetting instrument settings to factory defaults.
Details the EXT I/O connector pinout and signal descriptions.
Illustrates timing diagrams for various signal operations and triggers.
Provides schematic diagrams of the instrument's internal circuits.
Configuration options for the external input/output interface.
Procedures for checking and testing external control functions.
Introduces the instrument's communications interfaces and their capabilities.
Steps for connecting and configuring communications interfaces.
Instructions for controlling the instrument and acquiring data via commands.
Automatically sending measured data to a computer after measurement.
Procedure for connecting a compatible printer to the instrument.
Methods for printing measured values, judgments, and instrument settings.
Details the instrument's measurement ranges, method, and terminals.
Information on instrument calibration conditions and equipment.
Guide to identifying and resolving common instrument issues.
Explanation of error messages and their corresponding remedies.
Step-by-step guide for replacing the instrument's protective fuse.
Explains how capacitive and electromagnetic coupling cause unstable measurements.
How temperature variations affect measurement targets and cause errors.
Specifications for conductor resistance, capacitance, and dielectric material for measurement leads.
Guidelines and diagrams for wiring measurement leads correctly.
| Type | Resistance Meter |
|---|---|
| Frequency Range | DC |
| Testing frequency | 1 kHz ±0.1 Hz |
| Measurement current | 10 mA (at 0.000 mΩ to 3.2000 Ω range) |
| Display | LCD |
| Interface | USB, RS-232C |
| Power Supply | AC 100 V to 240 V, 50/60 Hz |
| Dimensions | 215 mm |