38 ZeroWire Reference Guide
Notes on Force Arming, Bypass, and Auto-Bypass
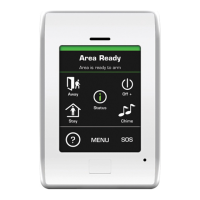
Normally to arm an area it must first be “Ready to Arm”. This means all zones in
that area must be sealed.
For example, if the front door is open, then a user would need to close it first and
ensure there is no movement in the reception area. This provides the Ready to
Arm status in Area 1 that is needed before attempting to arm. However, this is
not always user friendly or practical.
The term force arm refers to the ability to arm an area even though zones are not
ready. It is usually only used with motion zones as these are self-restoring and
will be restored by the time the exit delay ends (e.g. the person arming the
system leaves the building causing the Reception PIR to restore.)
If the front door is not closed properly then Area 1 would go into alarm at the end
of the Exit time. To avoid this false alarm we enable “Force Arm With Bypass” so
all zones that are not sealed (i.e. not ready) by end of the exit time will be “Auto-
Bypassed”.
AREA 1 - Office
[ ] Force Arm With Bypass
[ ] Force Arm Without Bypass
ZONE 1 – Door Reed Switch