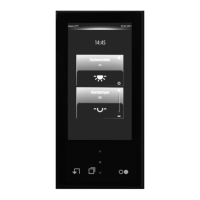
Art. No. SC 1000 KNX
(F) Display area for channel name and channel command (the text and icon are dependent on
the channel function)
(G) Display area for the switching time
(H) Operating area for presetting the channel command (depending on the channel function)
The room name (A) is displayed in the upper area of the submenu of a switching time. The area
of operation of the switching time is identified by this. A switching time submenu also has 3
additional display areas...
- In the first display area (F), the name of the allocated KNX channel is displayed. This
clearly identifies which KNX function is activated by the switching time (e.g. "wall lighting",
"ceiling spot", "roller blind window"...). The name is configured in the ETS in the parameter
node of the KNX channel concerned. In addition, a status text and status icon are displayed
in this display area according to the set channel command of the switching time.
These display elements are dependent on the function of the allocated KNX channel (see
description of the channel functions). With some channel functions the icon can be
changed if required and thus adapted to the activated KNX function. In the display area of a
switching time, the icon selected during the ETS configuration of the allocated KNX
channel is always used.
In the channel functions "dimming (brightness value"), "Venetian blind/shutter (position)",
"1-byte value transmitter", "2-byte value transmitter" and "setpoint shift internal", you can
touch the status text in the first display area with your finger. This causes a keyboard to be
shown in the display in which the value of the switching time, i.e. the channel command,
can be edited.
- In the second display area (G), settings for the switching time are displayed. Thus, the
display shows the enabled time and weekdays of the switching time in this area. You can
touch this display area with your finger. As a result, the display branches to the editing
mode for setting the aforementioned switching time parameters (see below).
The "Active" and "Delete" buttons are visible along the bottom of the described display
area. By touching the "Active" button the selected switching time can be activated
(Display: > ) or deactivated (Display: X). The delete mode is selected similarly by touching
the "Delete" button (see page 238-239).
The selection for an active or inactive switching time or for the delete mode is only applied
if the "Save >" icon in the status line of the submenu at the top edge of the display is
pressed. After editing a switching time, the new settings can also only be saved using this
icon in the status line. Alternatively, a setting or selection can be discarded by pressing the
" Z Cancel" icon in the status line. In this case, the old settings for the switching time remain
active.
- In the operating area (H), the channel command for the selected switching time can be
preset or changed. The selectable channel commands and thus the appearance of the
sensor area is dependent on the configured channel function (see page 227-228). Thus,
the sensor area can be two-part (rocker element, switch on/off, move up/down) or can also
contain value slider.
It should be noted that the timer can only handle some channel functions simplified. Thus,
for example, a channel function "dimming (Start/Stop)" can only be controlled by ON and
OFF commands. This is similar in the case of the channel function "Venetian blind/shutter
(Step/Move/Step)". Long-time operation (move) only is operational here using the timer.
The channel command for the channel functions "scene extension" and "operating mode
switchover internal" cannot be preset with the timer. The command that was set in the
channel configuration is always executed when executing a switching time. Consequently,
the sensor element (H) of the timer is empty for this channel function and not operational.
In the channel function "setpoint shift internal", the sensor area only shows the graphic for
the 4-level setpoint shift. The channel command and thus the value of the setpoint shift
(-4...0...+4) is preset by the timer by a long press of the status value in the first display area
(F). The level size for the setpoint shift can then be entered via the keyboard.
A modified channel command is only applied if the "Save >" icon in the status line of the
submenu at the top edge of the display is pressed. Alternatively, a setting can be discarded
by pressing the " Z Cancel" icon in the status line. In this case, the old settings for the
channel command remain active.
Page 236 of 347
Software "Smart Control 501511"
Functional description
 Loading...