➢ Go to the required group folder and press OK.
The analyser displays the inspection list recorded in this group.
➢ Go to the required inspection and press OK.
The analyser displays the inspections details.
8.5. Add an inspection to a group
The group function has to be activated (see page 18). If an inspection or a measurement is not added to a group during the recording,
it is possible to add it later:
➢ Go to the required inspection or measurement with the arrows.
➢ Press OK to display the details.
➢ Press the “Add” function key to add it to a group.
➢ Select the group to add the measurement or inspection with the arrows, or create a new group (see page 25).
➢ Press OK to validate.
The measurement is saved in the group.
8.6. Delete a group
To delete a group:
➢ Go to the “Customer” menu with the keypad and press OK.
The analyser displays the list of recorded customers on the instrument.
➢ Go to the required customer with the arrows and press OK.
The analyser displays all the boilers linked to this customer.
➢ Go to the required boiler with the arrows and press OK.
The analyser displays all the inspections linked to this customer and boiler and the created groups.
➢ Go to the required group folder and press the “Delete” function key.
A confirmation message is displayed.
➢ To confirm the deletion: go to YES and press OK. To cancel: go to NO and press OK, or press Esc key.
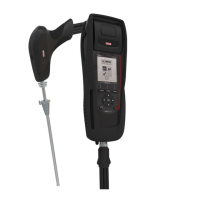
9. Perform measurement of a customised procedure
Customised procedures, created by the LOGAZ-2 software (optional software), when they are transferred in the analyser can be
performed.
9.1. Preliminary operations to procedures
Before performing the measurements, names of the different customers and theirs respective boilers must be saved in the
analyser. See page 23 to create customers and page 24 to create boilers or the LOGAZ-2 software user manual (optional
software).
9.2. Launch a customised procedure
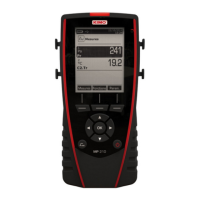
➢ Turn on the analyser.
➢ Go to “Procedures” with the keypad then press OK.
➢ Select the customer then the boiler in which measurements will be performed.
➢ Go to “Customised” with the keypad then press OK.
The list of procedures saved in the analyser is displayed.
➢ Select the procedure with the keypad then press OK.
The analyser displays the 1
st
step of the customised procedure.
➢ Go to “Start” with the keypad then press OK.
The analyser performs the measurement.
➢ Press OK on “Next” if the customised procedure has several step.
The analyser launches the next step.
OR
➢ Press OK on “Quit” if the customised procedure has only one step.
The analyser backs to the list of customised procedures. At the end of the procedure, the analyser saves it and automatically links it to
the customer and boiler selected before launching the measurement. It is possible to get to details of this procedure in the “Customer”
menu.
26 Perform measurement of a customised procedure