LightLas 532 – Operator's Manual Rev. No 01 Page 6 of 115
LIST OF DRAWINGS / FIGURES
Laser Console Safety and Controls Labels
Laser Console Safety labels
Integrated Slitlamp LDU with Labels (RH side)
Integrated Slitlamp LDU with Labels (LH side)
Attachment LDU with Labels
Microscope Doctor Safety Filter with Labels
Microscope Safety Filter with labels
System software start up screen shot
System software boot up ok and system is "Standby" mode
System software is ready to shutdown
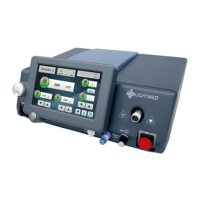
Laser Console Controls and LCD Displays
LCD Panel Displays and Control
Integrated Slitlamp LDU Controls
Attachment Slitlamp LDU Controls
Truspot Attachment Slitlamp LDU Controls (New version)
Front View of LIO LDU Controls
Top View of LIO LDU Controls
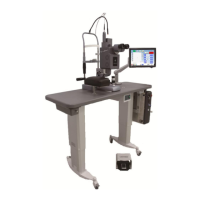
SL980 Slitlamp Parts List and Controls
SL990 Slitlamp Parts List and Controls
Packing Carton for Integrated LDU and Slitlamp
Portable Carry Cases for Console and LDU’s
Removal voltage setting block and reinsert it back upon completion
Assembled Upper and Lower Housing Screw
Slitlamp mounted onto Table Top ready for Integrated LDU
Slitlamp arm ready for Delivery housing
Fit Delivery unit housing to the Slitlamp
Lock the housing securely to the Slitlamp when it is pushed against
Chrome Stop screw