LightLas 532 – Operator's Manual Rev. No 01 Page 7 of 115
Align the keyways then fit the Zoom unit to the Delivery housing
Rotate the Zoom housing to the end stop
Original Illumination Tower
New modified Illumination Tower fitted
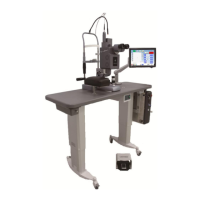
Haag Streit Attaching Tonometer mount ready for Attachment LDU
Zeiss 30SL Attaching the Tonometer mount and Attachment LDU
Mounting Arm
Lightmed SYL9000 Attaching Tonometer mount ready for Attachment
LDU
Lightmed SYL9000 Attaching the Tonometer mount and Attachment
LDU Mounting Arm
Haag Streit Mounting the whole attachment LDU to Tonometer mount
& micromanipulator
Zeiss Style 30SL Mounting the whole attachment LDU to Tonometer
mount & micromanipulator
Lightmed SYL9000 Mounting the whole attachment LDU to Tonometer
mount & micromanipulator
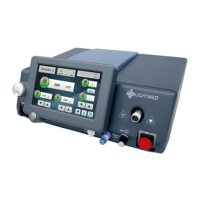
LIO connections in console
Endoprobe plug installation
Standard System connection set-up
Combo System Y-Joint connection set-up
Sample of Delivery Fiber and Delivery Key Connection
System boot up sequential display #1
System boot up sequential display #2
Initial Power on displays and outputs
Sample of Delivery Fiber and Delivery Key Connection
Attach the Delivery fiber to the Zoom unit
Upper / Lower Slit Alignment Aiming Integrity and Focus Checkout
Realignment set screw location (X-Y axis)