EasyManuals Logo

Lightware HDMI-3D-OPT-RX150RA User Manual

Lightware HDMI-3D-OPT-RX150RA
97 pages
To Next Page IconTo Next Page
To Previous Page IconTo Previous Page
Page #42 background imageLoading...
Page #42 background image
ξ˜™ξ˜’ξ˜„ξ˜·ξ™“ξ™Šξ™˜ξ™›ξ™…ξ™–ξ™‰ξ˜„ξ˜§ξ™“ξ™’ξ™˜ξ™–ξ™“ξ™ξ˜„ξ˜‘ξ˜„ξ˜°ξ™ξ™‹ξ™Œξ™˜ξ™›ξ™…ξ™–ξ™‰ξ˜„ξ˜¨ξ™‰ξ™šξ™ξ™‡ξ™‰ξ˜„ξ˜§ξ™“ξ™’ξ™˜ξ™–ξ™“ξ™ξ™ξ™‰ξ™– HDMI-3D-OPT series – User's Manual 42
ξ˜™ξ˜’ξ˜•ξ˜•ξ˜’ξ˜–ξ˜’ξξ˜·ξ™…ξ™šξ™‰ξ˜„ξ™˜ξ™Œξ™‰ξ˜„ξ˜·ξ™‰ξ™˜ξ™˜ξ™ξ™’ξ™‹ξ™—ξ˜„ξ™“ξ™Šξ˜„ξ™…ξ˜„ξ˜¨ξ™‰ξ™šξ™ξ™‡ξ™‰ξ˜„ξ˜Œξ˜¦ξ™…ξ™‡ξ™ξ™™ξ™”ξ˜
Step 1. Apply the desired settings in the transmitter (port parameters, crosspoint, etc.)
Step 2. Select the Settingsξ˜„ξ˜“ξ˜„Backup tab from the menu.
Step 3. ξ˜»ξ™–ξ™ξ™˜ξ™‰ξ˜„ξ™…ξ˜„ξ™—ξ™Œξ™“ξ™–ξ™˜ξ˜„description in the text box on the left (optional).
Step 4. Press the Create a full backupξ˜„ξ™†ξ™™ξ™˜ξ™˜ξ™“ξ™’ξ˜’ξ˜„ξ˜½ξ™“ξ™™ξ˜„ξ™›ξ™ξ™ξ™ξ˜„ξ™†ξ™‰ξ˜„ξ™”ξ™–ξ™“ξ™‘ξ™”ξ™˜ξ™‰ξ™ˆξ˜„ξ™˜ξ™“ξ˜„ξ™—ξ™…ξ™šξ™‰ξ˜„ξ™˜ξ™Œξ™‰ξ˜„ξž€ξ™ξ™‰ξ˜„ξ™˜ξ™“ξ˜„ξ™˜ξ™Œξ™‰ξ˜„ξ™‡ξ™“ξ™‘ξ™”ξ™™ξ™˜ξ™‰ξ™–ξ˜’ξ˜„ξ˜Έξ™Œξ™‰ξ˜„ξ™ˆξ™‰ξ™Šξ™…ξ™™ξ™ξ™˜ξ˜„
ξž€ξ™ξ™‰ξ˜„ξ™’ξ™…ξ™‘ξ™‰ξ˜„ξ™ξ™—ξ˜„ξ™˜ξ™Œξ™‰ξ˜„ξ™Šξ™“ξ™ξ™ξ™“ξ™›ξ™ξ™’ξ™‹ξ˜ž
BACKUP_<DEVICE TYPE>_SN<SERIAL NUMBER>.LW3
Step 5. Set the desired le name, select the folder and saveξ˜„ξ™˜ξ™Œξ™‰ξ˜„ξž€ξ™ξ™‰ξ˜’
ξ˜Έξ˜­ξ˜΄ξ˜·ξ˜„ξ˜₯ξ˜²ξ˜¨ξ˜„ξ˜Έξ˜Άξ˜­ξ˜§ξ˜―ξ˜·ξ˜žξ˜„ξ˜Ήξ™—ξ™ξ™’ξ™‹ξ˜„ξ™˜ξ™Œξ™‰ξ˜„ξ™‰ξ™œξ™…ξ™‡ξ™˜ξ˜„ξ™”ξ™–ξ™“ξ™ˆξ™™ξ™‡ξ™˜ξ˜„ξ™˜ξ™ξ™”ξ™‰ξ˜„ξ™ξ™’ξ˜„ξ™˜ξ™Œξ™‰ξ˜„ξž€ξ™ξ™‰ξ™’ξ™…ξ™‘ξ™‰ξ˜„ξ™ξ™—ξ˜„ξ™–ξ™‰ξ™‡ξ™“ξ™‘ξ™‘ξ™‰ξ™’ξ™ˆξ™‰ξ™ˆξ˜„ξ™—ξ™ξ™’ξ™‡ξ™‰ξ˜„ξ™ξ™˜ξ˜„ξ™‘ξ™…ξ™ξ™‰ξ™—ξ˜„ξ™˜ξ™Œξ™‰ξ˜„ξž€ξ™ξ™‰ξ˜„
usage more comfortable.
ξ˜₯ξ™†ξ™“ξ™™ξ™˜ξ˜„ξ™˜ξ™Œξ™‰ξ˜„ξ˜¦ξ™…ξ™‡ξ™ξ™™ξ™”ξ˜„ξ˜ͺ
ξ˜Έξ™Œξ™‰ξ˜„ξ™†ξ™…ξ™‡ξ™ξ™™ξ™”ξ˜„ξž€ξ™ξ™‰ξ˜„ξ™ξ™—ξ˜„ξ™…ξ˜„ξ™—ξ™ξ™‘ξ™”ξ™ξ™‰ξ˜„ξ™˜ξ™‰ξ™œξ™˜ξ˜„ξž€ξ™ξ™‰ξ˜„ξ™›ξ™Œξ™ξ™‡ξ™Œξ˜„ξ™‡ξ™“ξ™’ξ™˜ξ™…ξ™ξ™’ξ™—ξ˜„ξ˜°ξ˜»ξ˜—ξ˜„ξ™”ξ™–ξ™“ξ™˜ξ™“ξ™‡ξ™“ξ™ξ˜„ξ™‡ξ™“ξ™‘ξ™‘ξ™…ξ™’ξ™ˆξ™—ξ˜’ξ˜„ξ˜Έξ™Œξ™‰ξ˜„ξž€ξ™–ξ™—ξ™˜ξ˜„ξ™ξ™ξ™’ξ™‰ξ˜„ξ™ξ™—ξ˜„ξ™˜ξ™Œξ™‰ξ˜„ξ™ˆξ™‰ξ™—ξ™‡ξ™–ξ™ξ™”ξ™˜ξ™ξ™“ξ™’ξ˜„
ξ™…ξ™’ξ™ˆξ˜„ξ™˜ξ™Œξ™‰ξ˜„ξ™Šξ™™ξ™–ξ™˜ξ™Œξ™‰ξ™–ξ˜„ξ™ξ™ξ™’ξ™‰ξ™—ξ˜„ξ™…ξ™–ξ™‰ξ˜„ξ™˜ξ™Œξ™‰ξ˜„ξ™‡ξ™“ξ™‘ξ™‘ξ™…ξ™’ξ™ˆξ™—ξ˜„ξ™›ξ™Œξ™ξ™‡ξ™Œξ˜„ξ™›ξ™ξ™ξ™ξ˜„ξ™†ξ™‰ξ˜„ξ™‰ξ™œξ™‰ξ™‡ξ™™ξ™˜ξ™‰ξ™ˆξ˜„ξ™ˆξ™™ξ™–ξ™ξ™’ξ™‹ξ˜„ξ™˜ξ™Œξ™‰ξ˜„ξ™–ξ™‰ξ™—ξ™˜ξ™“ξ™–ξ™‰ξ˜„ξ™”ξ™–ξ™“ξ™‡ξ™‰ξ™—ξ™—ξ˜’ξ˜„ξ˜Έξ™Œξ™‰ξ˜„ξž€ξ™ξ™‰ξ˜„ξ™‡ξ™…ξ™’ξ˜„ξ™†ξ™‰ξ˜„
ξ™šξ™ξ™‰ξ™›ξ™‰ξ™ˆξ˜„ξ˜Œξ™…ξ™’ξ™ˆξ˜“ξ™“ξ™–ξ˜„ξ™‰ξ™ˆξ™ξ™˜ξ™‰ξ™ˆξ˜ξ˜„ξ™†ξ™ξ˜„ξ™…ξ˜„ξ™—ξ™ξ™‘ξ™”ξ™ξ™‰ξ˜„ξ™˜ξ™‰ξ™œξ™˜ξ˜„ξ™‰ξ™ˆξ™ξ™˜ξ™“ξ™–ξ˜ξ˜„ξ™‰ξ˜’ξ™‹ξ˜’ξ˜„ξ˜²ξ™“ξ™˜ξ™‰ξ™”ξ™…ξ™ˆξ˜’
See the entire list of saved data in the Content of Backup File section.
ATTENTION! Editing the command lines is only recommended for expert users.
ξ˜™ξ˜’ξ˜•ξ˜•ξ˜’ξ˜—ξ˜’ξξ˜Ήξ™”ξ™ξ™“ξ™…ξ™ˆξ˜„ξ™˜ξ™Œξ™‰ξ˜„ξ˜·ξ™‰ξ™˜ξ™˜ξ™ξ™’ξ™‹ξ™—ξ˜„ξ™˜ξ™“ξ˜„ξ™…ξ˜„ξ˜¨ξ™‰ξ™šξ™ξ™‡ξ™‰ξ˜„ξ˜Œξ˜Άξ™‰ξ™—ξ™˜ξ™“ξ™–ξ™‰ξ˜
WARNING! Please note that the settings will be permanently overwritten with the restored parameters
in the device. Undo is not available.
ATTENTION!ξ˜„ξ˜Έξ™Œξ™‰ξ˜„ξ™‡ξ™ξ™“ξ™’ξ™ξ™’ξ™‹ξ˜„ξ™ξ™—ξ˜„ξ™—ξ™™ξ™‡ξ™‡ξ™‰ξ™—ξ™—ξ™Šξ™™ξ™ξ˜„ξ™›ξ™Œξ™‰ξ™’ξ˜„ξ™˜ξ™Œξ™‰ξ˜„ξ™†ξ™…ξ™‡ξ™ξ™™ξ™”ξ˜„ξž€ξ™ξ™‰ξ˜„ξ™ξ™—ξ˜„ξ™ˆξ™“ξ™›ξ™’ξ™ξ™“ξ™…ξ™ˆξ™‰ξ™ˆξ˜„ξ™Šξ™–ξ™“ξ™‘ξ˜„ξ™˜ξ™Œξ™‰ξ˜„ξ™—ξ™…ξ™‘ξ™‰ξ˜„ξ™˜ξ™ξ™”ξ™‰ξ˜„ξ™“ξ™Šξ˜„ξ™—ξ™“ξ™™ξ™–ξ™‡ξ™‰ξ˜„
device as the destination device.
The Restoring Process
Step 1. Select the Settingsξ˜„ξ˜“ξ˜„Backup tab from the menu.
Step 2. Click on the Choose le button on the right panel and browseξ˜„ξ™˜ξ™“ξ˜„ξ™˜ξ™Œξ™‰ξ˜„ξ™ˆξ™‰ξ™—ξ™ξ™–ξ™‰ξ™ˆξ˜„ξž€ξ™ξ™‰ξ˜’
Step 3. ξ˜Έξ™Œξ™‰ξ˜„ξž€ξ™ξ™‰ξ˜„ξ™ξ™—ξ˜„ξ™šξ™‰ξ™–ξ™ξž€ξ™‰ξ™ˆξ˜„ξ™…ξ™’ξ™ˆξ˜„ξ™˜ξ™Œξ™‰ξ˜„ξ™–ξ™‰ξ™—ξ™™ξ™ξ™˜ξ˜„ξ™›ξ™ξ™ξ™ξ˜„ξ™†ξ™‰ξ˜„ξ™ˆξ™ξ™—ξ™”ξ™ξ™…ξ™ξ™‰ξ™ˆξ˜„ξ™ξ™’ξ˜„ξ™˜ξ™Œξ™‰ξ˜„ξ™˜ξ™‰ξ™œξ™˜ξ™†ξ™“ξ™œξ˜„ξ™†ξ™‰ξ™ξ™“ξ™›ξ˜’ξ˜„ξ˜­ξ™Šξ˜„ξ™˜ξ™Œξ™‰ξ˜„ξž€ξ™ξ™‰ξ˜„ξ™ξ™—ξ˜„ξ™‡ξ™“ξ™–ξ™–ξ™‰ξ™‡ξ™˜ξ˜ξ˜„ξ™˜ξ™Œξ™‰ξ™’ξ˜„ξ™˜ξ™Œξ™‰ξ˜„
settings can be restored.
Step 4. Choose IP settingsξ˜„ξ™›ξ™Œξ™…ξ™˜ξ˜„ξ™ξ™“ξ™™ξ˜„ξ™›ξ™…ξ™’ξ™˜ξ˜„ξ™˜ξ™“ξ˜„ξ™™ξ™—ξ™‰ξ˜„ξ™…ξ™Šξ™˜ξ™‰ξ™–ξ˜„ξ™†ξ™…ξ™‡ξ™ξ™™ξ™”ξ˜’ξ˜„ξ˜½ξ™“ξ™™ξ˜„ξ™‡ξ™…ξ™’ξ˜„ξ™…ξ™”ξ™”ξ™ξ™ξ˜„ξ™—ξ™‰ξ™˜ξ™˜ξ™ξ™’ξ™‹ξ™—ξ˜„ξ™Šξ™–ξ™“ξ™‘ξ˜„ξ™˜ξ™Œξ™‰ξ˜„ξ™†ξ™…ξ™‡ξ™ξ™™ξ™”ξ˜„ξž€ξ™ξ™‰ξ˜ξ˜„
keep actual settings, set it manually in a dialog box or apply DHCP.
Step 5. Press the Start restore process button and click on the Yes button when asked.
Step 6. ξ˜Άξ™‰ξ™†ξ™“ξ™“ξ™˜ξ˜„ξ™˜ξ™Œξ™‰ξ˜„ξ™ˆξ™‰ξ™šξ™ξ™‡ξ™‰ξ˜„ξ™˜ξ™“ξ˜„ξ™…ξ™”ξ™”ξ™ξ™ξ˜„ξ™˜ξ™Œξ™‰ξ˜„ξ™’ξ™‰ξ™˜ξ™›ξ™“ξ™–ξ™ξ˜„ξ™—ξ™‰ξ™˜ξ™˜ξ™ξ™’ξ™‹ξ™—ξ˜„ξ™…ξ™Šξ™˜ξ™‰ξ™–ξ˜„ξž€ξ™’ξ™ξ™—ξ™Œξ™ξ™’ξ™‹ξ˜’
ξ˜™ξ˜’ξ˜•ξ˜–ξ˜’ξ
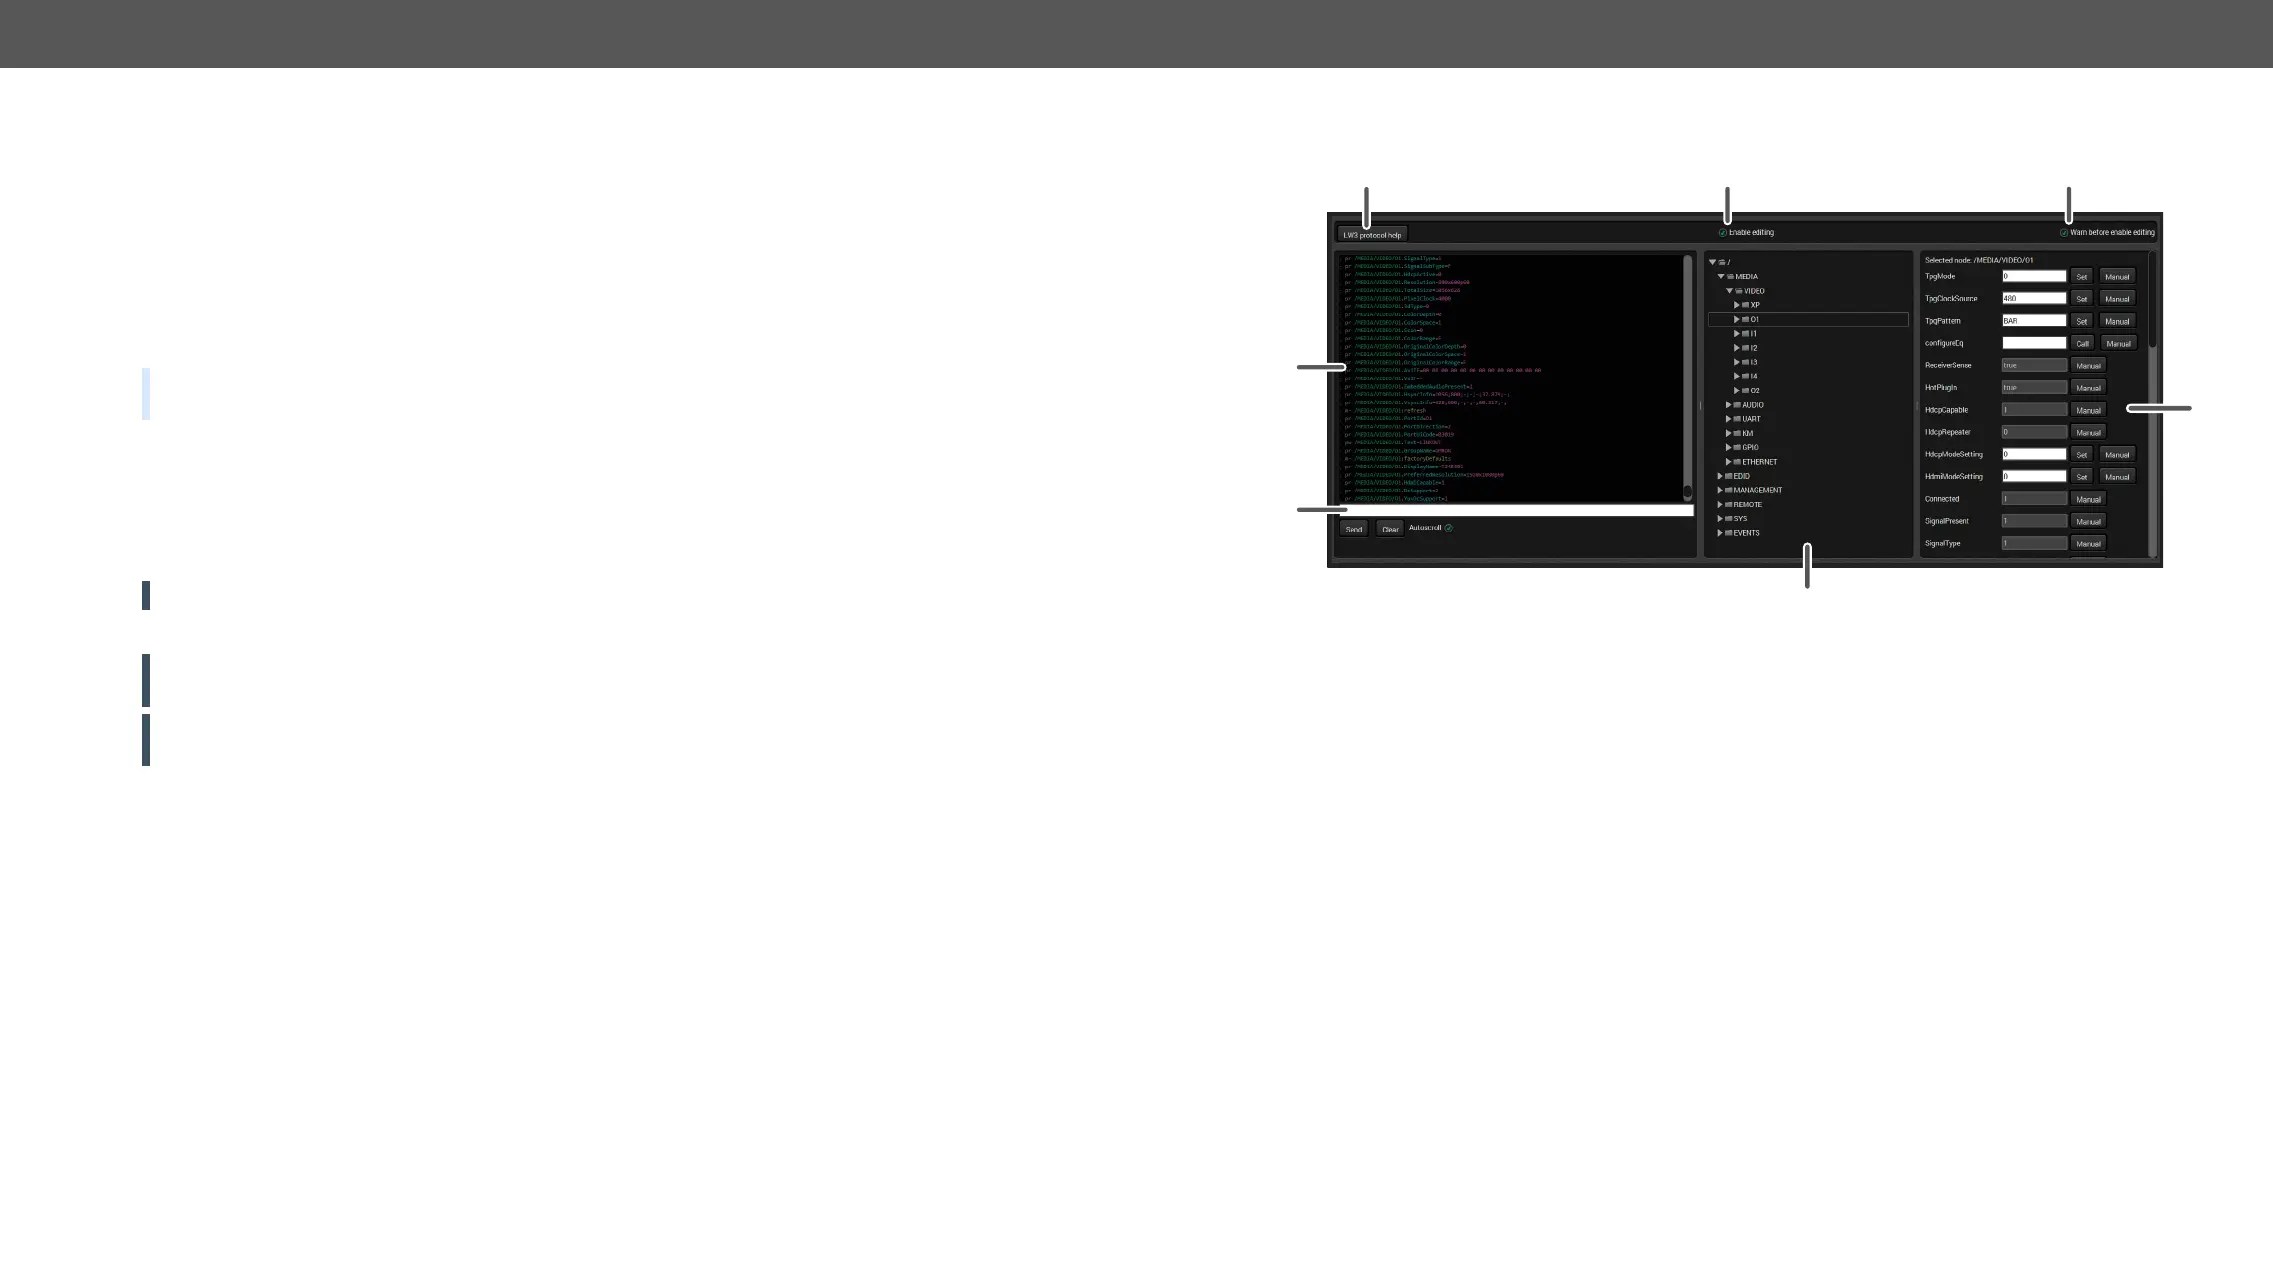
Advanced View Window
1
2 3
4
5
6
7
1
LW3 protocol help Pushing the button results a help window opening which describes the most
ξ™ξ™‘ξ™”ξ™“ξ™–ξ™˜ξ™…ξ™’ξ™˜ξ˜„ξ™ξ™’ξ™Šξ™“ξ™–ξ™‘ξ™…ξ™˜ξ™ξ™“ξ™’ξ˜„ξ™…ξ™†ξ™“ξ™™ξ™˜ξ˜„ξ˜°ξ˜»ξ˜—ξ˜„ξ™”ξ™–ξ™“ξ™˜ξ™“ξ™‡ξ™“ξ™ξ˜„ξ™‡ξ™“ξ™‘ξ™‘ξ™…ξ™’ξ™ˆξ™—ξ˜„ξ™ξ™’ξ˜„ξ˜¬ξ˜Έξ˜±ξ˜°ξ˜„ξ™Šξ™“ξ™–ξ™‘ξ™…ξ™˜ξ˜’
2
Edit mode The default appearance is the read-only mode. If you want to modify the
ξ™šξ™…ξ™ξ™™ξ™‰ξ™—ξ˜„ξ™“ξ™–ξ˜„ξ™”ξ™…ξ™–ξ™…ξ™‘ξ™‰ξ™˜ξ™‰ξ™–ξ™—ξ˜ξ˜„ξ™˜ξ™ξ™‡ξ™ξ˜„ξ™˜ξ™Œξ™‰ξ˜„ξ™“ξ™”ξ™˜ξ™ξ™“ξ™’ξ˜’ξ˜„ξ˜½ξ™“ξ™™ξ˜„ξ™›ξ™ξ™ξ™ξ˜„ξ™†ξ™‰ξ˜„ξ™”ξ™–ξ™“ξ™‘ξ™”ξ™˜ξ™‰ξ™ˆξ˜„ξ™˜ξ™“ξ˜„ξ™‡ξ™“ξ™’ξž€ξ™–ξ™‘ξ˜„ξ™ξ™“ξ™™ξ™–ξ˜„
selection.
3
Warning mode If this pipe checked in, a warning window pops up when you enable Edit mode.
4
Terminal window Commands and responses with time and date are listed in this window. Sent
ξ™‡ξ™“ξ™‘ξ™‘ξ™…ξ™’ξ™ˆξ˜„ξ™—ξ™˜ξ™…ξ™–ξ™˜ξ™—ξ˜„ξ™›ξ™ξ™˜ξ™Œξ˜„ξ¬ξ˜’ξ­ξ˜„ξ™‡ξ™Œξ™…ξ™–ξ™…ξ™‡ξ™˜ξ™‰ξ™–ξ˜ξ˜„ξ™–ξ™‰ξ™‡ξ™‰ξ™ξ™šξ™‰ξ™ˆξ˜„ξ™–ξ™‰ξ™—ξ™”ξ™“ξ™’ξ™—ξ™‰ξ˜„ξ™—ξ™˜ξ™…ξ™–ξ™˜ξ™—ξ˜„ξ™›ξ™ξ™˜ξ™Œξ˜„ξ¬ξ˜ ξ­ξ˜„ξ™‡ξ™Œξ™…ξ™–ξ™…ξ™‡ξ™˜ξ™‰ξ™–ξ˜’ξ˜„ξ˜„
The color of each item depends on the type of the command and response.
The content of the window can be emptied by the Clear button. If the Autoscroll
option is ticked, the list is scrolled automatically when a new line is added.
5
Command line Type the desired command and execute it by the Send button. Clear all current
commands and responses in the Terminal window by the Clear button.
6
Protocol tree ξ˜°ξ˜»ξ˜—ξ˜„ξ™”ξ™–ξ™“ξ™˜ξ™“ξ™‡ξ™“ξ™ξ˜„ξ™˜ξ™–ξ™‰ξ™‰ξ˜Ÿξ˜„ξ™—ξ™‰ξ™ξ™‰ξ™‡ξ™˜ξ˜„ξ™…ξ™’ξ˜„ξ™ξ™˜ξ™‰ξ™‘ξ˜„ξ™˜ξ™“ξ˜„ξ™—ξ™‰ξ™‰ξ˜„ξ™ξ™˜ξ™—ξ˜„ξ™‡ξ™“ξ™’ξ™˜ξ™‰ξ™’ξ™˜ξ˜’
7
Node list Correspondent parameters and nodes are shown which are connected to the
selected item in the protocol tree.
Manual button: Manual (short description) of the node can be called and
displayed in the terminal window.
Set button: ξ˜·ξ™…ξ™šξ™‰ξ™—ξ˜„ξ™˜ξ™Œξ™‰ξ˜„ξ™šξ™…ξ™ξ™™ξ™‰ξ˜“ξ™”ξ™…ξ™–ξ™…ξ™‘ξ™‰ξ™˜ξ™‰ξ™–ξ˜„ξ™˜ξ™ξ™”ξ™‰ξ™ˆξ˜„ξ™ξ™’ξ˜„ξ™˜ξ™Œξ™‰ξ˜„ξ™˜ξ™‰ξ™œξ™˜ξ™†ξ™“ξ™œξ˜’
Call button: Calls the method, e.g. reloads factory default settings.
ο„’




Table of Contents

Other manuals for Lightware HDMI-3D-OPT-RX150RA

Questions and Answers:

Question and Answer IconNeed help?

Do you have a question about the Lightware HDMI-3D-OPT-RX150RA and is the answer not in the manual?

Lightware HDMI-3D-OPT-RX150RA Specifications

General IconGeneral
BrandLightware
ModelHDMI-3D-OPT-RX150RA
CategoryReceiver
LanguageEnglish

Related product manuals