EasyManua.ls Logo

Native Instruments Traktor Kontrol Z2 User Manual

Native Instruments Traktor Kontrol Z2
85 pages
To Next Page IconTo Next Page
To Previous Page IconTo Previous Page
Page #21 background image
4.1.6 Adjusting Gain
The channel GAIN knob is located at the top of the Z2's channel filter and EQ sections. Note
that you can only adjust the gain for channels A and B using the Z2. Turning the GAIN knob
on the hardware simultaneously moves the GAIN knob in the TRAKTOR software, but only if
the knob is in User-Gain level viewing mode. And here's why: the button can be operated in
two viewing modes: Auto-Gain level and User-Gain level.
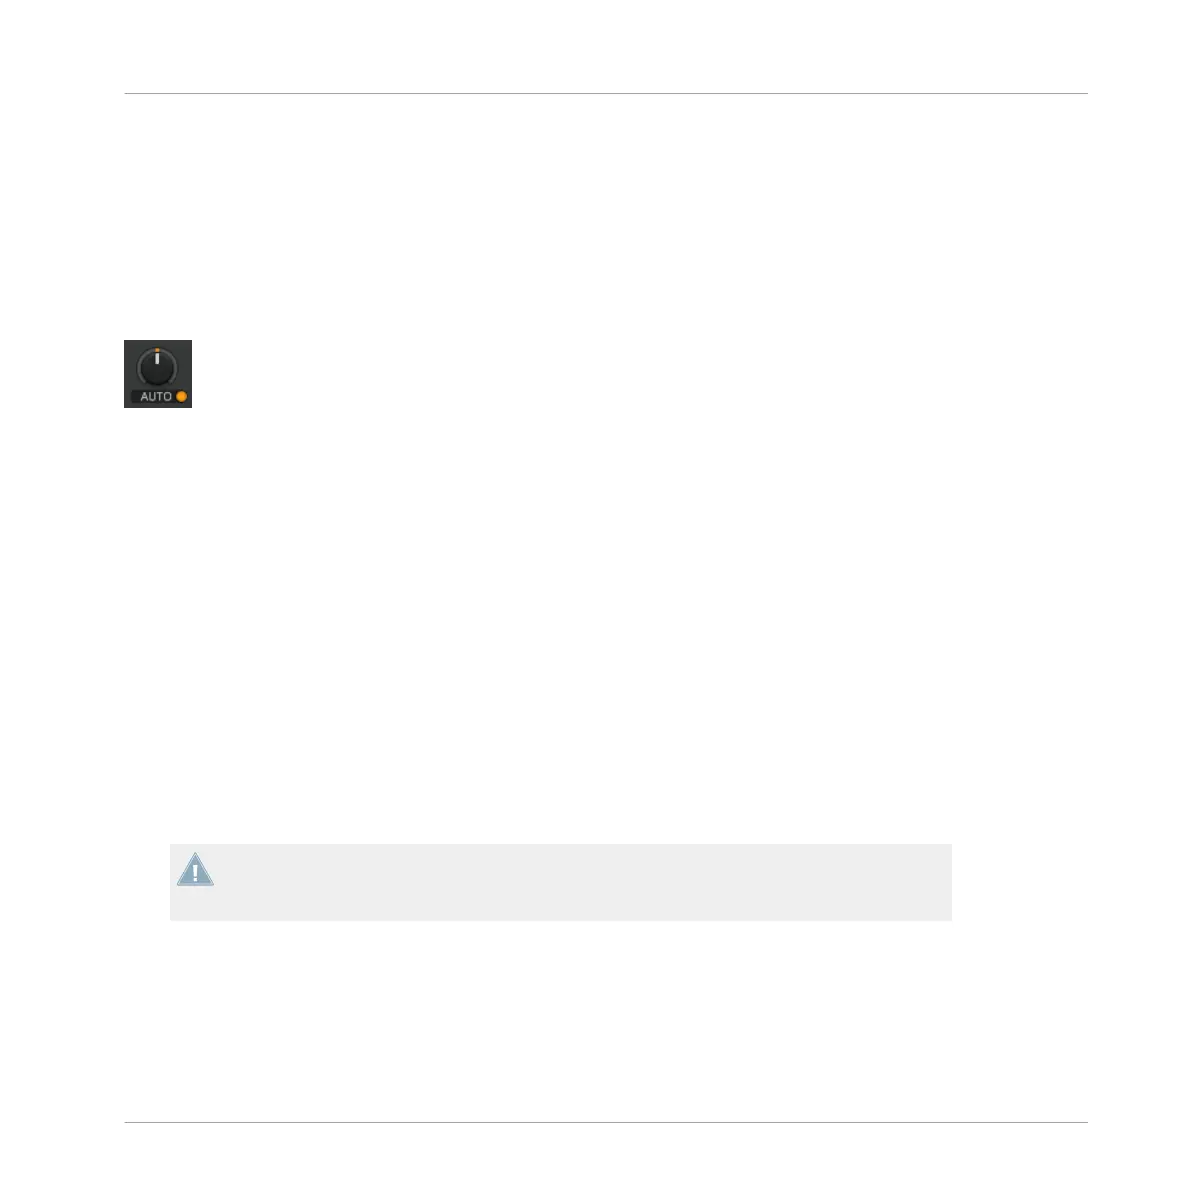
A Gain knob in Auto-Gain level viewing mode. Pressing the orange button will switch to User-Gain level viewing mode.
Here's what the two modes display:
User-Gain level: This is the default mode. A blue indicator ring around the knob shows
that you are in this viewing mode. By turning the GAIN knob on the Z2, you change the
mixer channel gain, which has a range of -inf to +12dB. This setting is not stored in your
song file.
Auto-Gain level: Clicking the button next to the label activates Auto-Gain level viewing
mode, the label then displays AUTO. When on, the knob shows the Auto-Gain level stored
with your song file during track analyzis (upon importing the track to the Library). Chang-
ing the Auto-Gain level on the software will also write this new Auto-Gain setting to the
song file.
However, turning the GAIN knob on the Z2, you still alter the User-Gain level, not the Au-
to-Gain level.
Auto-Gain can be activated in the preferences via Mixer > Level > Set Autogain When
Loading Track. Refer to the TRAKTOR manual for further information on Auto-Gain.
Loading a not formerly analyzed track into a Deck, Auto-Gain will be automatically disabled
for that Deck. Only after you reload the relevant track, the proper Auto-Gain setting will be
written to the file and Auto-Gain will be enabled.
Using the Z2 with TRAKTOR (TRAKTOR Mode)
Basics
TRAKTOR KONTROL Z2 - Manual - 21

Table of Contents

Other manuals for Native Instruments Traktor Kontrol Z2

Question and Answer IconNeed help?

Do you have a question about the Native Instruments Traktor Kontrol Z2 and is the answer not in the manual?

Native Instruments Traktor Kontrol Z2 Specifications

General IconGeneral
Frequency range20 - 20000 Hz
Channels quantity6 channels
Supported sample rates48 kHz
Digital sound processing24 bit
AUX inYes
XLR out2
AUX out ports1
Headphone connectivity3.5 mm/6.35 mm
Product colorBlack
USB connector typeUSB Type-A, USB Type-B
AC input voltage115 - 230 V
Power consumption750 mA
AC input frequency50 - 60 Hz
Minimum storage drive space1024 MB
Mac operating systems supportedMac OS X 10.12 Sierra, Mac OS X 10.13 High Sierra, Mac OS X 10.14 Mojave, Mac OS X 10.15 Catalina
Windows operating systems supportedWindows 10

Summary

Disclaimer

Welcome to TRAKTOR KONTROL Z2

Document Conventions

Explains formatting, icons, and typographical conventions used in the manual.

Documentation Overview

Lists related guides and manuals for the Z2 and TRAKTOR software.

System and Power Requirements

Power Requirements

Specifies the voltage and frequency requirements for the Z2's power supply.

Software System Requirements

Details the minimum computer hardware and OS specifications for TRAKTOR.

Using the Z2 as a Stand-alone DJ Mixer (Direct Mode)

Connectivity

Lists audio inputs and outputs available on the Z2.

Connecting The Z2

Step-by-step instructions for setting up the Z2 as a standalone mixer.

Adding Audio Sources and Using EQs/Filters

Instructions for connecting microphones, external devices, and using EQs/Filters.

Using the Z2 with TRAKTOR (TRAKTOR Mode)

Basics

Overview of essential operations when using the Z2 with TRAKTOR software.

TRAKTOR KONTROL Z2 Hardware Reference

Introduction

Overview of the chapter detailing each component of the Z2.

Rear Panel Connectors

Details all inputs, outputs, USB ports, and power connections on the rear panel.

Front Panel Controls

Describes the headphone jacks, crossfader reverse switch, and curve knob.

Top Panel: AUX/MIC and FX Controls

Controls for microphone, auxiliary inputs, and TRAKTOR's Macro FX.

Top Panel: Deck and Loop Controls

Controls for deck volume, looping, beatjumping, and sample triggering.

Top Panel: Performance and Playback Controls

Buttons for TRAKTOR mode, gain, EQ, filters, and browsing/loading tracks.

Top Panel: Status Indicators and Utility Buttons

Information on status indicators, Snap, Quantize, Settings, and SHIFT buttons.

Top Panel: Volume, Cue, and Output Controls

Controls for headphone monitoring, master/booth output levels, and crossfader.

Related product manuals