MX-5050 Operation and Maintenance Manual
May 1992
Section 6 Transport Adjustment and Parts Replacement
6 - 7
MX-5050MK
IV
-2
1. Remove the pinch roller cap screw and the roller cap.
2. Thread a hex socket head screw (M3, length 25~30mm) into the pinch roller.
3. Press the EDIT button and then press the PLAY button. The pinch roller will
move to make contact with the capstan and both will rotate.
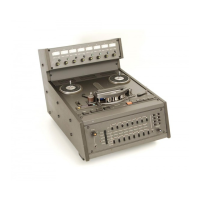
4. Measure the pinch roller pressure by using the Push function (piston part,
not hook part) of the spring scale.
Put the end of the piston part of the spring scale (3kg) on the hex socket
head screw (M3) from the direction of the capstan shaft. Refer to Figure 6-7.
Be careful that the piston part does not touch the capstan shaft.
5. Push on the scale and note the scale reading when the pinch roller just loses
contact with the capstan shaft (the pinch roller stops rotating).
The scale reading should be 2.7 ~ 2.8 kg (5.9 ~ 6.2 pounds).
6. If a proper scale reading is not obtained in step 5, adjust the nut shown in
Figure 6-6. Loosen the LOCK nut and Adjust the Adjustment Nut . Turning the
Nut in the spring direction increases the pinch roller pressure. Tighten the
Lock Nut after adjustment.
7. Confirm that the plunger reaches the bottom when the solenoid is activated.
If not, the solenoid pressure will not be strong enough so that even a slight
pressure will be able to move the pinch roller away from the capstan shaft.
8. If the plunger does not reach the bottom of the solenoid, loosen the Double
nut and readjust the pressure.