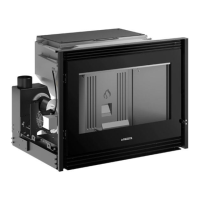
NUMBER KEY / DISPLAY DESCRIPTION
1 Key ON/OFF Allows you to start up or shut down the stove.
2 Key LOCK KEYBOARD
Pressing the stand-by key and holding it down (for around 5 seconds) until KEYPAD BLOCKED
appears on the display will disable the keypad. To re-enable the keypad press the stand-by key
and hold it down (for around 8 seconds) until KEYPAD UNBLOCKED appears on the display.
3 Key POWER
Allows you to select the power setting. With the SELECT key you can choose between the ve
available settings, P1-P2-P3-P4-P5.
4 Key FAN SPEED
Allows you to choose the speed setting on the Multifuoco fan. With the SELECT key you can
choose between the four available settings, 01-02-03-04.
5 Key SELECT
Allows you to choose: • power level - having previously pressed the POWER key
• fan speed - having previously pressed the FAN SPEED key
• temperature - having previously selected the TEMPERATURE key.
6 Key TEMPERATURE
Allows you to set the room temperature. The SELECT key will allow to choose the desired
temperature between 7°C and 30°C.
7 Key TIMER Displays the current date and time.
8 Key MENU
Allows: • access to the programming menu
• return to the initial display.
9 Key SET Conrm MENU selected.
10 Key MENU SELECTION Scrolls through the programming MENU.
11 Key ESC Returns to previous menu.
12 Key OPT
Displays the MULTICOMFORT temperatures. The dash before the temperature shows which
sensor is giving the temperature reading.
13 Display Shows on three lines the function settings, the current time and the temperature.
14 Display POWER Shows the power setting selected, P1-P2-P3-P4-P5.
15 Display MULTIFUOCO
Shows the Multifuoco setting selected, 01-02-03-04. The two lines of squares to the left and to
the right show respectively the left or right fan.
16 Display DAYS OF THE WEEK
Shows the day of the week, 1 Monday, 2 Tuesday, 3 Wednesday, 4 Thursday, 5 Friday, 6 Saturday,
7 Sunday.
17
Display RADIO SIGNAL
EMISSION
Active if the remote is receiving data from the stove.
18 Display TIMER Shows that the timer is engaged.
19 Display SAFETY Symbol appears when the safety system is activated.
20 Display FLAT BATTERY Shows that the battery is at or running down.
DT2010082-06
6.3 LIGhTING FOR ThE FIRST TIME
• Before lighting the stove for the rst time, check that the grate is properly placed and pushed towards the left.
• There will be odours when lighting the rst few times due to the evaporation of paints and oils used during the manufacturing process.
During this stage, air the room well where the stove is installed and avoid staying there any length of time since the fumes being given off could be
harmful to persons or pets.
The stove body should have settled down and the paints fully evaporated after having lit the stove a few times.
To this end, follow the instructions given below when using the stove:
- Operate at medium power for the rst 5-6 hours after igniting the fuel (the expansion caused by the heat during this stage will allow the stove
body to settle).
- After the settling-down stage the stove must be set to operate at maximum power for a period between 6 and 10 hours, depending on the amount
of paint on the stove body that must be evaporated off.
The time indicated for operation at maximum power does not necessarily have to be continuous, but may be divided up into two periods separated
by an interval of at least 3-4 hours with the stove shut down.
At the end of the recommended period the paint will have evaporated and the stove should be used at the suitable power for normal use.
If necessary the stove may be used for a further period at maximum power to ensure complete and nal disappearance of all paint residue.
When the hopper is being loaded for the rst time the loading auger needs time to ll up; during this stage the pellets are not distributed inside the
rebox and it is highly probable that the rst attempt at ignition fails. In this case we advise to provide to load manually the auger screw following
the instructions of the table “LOADING AUGER” in the “PARAMETER MENU”.
If the alarm is activated, shut down the stove by pressing the ON/OFF key for a few moments, remove the fuel in the grate and then set the stove
for a new ignition process.
Dispose the not burned pellets contained in the brazier.
H072047UK0 / DT2001513 – 04
27