EasyManua.ls Logo

RDS loadmaster 9000i - 1.3 Calibration; 1.5 The Head Unit

RDS loadmaster 9000i
34 pages
Print Icon
To Next Page IconTo Next Page
To Previous Page IconTo Previous Page
Loading...
1 - OVERVIEW
6
1.3 Calibration
For approved mode operation, all calibration is done on installation prior to NAWI or AWI certification. No further
calibration is permissible.
For calibration in non-approved mode, please refer to the Loadmaster 9000i Calibration manual.
1.4 Weighing Units
For NAWI and AWI approved modes: The units are 't' for tonnes or "kg" for kilograms, with a resolution ('e') according
to the certification as defined on the label on the head unit
In non-approved mode: Metric or imperial units (kgs, tonnes, m
3
, UK tons, US tons, lbs), and the resolution can be
selected via the 'CALIBRATION' menu. If weighing volumetrically, you must set the density.
On a Loadmaster 8000i, the units are normally displayed on screen and on printouts. If a Loadmaster 9000i Class IIII
approved weighing system is used in non-approved weighing mode (i.e. as a Loadmaster 8000i), then units are not
displayed on screen or included on a printout in compliance with the requirements for Weights and Measures Approval.
Also, the text "Not for Trade use or Applications under Article 1.2(a) 90/384/EEC" will appear on every printout.
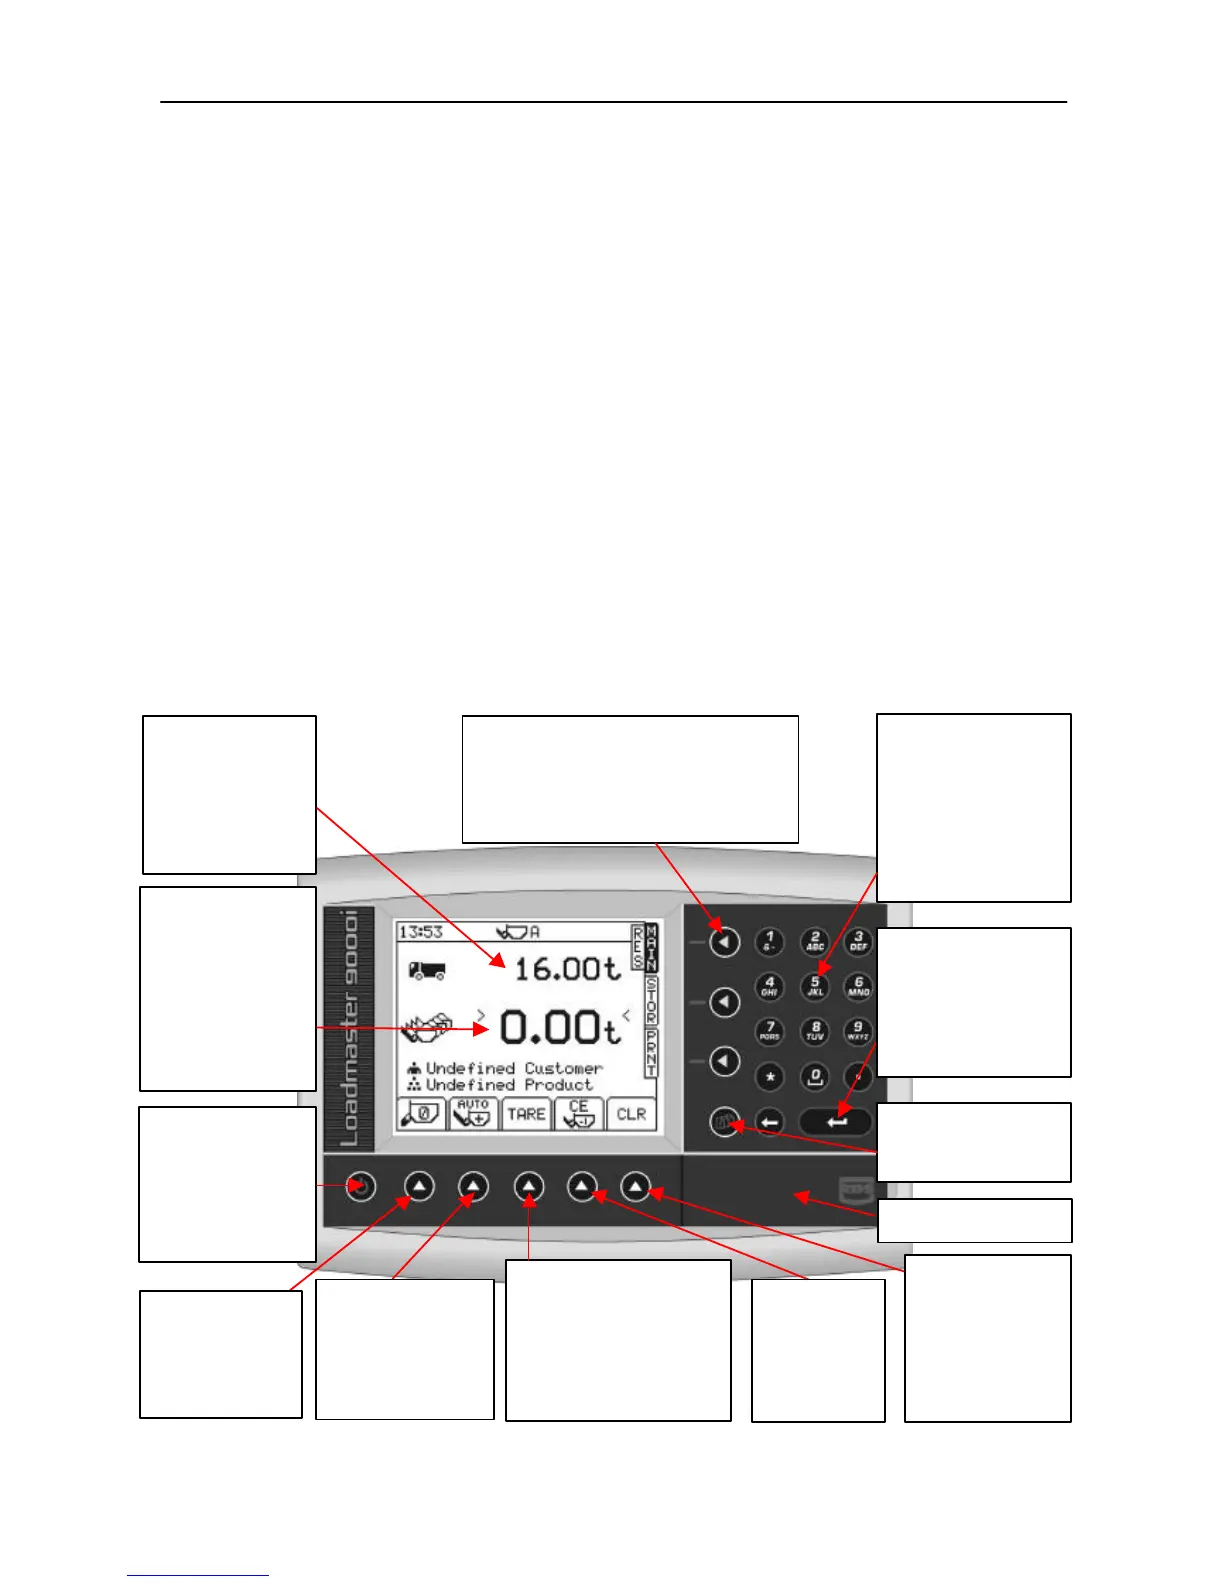
1.5 The Head Unit
Figure 2
“Target load”
You want this load to
load on the vehicle.
As you load, the figure
will decrease to show
how much is left to
load.
“Return to MAIN Screen”
Press at any time to return from the Tare screen
or any other screen, back to the MAIN weighing
screen displayed here.
Numeric Keypad
Used to enter a 'Target
Load'. If the Target Load
displayed is incorrect, just
type in a new one,
finishing with the Enter
key.
Use also for keying in a
Preset Tare value.
“Power On / Off“
Button
Turns the Loadmaster
on and off. Note that
this unit is also
switched through the
loader’s ignition key.
“Weight in bucket”
and “Total loaded so
far”
This shows the weight
the total loaded,
starting at 0.00 and
increasing as you load,
to show how much has
been loaded so far.
TARE Button
Optional TARE entry facility
subtracting a set value to
provide a NET Weight.
Press and hold until the Tare
window appears, then enter
the tare value required
“Setup” Button
Not used when loading.
SD/MMC Card Reader
“Clear Totals” Button
Press and hold for 1
second to clear the
'Total Loaded' and
'Left to Load' figures
before starting to load
a new vehicle.
Automatic / Manual
Weight Entering
Depending on
Certification.
Selectable in Non-
Approved Mode
“Zero Button”
Press to select the
Bucket Zero screen
when you want to
zero the bucket.
“ENTER” Button
When you have typed in a
new Target Load, press
this button to enter it.
Also used to set in the
Bucket Zero.
“Clear Last
Entry”
Press to delete
the last entry and
restore the
previous tota
l

Table of Contents