170
Recording Songs
Realtime Recording is the recording method in which your keyboard
playing and controller operations are recorded just as you perform
them. Use this recording method when you want to capture the
nuances of your own performance.
1.
Make sure that the preparations for recording have been
completed as described in “Before You Record a New
Song” (p. 168).
If you want to record into an existing song, load the desired
song into Temporary Song (p. 177). Then press [FWD] or [BWD]
to specify the measure at which you want to begin recording.
The measure at which recording will begin is indicated by the
“M=” in the upper part of each PLAY screen.
2.
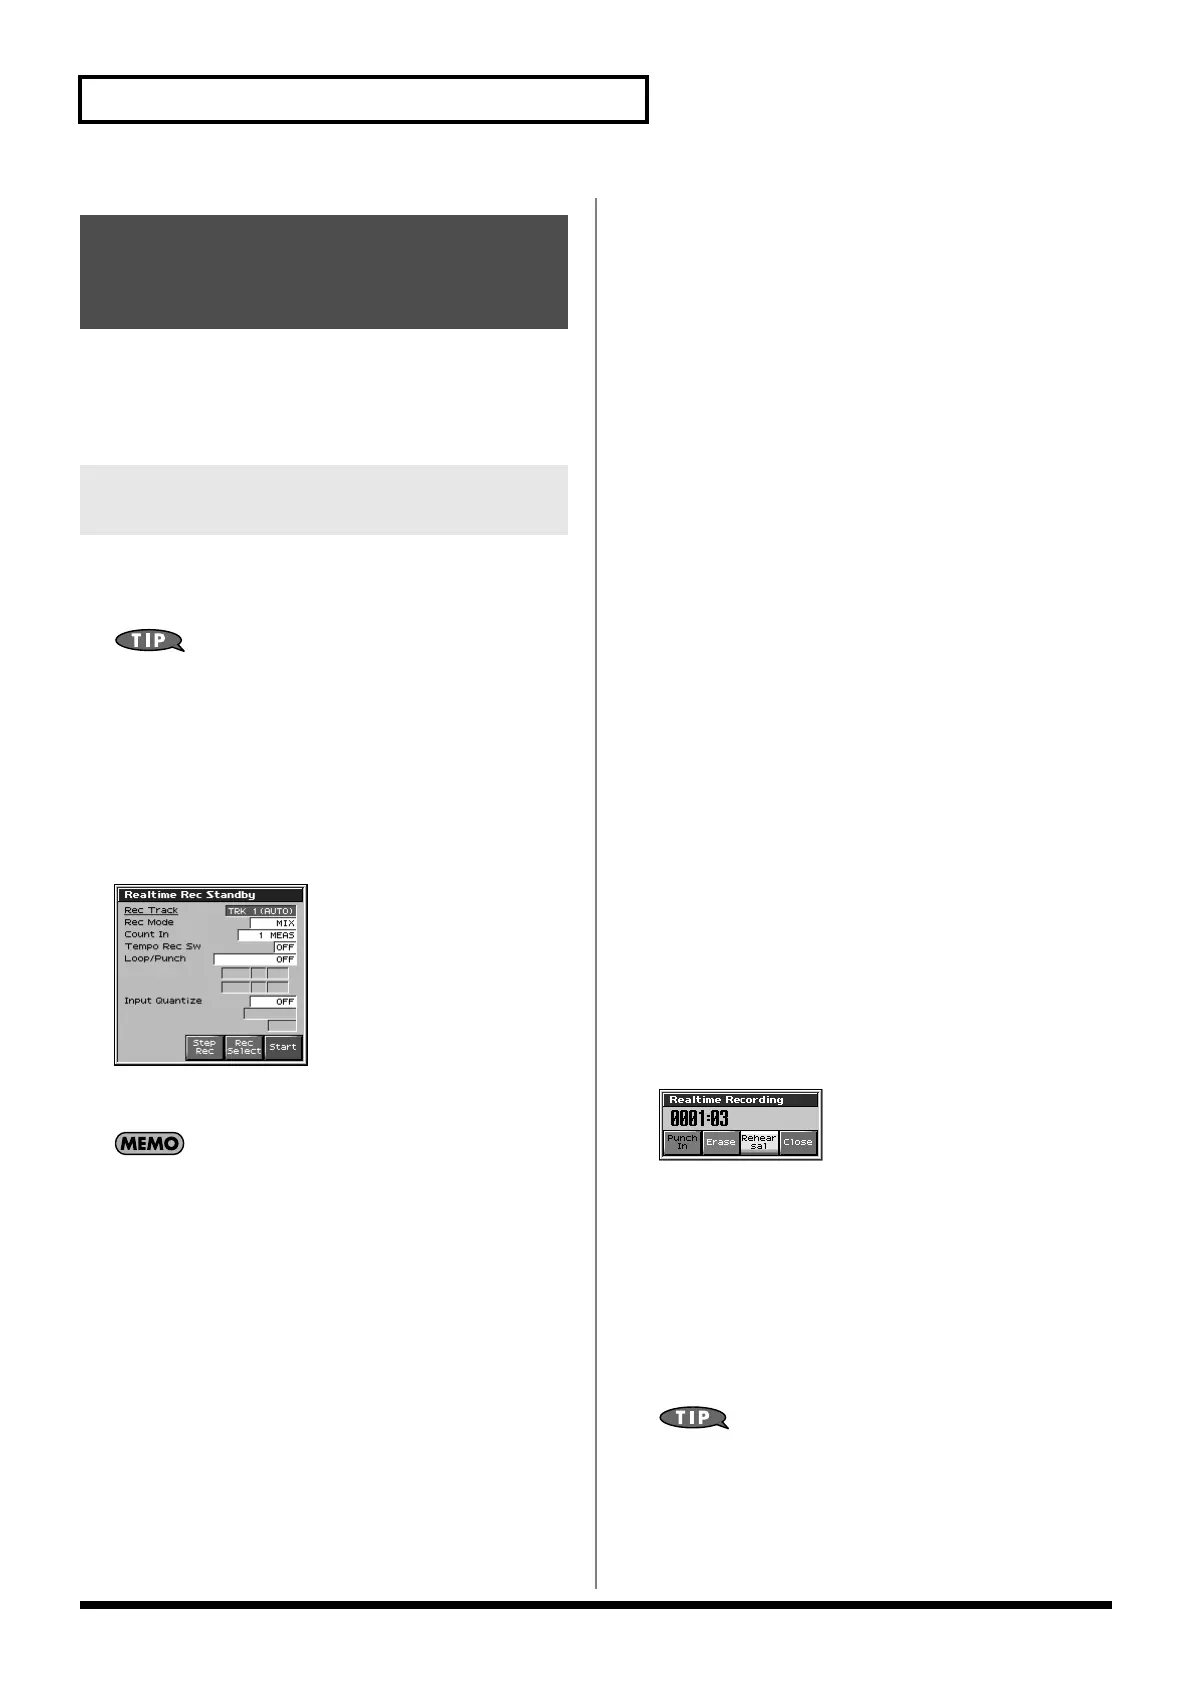
Press [REC].
The [REC] indicator will blink, and the Realtime Rec Standby
window appears.
fig.18-003_50
This window lets you set various parameters for realtime
recording.
If you want to record a pattern, press [F2 (Ptn)] in the Song Edit
screen so it lights red, and then press [REC].
3.
As basic settings, specify the following three parameters.
Use [CURSOR] to move the cursor to each parameter, and
turn the VALUE dial or press [INC]/[DEC] to make the setting.
•
Rec Track
Specify the phrase track or pattern on which you want to record.
* You can also make settings so that the phrase track of the same number
as the current part will be selected automatically. This is convenient
when you are recording just one part on each track. For details on how
to make this setting, refer to p. 234.
Value:
TRK 1–TRK 16,
PTN001–PTN100 (* when recording on a pattern)
•
Rec Mode (Recording Mode)
Select how recording is to take place.
Value
MIX:
Mix-recording will be carried out. Normally, you will
record using this method. If a performance has already been
recorded on the recording-destination track, your newly recorded
performance will be added to the existing performance without
erasing it. By using this in conjunction with Loop-recording, you can
record repeatedly over a specified area without erasing the
previously recorded performance. For example, this is a convenient
way to record a drum performance one instrument at a time; bass
drum -> snare drum -> hi-hat, etc.
REPLACE:
Replace-recording will be carried out. If a
performance has already been recorded on the
recording-destination track, it will be erased as
you record your new performance. Use this
when you want to re-record.
•
Count In
Select how recording is to begin.
Value
OFF:
Recording will begin immediately when you
press [PLAY].
1 MEAS:
When you press [PLAY], a count (playback) will
begin one measure before the recording-start
location, and recording will begin when you
reach the recording-start location.
2 MEAS:
When you press [PLAY], a count (playback) will
begin two measures before the recording-start
location, and recording will begin when you
reach the recording-start location.
WAIT NOTE:
As an alternative to pressing [PLAY], you can
play the keyboard, strike a pad, or press the
Hold pedal to start recording.
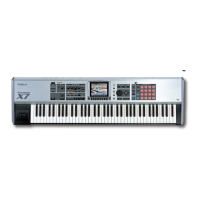
4.
When you are finished making settings in the Realtime Rec
Standby window, press [PLAY] or [F8 (Start)].
The Realtime Rec Standby window will close, the [REC]
indicator will change from blinking to lit, and recording will
begin.
When recording begins, the Realtime Recording window will
appear.
fig.18-004_50
In this window you can perform the following operations.
• Specify the punch-in/out points (Punch In p. 171)
• Realtime Erase (Erase p. 173)
• Rehearsal function (Rehearsal p. 173)
For details on these operations, refer to the appropriate page.
To close the Realtime Recording window, press [F8 (Close)] or
[PLAY]. To open it once again, press [PLAY].
5.
When you are finished recording, press [STOP].
The [REC] indicator will go dark.
If you are not satisfied with the realtime recording you just
made, you can press [MENU], and from the Menu window that
appears, select “Undo/Redo” to return to the state prior to
recording (Undo/Redo). After executing Undo, you can use
Redo to revert to the previous state. After executing Undo, you
can execute Redo by performing the above procedure the above
procedure once again.
Recording Your
Performance as You Play It
(Realtime Recording)
Basic Operation for Realtime
Recording
Fantom-X678_r_e.book 170 ページ 2005年5月12日 木曜日 午後4時40分