b If nece
ssary, use a spirit level to check that the components are parallel (&).
NOTE
W
hen mounting the brackets, take into account that the brackets cannot be mounted
at the same height if different system plugs are used on the sender and receiver.
Further topics
•
"Minimum dis
tance from the hazardous point", page 28
•
"Minimum distance to reflective surfaces", page 30
•
"Sender and receiver alignment", page 103
•
"Alignment with the QuickFix bracket", page 105
•
"Alignment with the FlexFix bracket or with the upgrade bracket", page 105
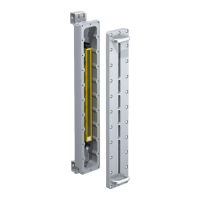
5.4.1 Mounting the QuickFix bracket
Overview
2 Q
uickFix brackets are used to mount the sender and receiver.
The QuickFix bracket consists of 2 parts, which are pushed into each other. The two
individual parts are connected with an M5 screw and the housing (sender or receiver) is
clamped with form-fit clamping.
The two mounting surfaces for the brackets of the sender or receiver must be parallel
and lie in the same plane.
Important information
NOTE
T
he following should be considered when mounting the QuickFix bracket:
•
Select the appropriate length of the M5 screw to prevent any risk of injury from an
overrun.
•
When selecting the screw length, observe the wall thickness and the depth of the
countersunk screw of the QuickFix bracket, see figure 62, page 139
NOTE
T
he QuickFix bracket has cable routing. Depending on the installation, the cable routing
can make mounting easier.
MOUNTING 5
8023872/18YZ/2021-01-14 | SICK O P E R A T I N G I N S T R U C T I O N S | deTec4 Ex II 3GD
71
Subject to change without notice

 Loading...