Do you have a question about the Tomey ViewLight EM-4000 and is the answer not in the manual?
Describes the manual's structure and content sections.
Explains the meaning of various symbols and icons used in the manual.
Essential safety and operational guidelines before using the instrument.
Verifies all items are included and undamaged upon receiving the instrument.
Defines technical terms and abbreviations used in the manual for better understanding.
Provides a general introduction to the instrument's purpose and functionality.
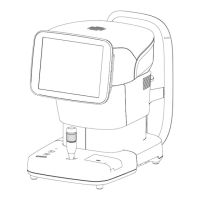
Details the components and controls visible to the operator.
Describes parts of the instrument that interact with the patient.
Identifies ports, switches, and slots on the main body of the instrument.
Covers fundamental screen layout and universally found elements.
Details the interface used for image acquisition.
Describes the screen for choosing captured images.
Explains the interface for reviewing and analyzing captured data.
Explains the meaning of various symbols and icons found on the instrument.
Critical safety guidelines to follow during instrument operation.
Steps to set up the instrument correctly before commencing examinations.
Details on connecting power, printers, and other peripherals.
Procedures for powering the instrument on and off safely.
How to prepare for a new patient by clearing previous data.
Steps for inputting patient demographic and identification information.
How to position the instrument for optimal patient eye alignment.
Configuring the fixation light for patient eye guidance during capture.
Adjusting parameters like alignment and light power for image capture.
Step-by-step guide for acquiring images of the eye.
Choosing whether to measure the left or right eye.
Process of aligning the instrument with the patient's eye.
The actual process of taking the image of the endothelium.
Choosing the best captured image for analysis from a series.
Overview of the analysis functions available for captured images.
Performing automated analysis of cell density and other parameters.
A specific method for calculating cell density based on manual input.
Another method for calculating cell density by outlining cells.
Managing captured data through export, printing, or saving.
Transferring examination data to external devices or systems.
Generating hard copies of examination results.
Storing examination data locally on the instrument's storage.
Managing patient and examination records stored within the instrument.
Accessing and reviewing stored patient and examination records.
Procedures for removing patient records and associated data.
Modifying patient identification numbers within the database.
Configuring various instrument settings and preferences.
Setting basic instrument parameters like language, date, and sound.
Configuring measurement modes and joystick functions.
Adjusting settings for display, analysis methods, and fixation light.
Configuring network connections and printer settings.
Details the terms and conditions of the product warranty.
Information on the expected lifespan of the instrument.
Guidelines for checking the instrument's condition and functionality.
Regular cleaning and upkeep procedures to ensure optimal performance.
Instructions for replacing parts like fuses and printer paper.
Procedure for replacing blown fuses to restore power.
How to load and replace the paper roll in the printer.
Proper methods for storing the instrument when not in use.
Guidelines for environmentally responsible disposal of the instrument.
Addresses general problems like power issues and screen display errors.
Specifies the type of paper required for the built-in printer.
Lists the consumable chin rest paper rolls.
Identifies the specific fuse type needed for the instrument.
The field of view or area captured by the instrument.
The precision of central corneal thickness measurements.
The minimum and maximum values for CCT measurement.
Physical and electrical specifications of the primary instrument unit.
Recommended conditions for operating and storing the instrument.
Details regarding electrical safety and protection standards.
Electromagnetic compatibility compliance information.
| Type | Specular Microscope |
|---|---|
| Alignment | Automatic |
| Analysis | Automatic |
| Power Supply | AC 100-240V, 50/60Hz |
| Measurement Method | Non-contact |
| Illumination | LED |