VX100Q/VX136Q/VX186Q, VX136QD/VX186QD, VX136QDM2/VX186QDM2
Pos: 221 /Übersc hriften/Überschrif t 3 /Anziehdr ehmomente der Z ylinder- o der Dehnschraub e zur Montage d er Druckschei be @ 59\mod_ 13131425403 67_48.doc @ 310021 @ 3 @ 1
8.7.3.1 Tightening torques of the hex socket head screw or strain screw for mounting the pressure
disk
Pos: 222 /WBV/X-Ri pper/W arnhinweise/Tipp/Inf o VVA - neu @ 58\mod_13 12961466346_48. doc @ 30942 3 @ @ 1
VVA = All steel and cast parts of the machine coming in contact with the medium are made of stainless steel.
Pos: 223 /WBV/P umpen/Instandse tzung/002 Anzi ehdrehmoment e Dehnschrau be/Zylinderschr aube @ 58\m od_13129623 47600_48.doc @ 309453 @ @ 1
Tighten strain screw with 200 Nm, then undo before
tightening with 140 Nm.
Tighten strain screw with 160 Nm, then undo before
tightening with 140 Nm.
Pos: 224 /WBV/X-Ri pper/W arnhinweise/Maschi nengefahr/War nhinweis - Antiseize-Ed elstahlschraube n - neu @ 42\ mod_12736697 43023_48.doc @ 185799 @ @ 1
Stainless steel bolts/nuts
Before installing stainless steel bolts and nuts:
Clean the threads and contact surfaces. Apply Anti-Seize Paste (Part-No. BKL.014/BAS.001) evenly and in
sufficient quantity to the screw head/nut contact surface and the thread using a brush or putty knife etc. to
avoid seizing of stainless steel.
Pos: 225 /Übersc hriften/Überschrif t 2 /Schutzpl attenwechsel @ 15\mod_1 183450816560_48 .doc @ 56441 @ 2 @ 1
8.8 Change of wear plates
Pos: 226 /WBV/P umpen/Warnhin weise/Maschi nengefahr/Schutz plattenwechs el - neu @ 42\mod_12736586 56700_48.doc @ 185456 @ @ 1
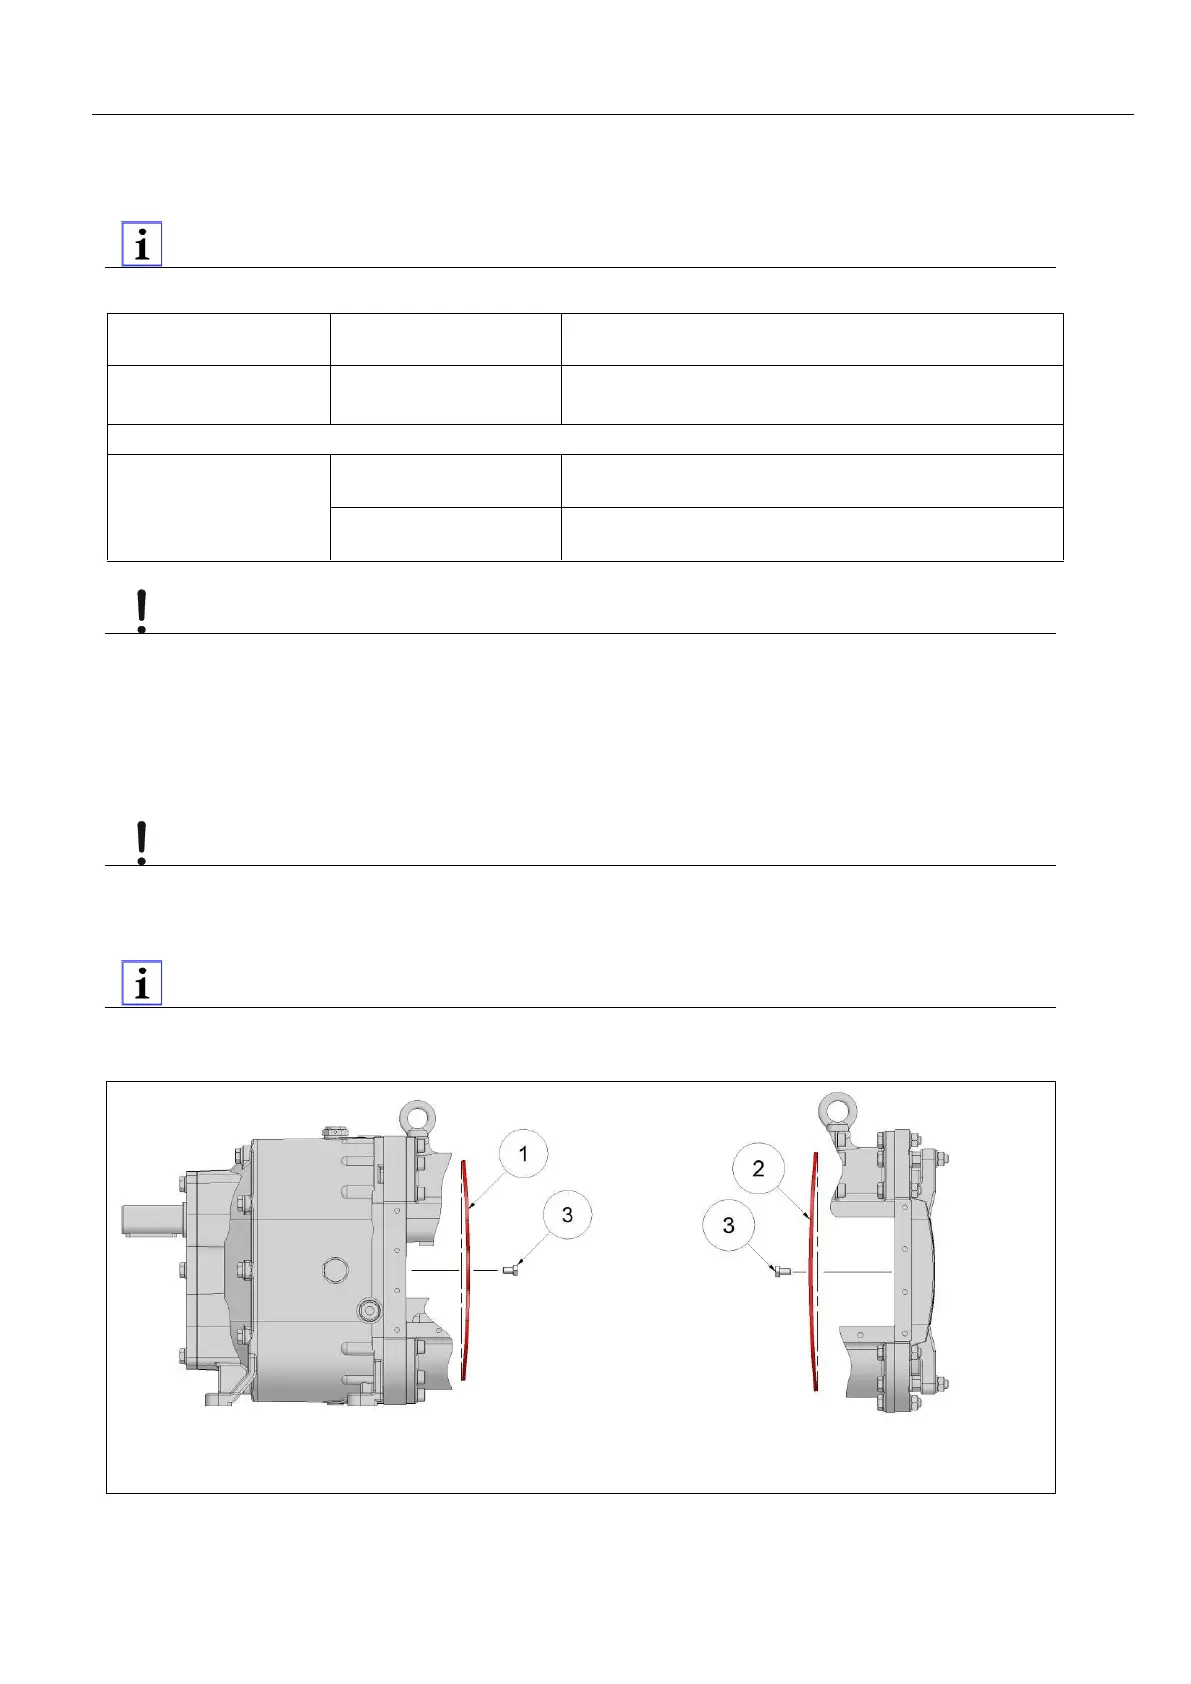
Wear plate installation position
The wear plates have a defined curve. To prevent premature wear by the rotary lobes sets, the correct
installation position of the wear plate must be observed during installation Fig. “Installation position of the
curved wear plates".
Pos: 227 /WBV/P umpen/Warnhin weise/Hinweis/ Anziehdrehmo mente der Schutz plattenschraub en VX100, VX1 36, VX186 @ 58\mod_1 312965740778_ 48.doc @ 309483 @ @ 1
• Wear plate screws of series VX100: 20 Nm
• Wear plate screws of series VX136 and VX186: 40 Nm
Pos: 228 /Grafi ken/Pumpen/ WBV/Instandsetzung /Einbaulage der g ewölbten Sc hutzplatte @ 3 9\mod_126 0960209266_ 48.doc @ 149598 @ @ 1
(1) Wear plate on the gearbox
(2) Wear plate on the cover
(3) Hex head screw with microencapsulation
Fig.
: Installation position of the curved wear plates
Pos: 229 /---Seitenum bruch--- @ 21\mod_12 01696136229 _0.doc @ 805 75 @ @ 1
 Loading...