VX100Q/VX136Q/VX186Q, VX136QD/VX186QD, VX136QDM2/VX186QDM2
Pos: 230 /Übersc hriften/Überschrif t 2 /Cartridge- Gleitringdic htungswechsel @ 0\mod_11099 28702779_48.d oc @ 1288 @ 2 @ 1
8.9 Change of cartridge mechanical seal
Pos: 231 /WBV/P umpen/Warnhin weise/Maschi nengefahr/Werkst off Duronit für Gl eitringe @ 5 9\mod_13130 63855876_48. doc @ 30981 6 @ @ 1
Material Duronit for seal rings
Mechanical seals made of 'Duronit' can only be used up to an operating pressure of 10 bar. Please note the
maximum operating pressure Chap. “Technical data".
Pos: 232 /Übersc hriften/Überschrif t 3 /Cartridge- Gleitringdic htungswechsel a m Getriebe @ 5 8\mod_13129 68708841_48. doc @ 309542 @ 3 @ 1
8.9.1 Change of cartridge mechanical seal on the gearbox
Pos: 233 /WBV/P umpen/Instandse tzung/002 Cartri dge Gleitringdic htungswechs el @ 64\m od_13225777257 26_48.doc @ 334194 @ @ 1
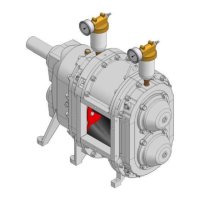
Fig. “Cartridge mechanical seal on the gearbox"
1. Depressurize the buffer chamber (with QD pumps, both buffer chambers).
2. Empty and clean the buffer chamber on the gearbox.
3. Remove any flushing connections and circulation system chap. "Circulation system on the cartridge
mechanical seal” and Fig. “Flushing operation".
4. Drain gearbox oil.
5. Work steps chap. "Perform “Rotary lobe change and wear plate change”.
6. Remove hex socket set screws (a) of the cartridge mechanical seal (Fig. a)).
7. Put on cartridge installation tool (D) and screw the hexagonal socket screws (b) into the borings of the
cartridge mechanical seal (fig. b)).
8. Smoothly pull out cartridge mechanical seal using the three hex head screws (c) of the installation tool
(Fig. b)).
9. Change O-ring (30) in the bearing seal housing (fig. c)).
10. Carefully remove the burrs on the keyways and clean the cartridge sealing ring seat in the housing
before installing the new cartridge sealing ring.
11. Push new cartridge mechanical seal onto the shaft. Carefully oil the outer O-rings on the seal carrier
(Pos. 34 in fig. b)) before installation. Attention! Do not use oil for EPDM O-rings!
12. If a circulation system is present, the bore holes in the cartridge mechanical seal must be aligned with
the flushing connections in the bearing seal housing.
13. To install the new cartridge mechanical seal, place the installation tool on the cartridge mechanical
ring without screws.
14. Push rotary lobe without key on the shaft.
15. Insert the pressure disk and the strain screw.
16. Tighten the rotary lobe until the cartridge mechanical seal is flush with the pump housing.
17. Reinstall any removed flushing connections.
18. Remove rotary lobe again.
19. Push O-ring and support ring onto the shaft.
20. Before installing the new rotary lobes, clean contact surfaces of rotary lobes and sealing components
very carefully.
21. Install rotary lobes, wear plates and Q cover or QD cover.
22. Top up buffer fluid.
23. Readjust pressure in the buffer chamber (for QD pumps in both buffer chambers).
24. Fill up the gearbox oil.
Pos: 234 /---Seitenum bruch--- @ 21\mod_12 01696136229 _0.doc @ 805 75 @ @ 1
 Loading...