48 Mounting WAGO-I/O-SYSTEM 750
750-493 3-Phase Power Measurement Module
Manual
Version 1.2.0
Pos: 73.6 /Serie 750 (WAGO-I/O-SYST EM) /M onti ere n/D em ontier en/ G erät e ein füg en und ent fer nen - Ü b erschr if t 2 @ 3 \mod_1231768483250_21.docx @ 25950 @ 2 @ 1
6.2 Inserting and Removing Devices
Pos: 73.7 /All e Seri en ( All ge meine Mo dul e)/ Wic htig e Er läut eru nge n/S ich erhei ts- und s ons tig e Hi n weise/ Ac htung / Achtu ng: Ar beit en a n G erät en nur s pa nnu ngsf rei dur chfü hr en! @ 6 \mod_1256193963573_21.docx @ 43426 @ @ 1
Perform work on devices only if they are de-energized!
Working on energized devices can damage them. Therefore, turn off the power
supply before working on the devices.
Pos: 73.8 /Serie 750 (WAGO-I/O-SYST EM) /M ontier en/D e monti ere n/B uskle mm e ein füg en @ 3\mod_1231769726703_21.docx @ 25989 @ 3 @ 1
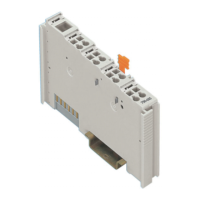
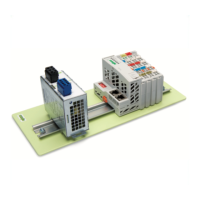
6.2.1 Inserting the I/O Module
1. Position the I/O module so that the tongue and groove joints to the fieldbus
coupler/controller or to the previous or possibly subsequent I/O module are
engaged.
Figure 8: Insert I/O Module (Example)
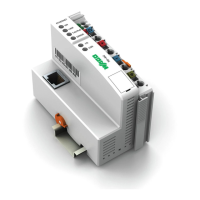
2. Press the I/O module into the assembly until the I/O module snaps into the
carrier rail.
Figure 9: Snap the I/O Module into Place (Example)
With the I/O module snapped in place, the electrical connections for the data
contacts and power jumper contacts (if any) to the fieldbus coupler/controller or to
the previous or possibly subsequent I/O module are established.
Pos: 73 .9 /Dok ument atio n allge mein/ Glieder ungs elem ente/---Seit en wechs el--- @ 3\mod_1221108045078_0.docx @ 21810 @ @ 1

 Loading...