Do you have a question about the AEMC 6250 and is the answer not in the manual?
Explanation of symbols for safety, warnings, and compliance.
Defines CAT II, CAT III, and CAT IV measurement standards.
Guidance on checking shipment contents and reporting damages.
Details on ordering the micro-ohmmeter and its accessories.
List of available accessories and replacement parts with catalog numbers.
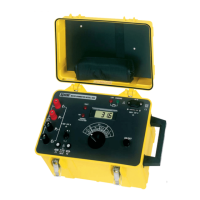
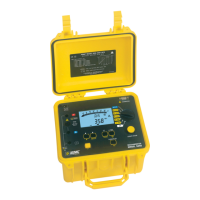
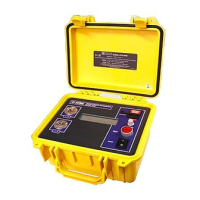
Overview of the Model 6250 micro-ohmmeter's design and capabilities.
Common uses of the micro-ohmmeter in various industries.
Highlights the instrument's primary functionalities and technical advantages.
Identifies and details the front panel controls and ports of the instrument.
Explains the specific function of each button on the micro-ohmmeter.
Defines the icons and symbols displayed on the instrument's screen.
Details electrical specifications including measurement ranges, accuracy, and current.
Provides physical dimensions, weight, and case protection details.
Describes the LCD display size, type, and data presentation fields.
Specifies operating and storage temperature and humidity conditions.
Lists safety standards and certifications the instrument adheres to.
A brief guide to performing basic measurements with the instrument.
Instructions for accessing and modifying various instrument settings.
Illustrates the hierarchical structure of the instrument's setup menu.
Configuration options for the RS-232 communication port settings.
Procedure to adjust the audible buzzer level and sound.
Method to display the instrument's unique serial number.
Procedure to check the instrument's current firmware version.
How to select the language displayed on printed reports.
Setting the reference temperature for resistance compensation.
Choosing to measure or program ambient temperature for compensation.
Selecting the metal type for accurate temperature compensation.
Setting the temperature coefficient (alpha) for selected metals.
Choosing between Celsius and Fahrenheit for temperature units.
Configuring alarm thresholds, activation, and buzzer settings.
Adjusting the duration the display backlight remains active.
Instructions for deleting stored measurement data from memory.
Detailed steps for performing measurements on various samples.
Guidance on connecting test leads and taking initial measurements.
Diagram and instructions for connecting Kelvin probes to the instrument.
Considerations and potential issues when measuring very low resistance.
Information on reading stabilization times for different measurement types.
Explanation of the instrument's standby mode after a test.
How to select the appropriate resistance measurement range for accuracy.
Overview and procedures for different measurement modes.
Critical safety precautions for performing measurements.
Procedure for measuring inductive resistance with the instrument.
Procedure for measuring general resistance levels accurately.
Method for measuring low inductive resistance using automatic triggering.
Explains the principle and application of temperature compensation.
Steps to enable and utilize the temperature compensation feature.
How to configure and activate alarms for measurement thresholds.
How to store, manage, and print measurement data from memory.
Procedure to recall and display stored measurement results.
Information on required cables and compatible printers for data transfer.
Step-by-step instructions for installing the DataView software and drivers.
Guidance on physically connecting the micro-ohmmeter to a PC.
Steps to configure PC-to-instrument communication settings.
Using DataView to set up instrument parameters and preferences.
Procedure to transfer stored test results from the instrument to the PC.
How to generate a comprehensive report from downloaded test data.
Options for exporting generated reports into various file formats.
Explanation of error codes and messages displayed by the instrument.
Procedure for measuring winding resistance in motors and transformers.
Method for measuring resistance on electric motor commutators.
Guidelines for measuring battery strap connection resistance.
Important safety precautions for performing maintenance.
Instructions for cleaning the instrument's case and components.
Detailed procedure for charging the instrument's internal battery.
Steps for safely replacing the battery and internal fuses.
| Model | 6250 |
|---|---|
| Manufacturer | AEMC |
| Category | Measuring Instruments |
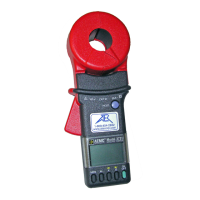
| Type | Clamp Meter |
| Display | LCD |
| Weight | 1.1 lbs (500g) |