L0118G
5-3
5.7 HELIX ADAPTER
1. To remove, twist the adapter to free the mounting
leg from the locking tab.
2. Reverse the removal procedure to reinstall.
5.8 HELIX EJECTOR
The ejector’s function is to cause the product to fall
sooner, and therefore stop the helix sooner. This will
help retain the next product in the helix coil, especially
if they are difficult products.
1. The helix ejector is pulled off and pressed on the
helix by hand.
2. The ejector is typically positioned half a coil, and
often much less, from the end of the helix.
3. The “fin” shaped portion is angled towards the
front of the tray.
The best position and angle for the ejector is
determined by test vending products.
5.9 HELIX ALIGNMENT DEVICE
The helix alignment device is installed under the
bottom left side of the large helices to help keep them
centered in their columns.
1. To remove, grasp the front of the helix alignment
device with pliers and pull or pry upward. Take
care not to lose the plastic mounting clips.
2. Reinstall by pressing the plastic mounting clips
back into the mounting holes. Note that the
mounting flange goes toward the helix.
5.10 MOTOR POSITIONS / HOME
Motor position can be changed sideways for different
width columns, and there are two mounting positions
on the snack tray. The lower and upper positions are
used for the small and large helices, respectively.
1. Remove the helix. Remove the harness terminals
(one small and one large).
2. Press down and rearward on the top mounting
tab, then pull the lower mounting legs out of the
mounting slots.
3. Reverse the removal procedure to reinstall.
4. After all motor changes have been made use the
Tray Setup option in Service Mode to
configure
the motors
.
5. The vendor will not vend from a given helix when
the motor is missing, jammed or has home switch
problems.
6. After a motor has been configured check to make
sure all the helices are in the home position. If
the end of a helix is not at its lowest position in
the column pull it out of the motor, turn it until it
is, and reinsert the helix into its motor.
5.11 BOTTLE TIPPER BAR
The bottle tipper bar is typically used with carbonated
beverage bottles. The bottles stand upright. The
tipper bar restrains the top of the bottle so that it falls
bottom first, rather than tumbling off the tray.
1. To remove, bow the bar until one end can be
pulled free from the support bracket. Take care
not to lose the plastic bushings in the supports.
2. To reinstall, reverse the removal procedure.
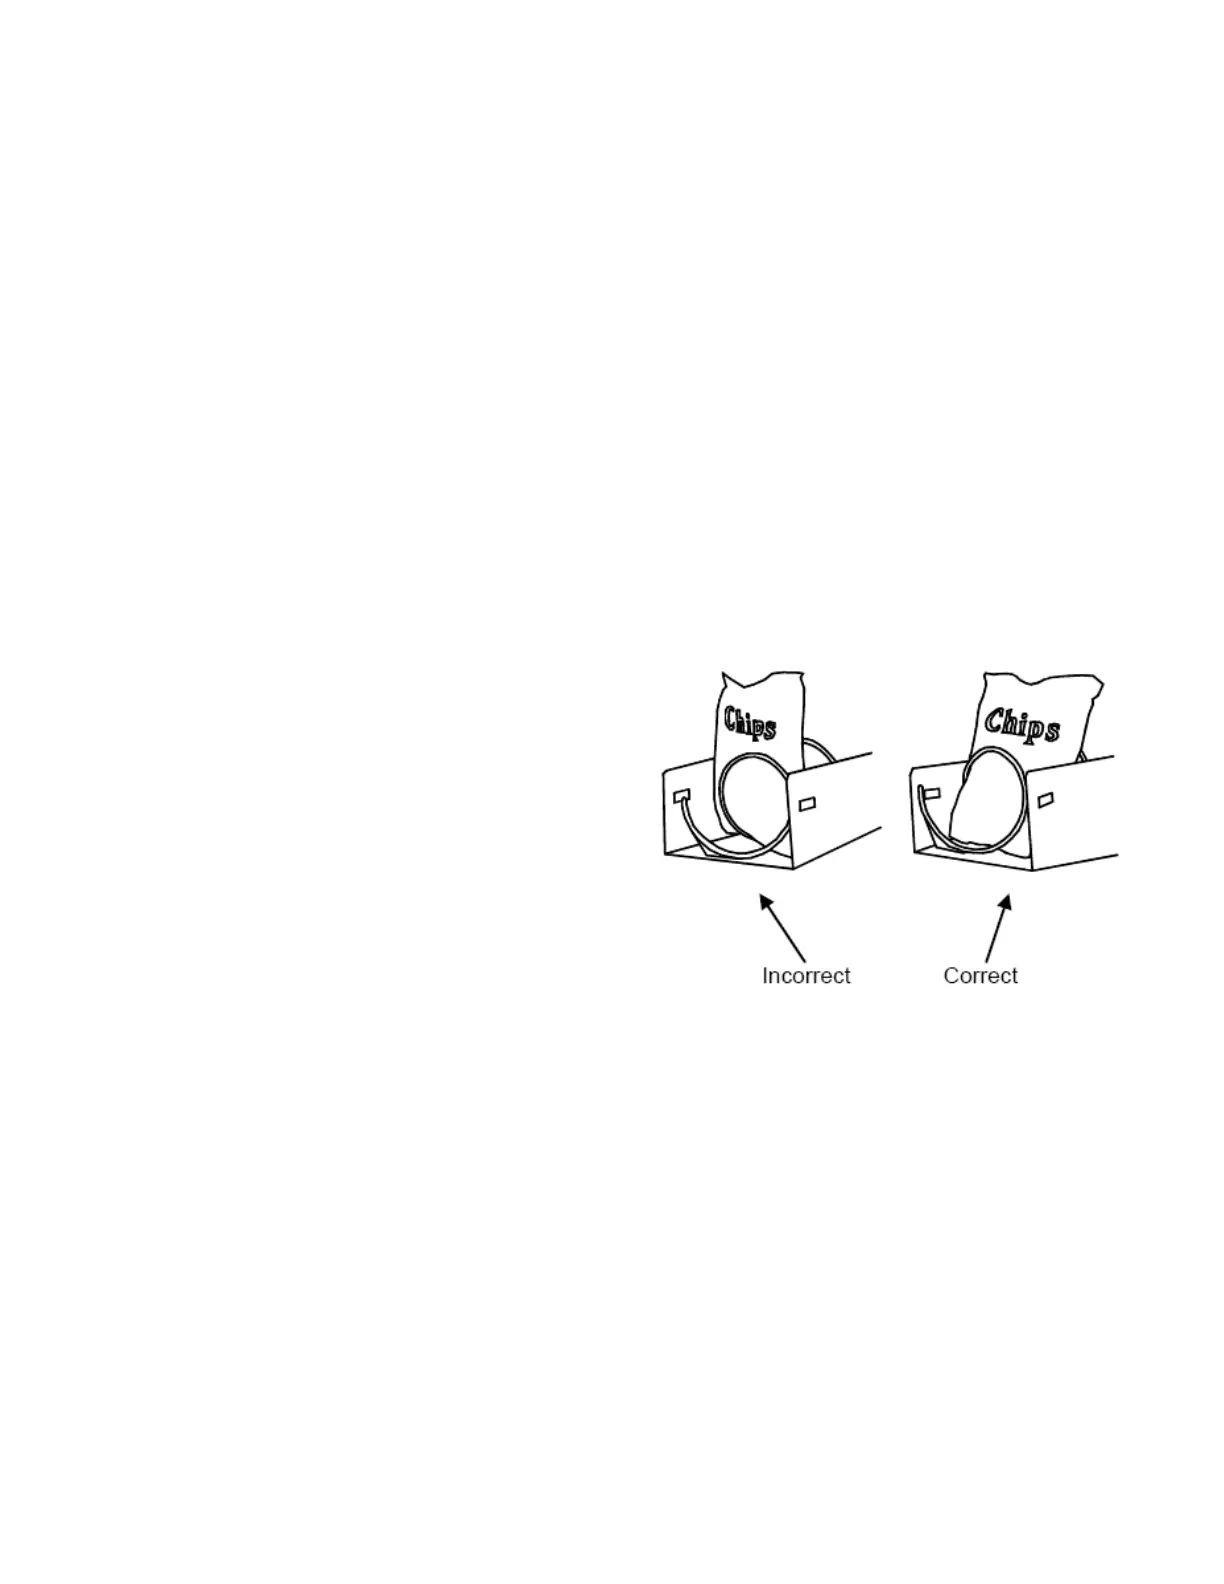
5.12 AVOIDING PRODUCT HANG-UPS
Avoid large products, such as chips, from “hanging-
up” between the tray and the glass by loading them
“left corner first” into the helix. The bottom left corner
of the bag should be in front of the helix to let the helix
push the bottom out first (Refer to Figure 5.2). An
incorrect loading may cause the bag to fall top first,
which could lead to a hang-up. Loading “left corner
first” prevents the product from falling top first.
Figure 5.2 Large Bag Vending
5.13 TALL PRODUCT VENDING
Place tall, narrow products in a column with a candy
pusher bar. Typically these are installed in columns 8
and 9 on the candy trays. Rotate the bar upward or
downward to the desired position. It should hold the
product upright, but not pinch or bind the product.
5.14 CANDY PUSHER BAR INSTALLATION
The candy pusher bar is an adjustable bar that
mounts to any tray divider to keep tall candies from
falling sideways (Refer to Figure 5.3). Four pusher