Do you have a question about the ARRI TRINITY and is the answer not in the manual?
Defines safety warnings, alert symbols, and signal words indicating different risk levels.
Details the manual's structure, sections included, and how to interpret directions from the operator's viewpoint.
Lists various TRINITY upgrade kits for different camera systems and their corresponding order codes.
Details the standard components included in the TRINITY upgrade bundle and lists specific cables and mounts.
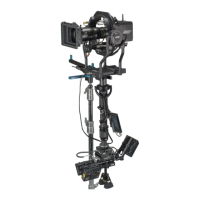
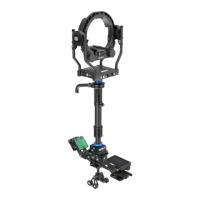
Lists the specific components included in the TRINITY Rig, such as the head, joystick mount, monitor, and various cables.
Details the HD 1, HD2, and EXT connectors located on the left side of the TRINITY head ring.
Details the Cam Pwr Out, Focus Power Out, LBUS, and Aux/Tally Out connectors on the right side of the TRINITY head ring.
Describes the CAN/Tally, Vid Out, Joystick, Loop Out, and Control connectors on the front of the TRINITY base.
Details the STAB ON/OFF, USB IN, EXT PWR IN, and CAM PWR ON/OFF connectors on the right side of the TRINITY base.
Notes that the left side connectors are reserved for future customization and upgrades.
Describes the user interface for accessing presets and performing basic adjustments on the TRINITY base.
Explains the function of each control button: UP, OK, DOWN, MODE, and ROLL.
Details the three different Post connectors available for the TRINITY system and the required docking bracket.
Introduces the TRINITY Joystick as the human interface and explains settings adjustable via PC/Tablet.
Describes how the grey MODE button recalls preprogrammed user presets (ONE to FIVE).
Explains how to use the clamp screw to secure the joystick housing and discusses mounting options.
Details the LEMO sockets at the bottom of the joystick housing for main cable and monitor power.
Explains the use of the Gimbal extension for increased clearance and provides cautions for assembly and thread locker.
Describes the TRINITY Battery Hanger's shape, mounting compatibility, and rod connections for battery mounts.
Details the front and back power sockets of the Battery Hanger for system power, battery input, and video transmitters.
Explains the TRINITY Pendulum's function as a drop-down generator, its alignment assistance, and adjustment knob.
Details the two available TRINITY Battery Mounts (Gold Mount and V-Mount) and their order codes.
Details the required mounting bracket and steps for attaching the ARRI Starlight or Transvideo Starlight monitor.
Provides guidance on orienting the monitor bracket rod and ensuring connectors point away from the mount.
Explains how to flip the monitor image for 'regular' or 'left-handed/goofy' operators.
Ensures use of proper stands, even ground, protection from weather, and securing the stand with sandbags.
Step-by-step guide for removing components, mounting the Top Stage, docking the post, and securing the rig.
Instructions for mounting the Battery Hanger, Pendulum assembly, and Battery Mounts onto the rig's rods.
Guides on connecting batteries to the Battery Hanger and connecting the Battery Hanger's Pwr Out to the Top Stage.
Emphasizes switching off power, careful cable connection, correct logo alignment, and avoiding finger entrapment.
Details parking the system in the Docking Bracket and pushing the Docking Ring fully into the yoke.
Describes battery mounting configurations (two, three, four) and order codes for battery mounts.
Explains how to check and adjust pendulum clearance with front batteries and notes on mount clamping.
Details monitor mount positioning, securing with tape, and connecting power and video cables.
Explains how to get a video signal from the camera to the monitor using HD2 and BNC cables.
Emphasizes symmetry and neutral balance for precise balancing and optimal system performance.
Stresses keeping the camera's COG low and total length compact for better system agility and balance.
Advises mounting accessories low, using the rear Battery Hanger for transmitters, and ensuring low overall system weight.
Ensures components and accessories are mounted symmetrically and balanced, using rods for focus motors as examples.
Highlights the importance of fully tightening all components and accessories to prevent vibration and performance issues.
Describes the Quick Lock mechanism for the Camera Dovetail Plate and the side-to-side adjustment.
Guides on sliding the camera into the ring, detaching accessories if needed, and ensuring the camera is level.
Provides a critical safety warning against inserting fingers or limbs between the TRINITY Yoke and inner ring.
Introduces the TRINITY's unique balancing method and emphasizes precision for symmetry and neutral balance.
Lists essential checks before balancing: stand, power, docking rings, batteries, pendulum, joystick, and camera alignment.
Advises on positioning the Gimbal close to the Docking Bracket center due to its increased length and width.
Guides on mounting the Gimbal Handle, powering on the system, selecting preset 1, and achieving horizontal position.
Explains loosening the Gimbal clamp to adjust it up/down the post for a neutral horizontal position.
Details using the Fine Trim adjustment to set the rig at absolute horizontal and neutral balance.
Describes adjusting the pendulum and top stage to eliminate roll and achieve equal speed correction from both sides.
Advises keeping the pendulum aligned with the Center Post and using the Top Stage to counteract off-center issues.
Explains adjusting the back battery using the knurled knob to bring the rig back to a vertical position.
States the objective is a smooth High to Low Mode transition without side-to-side rotation, using the Pendulum for drop-down momentum.
Details the ON/OFF switch, menu navigation, SD card slot, and power/video connections of the Starlight Monitor.
Provides steps to flip the monitor image both horizontally and vertically via the Tools menu.
Specifies the Lemo connector for power input (5 to 30V DC) and its pin configuration.
Introduces the two interaction methods: the TRINITY user interface and the GUI on Windows 8 or 10.
Highlights important displayed information: selected profile, battery state, and axis values (tilt, pan, roll).
Lists and describes the functions of the main push buttons on the TRINITY interface: UP, OK, DOWN, MODE.
Explains how to program, store, and recall five personal presets using the MODE button on the TRINITY head or joystick.
Details the 5 preprogrammed factory presets for different camera configurations, including Follow Mode and Fully Stabilized.
Describes how to easily change the joystick direction (Normal, Inverted, Off) using the OK, UP, and DOWN buttons.
Provides steps for pairing the wireless remote control by initiating pairing mode on the TRINITY and switching on the remote.
Guides on ensuring drivers/GUI are installed, connecting the TRINITY via USB, selecting the port, and establishing a connection.
Explains how to upload profiles and adjust motor power settings (P/I/D) based on camera configuration weight.
Details how to navigate the GUI to edit P/I/D values using the cursor and numeric keyboard, emphasizing the WRITE function.
Provides golden rules to identify correct P/I/D values, diagnose vibration issues (too high P/D), and ensure motor holding power (too low P/I/D).
Explains how to set speed, ramp, and direction for the joystick axes (Roll, Tilt, Pan) via the GUI.
Details Deadband and Expo Curve settings for joystick and follow modes, explaining their impact on delay and ramp.
Explains choosing between Follow Mode (Handheld, Easy Rig) and Fully Stabilized (Hard Mounted, Crane) for various setups.
Describes how to toggle the ON/OFF switch to change individual axes between Follow Mode and Fully Stabilized.
Explains how Deadband, Expo Curve, and Speed affect camera reaction, delay, and ramp in Follow Mode.
Provides example settings for Follow Mode suitable for a 10 Kg / 22lb setup, with notes on heavier cameras.
Provides steps to reset the TRINITY's sensors if it becomes hard to control or fails to hold position.
Guides on restoring all TRINITY settings to their factory default configuration via the menu.
| Counterbalance | Adjustable |
|---|---|
| Compatibility | ARRI Cameras |
| Pan Range | 360° |
| Tilt Range | ±45° |
| Load Capacity | Up to 25 kg |
| Material | Carbon Fiber, Aluminum |