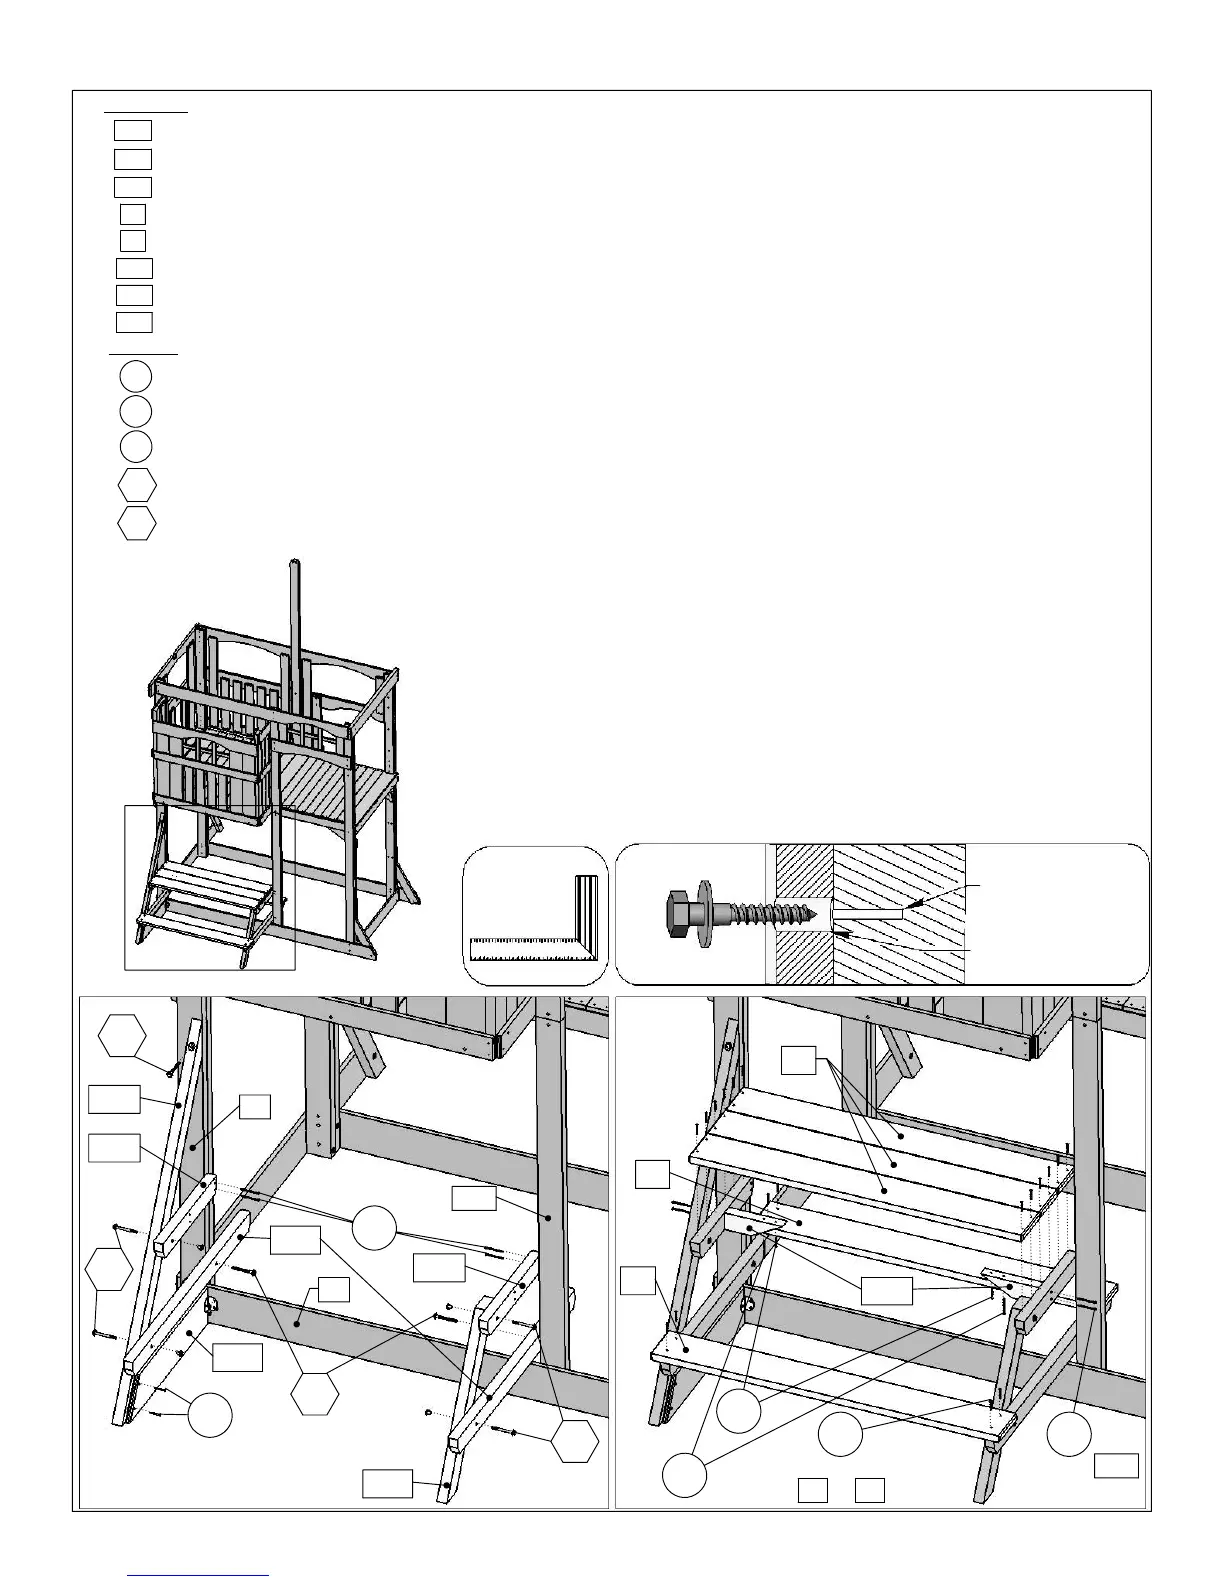
STEP 19 Attach Picnic Table
E17
E6
4X
S4
CE Table Seat to each side of the picnic
Seat Supports using 4
CE Table Top 5/4 x 6 x 45ǫ"
26X
2X
Seat Support 2 x 3 x 36½"
S2
Hex Bolt 1/4 x 2¾"
CE Table Seat 5/4 x 6 x 47¾"
(S3)
Lag Screw 1/4 x 3"
2X
3X
Ground Picnic Table 1 x 6 x 24½"
E24
#8 x 2½” wood screws per CE Table Seat.
1X
3X
2X
S3
C16
1X
table attaching to both
1X
Wood Screw #8 x 1½"
Table Support 2 x 3 x 16¾"
(E24)
2X
Picnic Gusset 2 x 3 x 8"
H11
hole as a guide
4X
Wood Screw #8 x 3"
Table Leg 2 x 3 x 26¼"
4X
B31
B15
Wood Parts
Picnic Diagonal 2 x 3 x 52"
2X Corner Brace w/ hardware
E11
Use factory drilled
Hardware
Wood Screw #8 x 2½"
E5
Pre-drill pilot holes using a 1/8” drill bit before
attaching lag screws.
A
: Under the Porch, attach
(E17)
Ground Picnic Table to
the
(C8)
Ground Front Back flush to the
(C4)
Post using
2 Corner Brace with provided hardware.
B
: Attach
(C16)
Picnic Diagonal to the
(C4)
Post using 1
(LS3)
1/4 x 3” lag screw (with flat washer) and to
(E17)
Ground Picnic Table using 2
(S2)
#8 x 1½" wood screws.
C
: Attach
(B31)
Table Support and
(E24)
Seat Support to
(C16)
Picnic Diagonal using 1
(H11)
1/4 x 2¾"hex bolts
(with flat washer, lock washer and t-nut) per board.
D
: Attach the remaining
(B31)
Table Support and
(E24)
Seat Support to
(E11)
Table Leg using 2
(H11)
1/4 x 2¾”
hex bolts (with flat washer, lock washer and t-nut).
E
: Attach 1
(E24)
Seat Support to the
(C4)
Post and 1 to
the
(C14)
Lower Front Post using 1
(LS3)
1/4 x 3” lag
screw (with flat washer) per board. Make sure both
(E24)
Seat Supports are level.
F
: Attach 1
(B31)
Table Support to the
(C4)
Post and 1
to the
(C14)
Lower Front Post using 2
(S4)
#8 x 3” wood
screws per board. Make sure both
(B31)
Table Supports
are level.
G
: Attach 1
(B15)
Picnic Gusset to each
(B31)
Table
Support using 2
(S3)
#8 x 2½” wood screws per gusset.
H
: Attach 3
(E6)
CE Table Top to each
(B31)
Table
Support using 4
(S3)
# 8 x 2½” wood screws per board.
I
: Install 1
(E5)
LS3
Predrill 1/8"
pilot hole
E11
C16
LS3
C14
S4
S2
H11
C4
B31
H11
E17
B31
E24
LS3
C8
Square
and Level
Then
Predrill Pilot Holes for Lag Screws
4 per
S3
2 per
S3
E5
B15
E5
S3
B15
S2
E6
E5
&
E6
34