and start-up
ILLUSTRATION / OTHER INFORMATION
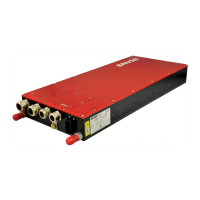
Connect the control connector (1) to the device.
Manually check if the control connector (1) is
secure!
Always ensure suitable mounting of the required
strain relief elements!
Connect the cooling water hoses.
Refer to chapter 8.4 Cooling water connections
Always check for correct connection of the
cooling water inlet (1) and cooling water
outlet (2)!
Manually check that all cable and hose connections
are tightly secured.
All cable connections near the device must be
secured with a strain relief in order to protect the
cable against vibration and consequential
damage.
---
Ventilate the cooling system.
Ensure that no air is trapped in the cooling
system!
Refer to chapter 9.3 Ventilating the cooling
system
---
Ensure that the converter is connected to the power
source via a suitable pre-charging unit.
Refer to chapter 9.4 Voltage pre-charging
Any connection without pre-charging contactor
may lead to voltage peaks and damage to the
charger!
---
The device is now completely installed and can be commissioned. The device can be set by means
of customer-specific CAN tools or using the BRUSA-specific PARAM
software. This software is
ideally suited for the device and can be purchased optionally. For fu
rther information, please contact
the manufacturer under the address provided in chapter 4.5 Manufacturer contact information.
 Loading...