_
DISPLAY
SETUP
•
[BRIGHTNESS]
[TV
SCREEN]
[MARKERS]
[DATA
CODE]
[LANGUAGE]
[DEMO
MODE]
,
[rm:J
ON],
[lm
OFF]
:
[lm
OFF],
[EW
LEVEL(WHn],
[EG
LEVEL(GRY)),
law
GRID(WHn],
;
[§f'G
GRID(GRY)]
[Iiifl
DATE],
[e
TIME],
[lIre
DATE
&
TIME]
I
[.
CAMERA
DATA]
..............., .
[CESTINA],
[DEUTSCH],
[EI\i\HNIKA],
[ENGLISH],
[ESPANOL],
[FRANCAIS],
[ITALIANO],
[MAGYAR],
[MELAYU]I
[POLSKI]
I
[ROMANA]
I
[TORKCE],
:
[PYCCKIt1I11],
[YKPAiHCbKA],
:
[~yJl],
LS""".Jl!],
[.fllM-1L
V1£J
],
.
[i'elf*Ifl:>t],
[~i!'lllflX],
[e'"~Oj],
[B*~~]
[
rm:J
ON]
I
[.
OFF]
............................................................................
; .
•
•
•
•
•
37
25
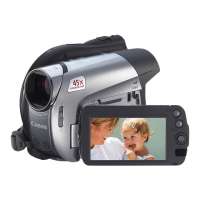
[BRIGHTNESS]: Adjust (
...
~)
the brightness
of
the LCD display with the joystick.
• Changing the brightness
of
the LCD display does not affect that
of
the viewfinder or the
recordings.
[TV
SCREEN]: When set to
[rm:J
ON], the camcorder's on-screen displays will appear also
on the screen of a connected
TV
or monitor.
[MARKERS]:
You
can display a grid or a horizontal line at the center
of
the screen. The
markers are available
in
white or gray. Use the markers
as
a reference to make sure your
subject is framed correctly (vertically and/or horizontally).
• Using the markers will not affect the recordings.
[DEMO MODE]: The demonstration mode displays the camcorder's main features. It starts
automatically when the camcorder is powered with the power adapter if you leave it turned
on without loading a recording media for more than 5 minutes.
•
To
cancel the demo mode once it started, press any button, turn off the camcorder or
load a disc.
76
•
Additional
Information