3-2012
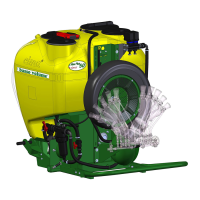
Plus 42 - 45 - 50 - 55
41
5a7. Close the cock (P12) (lever on “c”).
5a8. Put the thee-way faucet (P6) in work position (the lever on “a”).
5b. FILLING WITH MEDICINAL MIXTURES OR LIQUID PRODUCTS
5b1.Pour the medicinal mixture envisaged for every loading (together with the water possibly used for
the washing of product canisters and of the tools used in the preparation) into the main filler(BP).
5b2
.Close the main filler (BP) of the tank.
5b3.Engage the drive outlet (PTO) and take it to a speed of at least 500 RPM
5b4. Complete the filling with water and close the lid of the secondary filler (BS)
6. Move to the treatment place, keeping the Power Takeoff running rate at a minimum value of 500
r.p.m. during all the way.
FILLING DIRECTLY IN THE TREATMENT AREA:
7. Disengage the drive outlet (PTO) and rest the sprayer on the ground.
Stop the tractor and remove the key from the control panel.
8. Ensure that the fan is stopped. Engage the fan to the servo amplifier as indicated at point 8.1, then
re-close the mobile protection cover.
Tighten the protection-securing screw properly.
9. Start the tractor.
10. Lift the unit. Engage the Power Takeoff and set it up to a running rate of at least 500 r.p.m., in order
to carry out a further agitation.
540
Use ONLY the PTO at 540 rpm. Engage the PTO with the engine of the tractor at
low speed and with maximum modularity, obtaining soft and progressive graft
and avoiding abrupt starts of the cardan shaft.
12. Regulate the operating pressure, by acting on the pressure regulator (P5) (or electric E5) with the
distributor, hand (P9) or electric (E9), open (DISTRIBUTION).
13. CARRY OUT THE TREATMENT (See the paragraph 11.3).
8.3 - FILLING WITH THE SPECIFIC PIPE
(optional device)
USE ONLY IF CONCURRED FROM THE LAWS OF THE COUNTRY WHERE THE
SPRAYER IS USED. Before utilisation, check the operation and proper sealing of the
bottom-drawing valve by pouring water in the piping.
THE PUMP MUST NEVER RUN DRY.
EXECUTION:
1. Disengage the fan, see point 8.1.a.
2. Close the 2-way distributor:
a. se manual (P9), set the levers in the horizontal position;
b. if electrical, position the latch switches (E10) on “OFF”.
3. Check that:
- P6: is open (lever on “a”);
- P12: is closed (lever on "c");
- P5, pressure regulator: is completely open for the unit’s first use, or on the already selected
position for the outstanding treatment or for the previous one.