5-114
Cisco 7600 Series Router Installation Guide
OL-4503-26
Chapter 5 Removal and Replacement Procedures
Removing and Replacing the PEM
Step 3 Remove the power cord from the power connection on the PEM. Do not touch the metal prongs
embedded in the PEM.
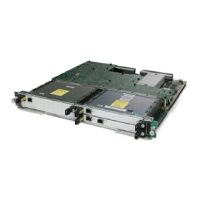
Step 4 Loosen the captive installation screws (Figure 5-109).
Figure 5-109 AC-Input PEM
Step 5 Grasp the PEM with one hand, and slide it part of the way out of the chassis. Place your other hand
underneath the PEM, as shown in
Figure 5-110, and slide it completely out of the chassis.
Figure 5-110 Handling a PEM
Step 6 If the PEM bay is to remain empty, install a blank PEM filler plate (Cisco part number 800-16719-01)
over the opening, and secure it with the captive installation screws. See
Figure 5-111.
130058
Captive installation screws
IEC 60320 C15 connector
AC power switch
S
U
P
E
R
V
IS
O
R
2
W
S
-X
6
K
-S
U
P
2
-2
G
E
STATUS
SYSTEM
CONSOLE
PWR MGMT
RESET
C
O
N
S
O
LE
C
O
N
S
O
LE
PO
R
T
M
O
D
E
P
C
M
C
IA
E
JEC
T
P
O
R
T 1
PO
R
T
2
S
w
itch Lo
ad
100
%
1
%
LINK
LINK
O
S
M
-4
O
C
1
2
P
O
S
-
S
I
4
P
O
R
T
O
C
-
1
2
P
O
S
S
M
I
R
S
T
A
T
U
S
1
1
2
2
3
3
4
4
R
E
S
E
T
L
IN
K
L
IN
K
L
IN
K
LIN
K
C
A
R
R
IE
R
A
L
A
R
M
C
A
R
R
IE
R
A
LA
R
M
C
A
R
R
IE
R
AL
A
R
M
C
A
R
R
IE
R
A
L
A
R
M
A
C
T
IV
E
T
X
R
X
T
X
P
O
R
T
1
R
X
A
C
T
IV
E
T
X
R
X
T
X
P
O
R
T
2
R
X
A
C
T
IV
E
T
X
R
X
T
X
P
O
R
T
3
R
X
A
C
T
IV
E
TX
R
X
T
X
P
O
R
T
4
R
X
O
S
M
-
4
O
C
1
2
P
O
S
-S
I
4
P
O
R
T
O
C
-1
2
P
O
S
S
M
IR
S
T
A
T
U
S
1
1
2
2
3
3
4
4
R
E
S
E
T
LIN
K
LIN
K
LIN
K
L
IN
K
C
A
R
R
IE
R
A
LA
R
M
C
A
R
R
IE
R
A
L
A
R
M
C
A
R
R
IE
R
A
L
A
R
M
C
A
R
R
IE
R
A
LA
R
M
A
C
T
IV
E
T
X
R
X
T
X
P
O
R
T
1
R
X
A
C
T
IV
E
T
X
R
X
T
X
P
O
R
T
2
R
X
A
C
T
IV
E
T
X
R
X
T
X
P
O
R
T
3
R
X
A
C
T
IV
E
TX
R
X
T
X
P
O
R
T
4
R
X
63301