EasyManuals Logo

Creality ENDER-3 V2 User Manual

Creality ENDER-3 V2
41 pages
To Next Page IconTo Next Page
To Previous Page IconTo Previous Page
Page #12 background imageLoading...
Page #12 background image
11
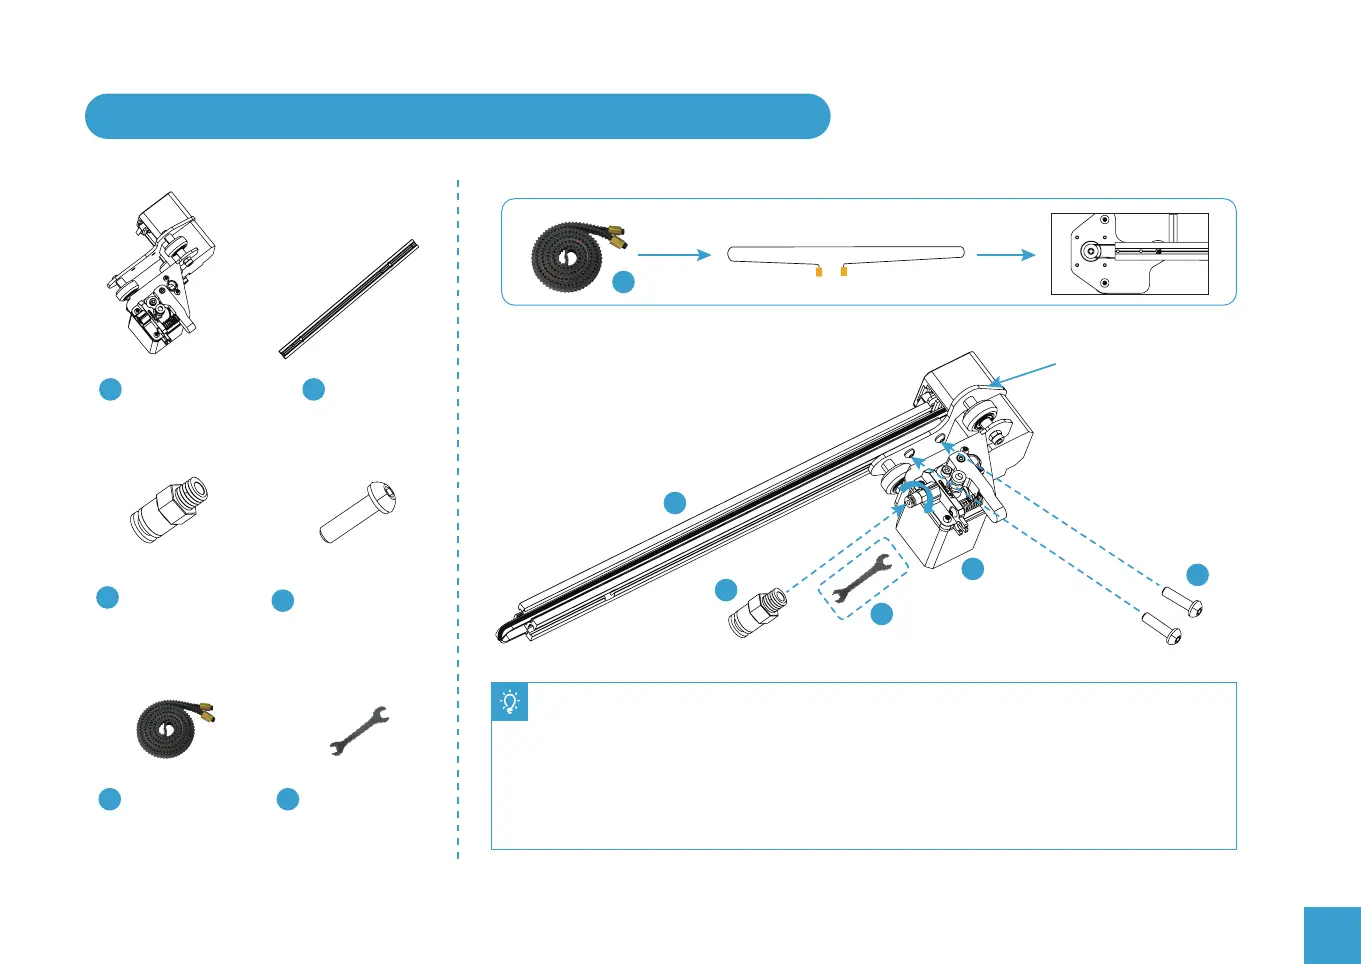
3. Install Pneumatic Joint, XE-axis Assembly and Drive Belt
8
8
12
12
X-axis
Profile x 1
XE-axis
Assembly x 1
Install the drive belt
around the pulley.
23
23
Bowden Tube
Connector x 2
32
32
Hexagon Socket
Flat Round Head
Spring Washer
Combination
17
Drive Belt x 1
25
25
Wrenches and
Screwdrivers x 1
17
● Tighten the Bowden tube connector firmly into the Extruder using an open-end wrench.
● Align the bolt head on the XE-Axis Assembly into the hole on the X Axis profile.
● Secure the XE-axis Assembly to the X-Axis Profile with two M4X16 screws. (Insert the
Allen key through the holes on the outer plate).
● Install the Drive belt round the pulley inside the XE-axis Assembly with the toothed side
round the pulley as shown above.

Questions and Answers:

Question and Answer IconNeed help?

Do you have a question about the Creality ENDER-3 V2 and is the answer not in the manual?

Creality ENDER-3 V2 Specifications

General IconGeneral
Build Volume220 x 220 x 250 mm
Layer Resolution0.1-0.4 mm
Filament Diameter1.75 mm
Nozzle Diameter0.4 mm
Bed LevelingManual
Extruder TypeBowden
Power SupplyMeanWell 350W
Build SurfaceCarborundum Glass
Printing TechnologyFDM (Fused Deposition Modeling)
Max. Nozzle Temperature255°C
Max. Bed Temperature100°C
Machine Dimensions475 x 470 x 620 mm
Machine Weight7.8 kg
ConnectivityUSB, SD Card
Supported MaterialsPLA, ABS, TPU, PETG
Display Screen4.3-inch Color LCD
Print Speed180 mm/s

Related product manuals