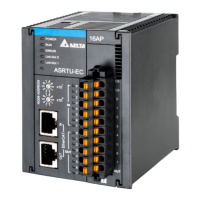
ASRTU-EC16AP1TA EtherCAT Remote Communication Module Operation Manual
4-2
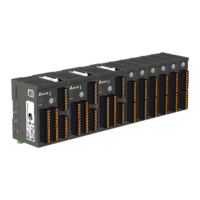
4.1 Installing ASRTU-EC16AP1TA and AS Extension Modules
to DIN Rail
Please push the clips of ASRTU-EC16AP1TA in the directions indicated by arrow ① until you hear a
click. That means the DIN clips are interlocked each other. Then insert the module hooks at the bottom
into the DIN rail mounting slot until you hear a click. That means ASRTU-EC16AP1TA is well connected
to the DIN rail.
To install an extension module, push the clips of the AS extension module in the directions indicated by
arrow ①. Then aim the left-side slot of the extension module at the right-side slot of
ASRTU-EC16AP1TA and push the extension module in the direction as illustrated by arrow ② until you
hear a click, which means the module is secured to the DIN rail and well connected to
ASRTU-EC16AP1TA. In the same way, install more IO modules to the right side of ASRTU-EC16AP1TA
and secure them to DIN rail one by one.
IN
EtherCAT
IN
OUT
0
1
2
3
4
5
6
7
0
1
2
3
4
5
6
7
AS RTU-EC
0
1
2
3
4
5
6
7
0
1
2
3
4
5
6
7
C0
C0
IN
OUT
PO WE R
RU N
ERR OR
NODE ADDRESS
x10
1
0
x10
0
9
8
7
6
5
4
3
2
1
0
9
8
7
6
5
4
3
2
1
O UT
Lin k/A ct 0
Lin k/Act 1
16AP
DIN
Rail Clip
DIN Rail Clip
1
1