4 Getting Started
4.1 Setting up the system the first time
Whensettingupthesystemforthefirsttimeplease
follow the instruction given in this section in
sequence.
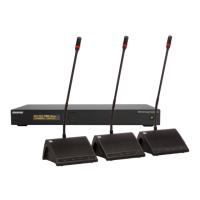
1. Unpack the CU 5905 Central Unit and the DC
5980P Conference units and place them
ltemporaryonatab e.
2. Attach the button overlays to the DC 5980P
units.Usetheoverlaysdeliveredwiththeunits
forDelegateunitsandusetheoverlays
delivered with the CU 5905 for Chairmanand
Interpreterunits.
Please refer to section ‘
6.2 Preparing the
conferenceunit
’fordetails.
Pleasenote,thattheoverlaysareNOTdesigned
toberemovedafterattachment.
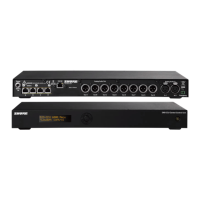
3. ConnectthepowercordtotheCU5900Power
Supply and connect the cable from the power
supplytotheCU5905.
Pleaserefertosection‘
5CU5905CentralUnit’
fordetails
4. ConnecttheunitswithChairman and
InterpreteroverlaystotheDCS‐LAN
connector(s)ontheCU5905usingEC6001‐xx
Cat5eextensioncables.
5. Turnpower‘On’totheCU5900PowerSupply.
Thelightindicationinthepowerswitchonthe
CU5905willlightred.
6. ActivatethepowerswitchontheCU5905and
the light indication in the button will light
green. After about 15 seconds, the display in
theCUwillbevisibleandtheLed’sinthe
buttonoverlayontheDC5980Pwillflashuntil
theunitsareregistered(lessthan60seconds).
7. Checkthattheunitsareworkingbytouching
the‘Speak’button.
Pleaserefertosection‘
6DC5980PConference
Unit
’fordetails.
8. Changetheunittypeaccordingtotheattached
overlay.
Please refer to section ‘
6.2.4 Configuration of
theunit
’fordetails
9. TurnOffpower
10. Placeallunitsatthepositions,wheretheyare
ptobeusedobserving theunitty e.
11. Connect the units with EC 6001‐xx Cat5e
extensioncablesinsuitablelengthtotheDCS‐
LAN connector(s) on the CU 5905 observing
thatthecablesarenotbendedtoaradiusless
than15mm.
Please refer to section ‘
4.3 Cabling guidelines’
fordetails.
12. ConnecttheGM59xxGooseneckMicrophoneto
theunit
13. Ifneededfixthegooseneckmicrophonestothe
unitswiththetooldeliveredwiththeCU5905.
Please refer to section ‘
7 GM 59xx Gooseneck
Microphone
’fordetails.
14. Turn‘On’powerandwaitforthesystemto
becomeready.
15. Touchthe‘Speak’buttonontheunitstocheck
functionality.
16. Adjust the ‘Loudspeaker volume’ to a desired
levelusingtheinteractivemenuonthefrontof
theCU5905.
Please refer to the section ‘
5.5 Using the
InteractiveMenu
’fordetails.
User Manual DDS 5900
11