Do you have a question about the DURKOPP ADLER 281 and is the answer not in the manual?
Describes the intended use and setup of the special sewing machine 281.
Instructions on reporting and handling damage incurred during product transport.
Outlines manufacturer's liability limitations regarding manual information and usage.
Explains the meaning of various symbols and signal words used throughout the manual.
Provides essential safety guidelines for operating, maintaining, and setting up the machine.
Details the meaning of signal words (Danger, Warning, Caution) and hazard symbols.
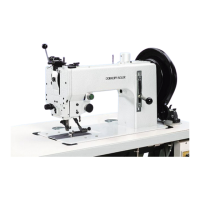
Lists the general technical characteristics and features of the Dürkopp Adler 281 sewing machine.
States the machine's compliance with relevant European regulations.
Specifies the intended purpose, materials, and environment for operating the sewing machine.
Presents detailed technical specifications, including stitch length, speed, and dimensions.
Lists available optional additional equipment and accessories for the sewing machine.
Step-by-step guide on how to turn the sewing machine's power supply on and off.
Instructions for safely inserting and replacing the needle in the sewing machine.
Detailed procedure for correctly threading the needle thread through the machine.
Guide on how to insert the bobbin and wind the hook thread onto it.
Instructions on how to adjust the amount of thread wound onto the bobbin.
Procedure for removing the empty bobbin and inserting a full one.
Explains how needle and hook thread tension affects stitch interlacing and correct settings.
Details how to adjust the stitch length using the adjusting wheel and lever.
Guide on adjusting the sewing foot pressure for optimal material transport.
Describes how to lift the sewing foot using the knee lever or mechanically.
Explains how to lock the sewing foot in the raised position for specific tasks.
Information on the function and use of the pushbutton located on the machine arm.
Overview of operating the machine using the DAC BASIC controller and its OP 1000 control panel.
Instructions on using the foot pedal to control sewing, including starting, stopping, and finishing seams.
Details regular cleaning procedures to maintain machine performance and prevent malfunctions.
Provides guidelines for proper lubrication of machine parts, including oil types and levels.
Lists contact information for obtaining repair services for the machine.
Instructions to verify all components are present before commencing machine setup.
Guide to remove all securing devices before the machine is set up.
Steps for assembling the frame components of the sewing machine table.
Instructions for assembling and completing the table plate with its accessories.
Steps for securely attaching the table plate to the assembled frame.
Guide on adjusting the table's working height to the desired level.
Instructions on fitting the DAC BASIC controller and its associated components.
Procedure for safely installing the heavy machine upper section onto the frame.
Details on securing the machine upper section with a retaining strap.
Instructions for attaching the oil can to the machine's oil pan.
Steps for installing the knee lever used to mechanically lift the sewing foot.
Guide on how to attach the control panel and its connecting cables.
Essential information and warnings regarding the electrical connection and grounding of the machine.
Procedure for performing a sewing test and adjusting the machine for optimal results.
Technical drawings and dimensions required for manufacturing a table plate for the machine.
| Needle System | 134 |
|---|---|
| Stitch Type | Lockstitch |
| Max. sewing speed | 5000 rpm |
| Sewing Speed | 5, 000 stitches/minute (depending on material) |
| Voltage | 220-240 V |