96 MPA2C3 Installation Guide
Wiring to the RS485 Busses.
Warning: Use a static strap whenever touching the panel to ensure protection from ESD
(Electrostatic Discharge).
RS485 I/O Devices bus (NX4IN / NX4OUT)
The MPA2C3 has a dedicated RS-485 interface bus for Input and output devices (I/O
Devices)
. A maximum of 2 NX4IN and/or 2 NX4OUT downstream I/O devices can be
added to the bus (total of 2 downstream I/O devices).
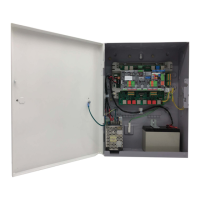
Figure 3-32 Wiring the Interface Bus
The Interface bus is wired into the panel using standard RJ45 connection (Prefera-
bly use CAT 7 S/FTP cable) (J6) on the board. Use pin1&2 (D/NA/CNB) to connect
the NX4 I/O boards. Make sure the NX4 I/O boards are powered with an external
24 VDC power supply.
For additional information about the Downstream I/O, see "RS-485 Panel Downstream
bus (IN/OUT)" on page 3-96.
RS-485 Panel Downstream bus (IN/OUT)
The access control panel has a RS-485 downstream bus for connecting down-
stream panels (MPA2C3 or NetAXS123). A maximum of 8 (1+7) MPA2 panels can
be configured in the loop, or a maximum of 8 (1+7) MPA2 panels and NetAXS123/
NetAXS4 panels can be configured in the loop. One MPA2C3 panel must be config-
ured as the primary panel and the panel loop must be RS-485.
 Loading...