2-5.
SC-220
Control
panel
1) Control panel
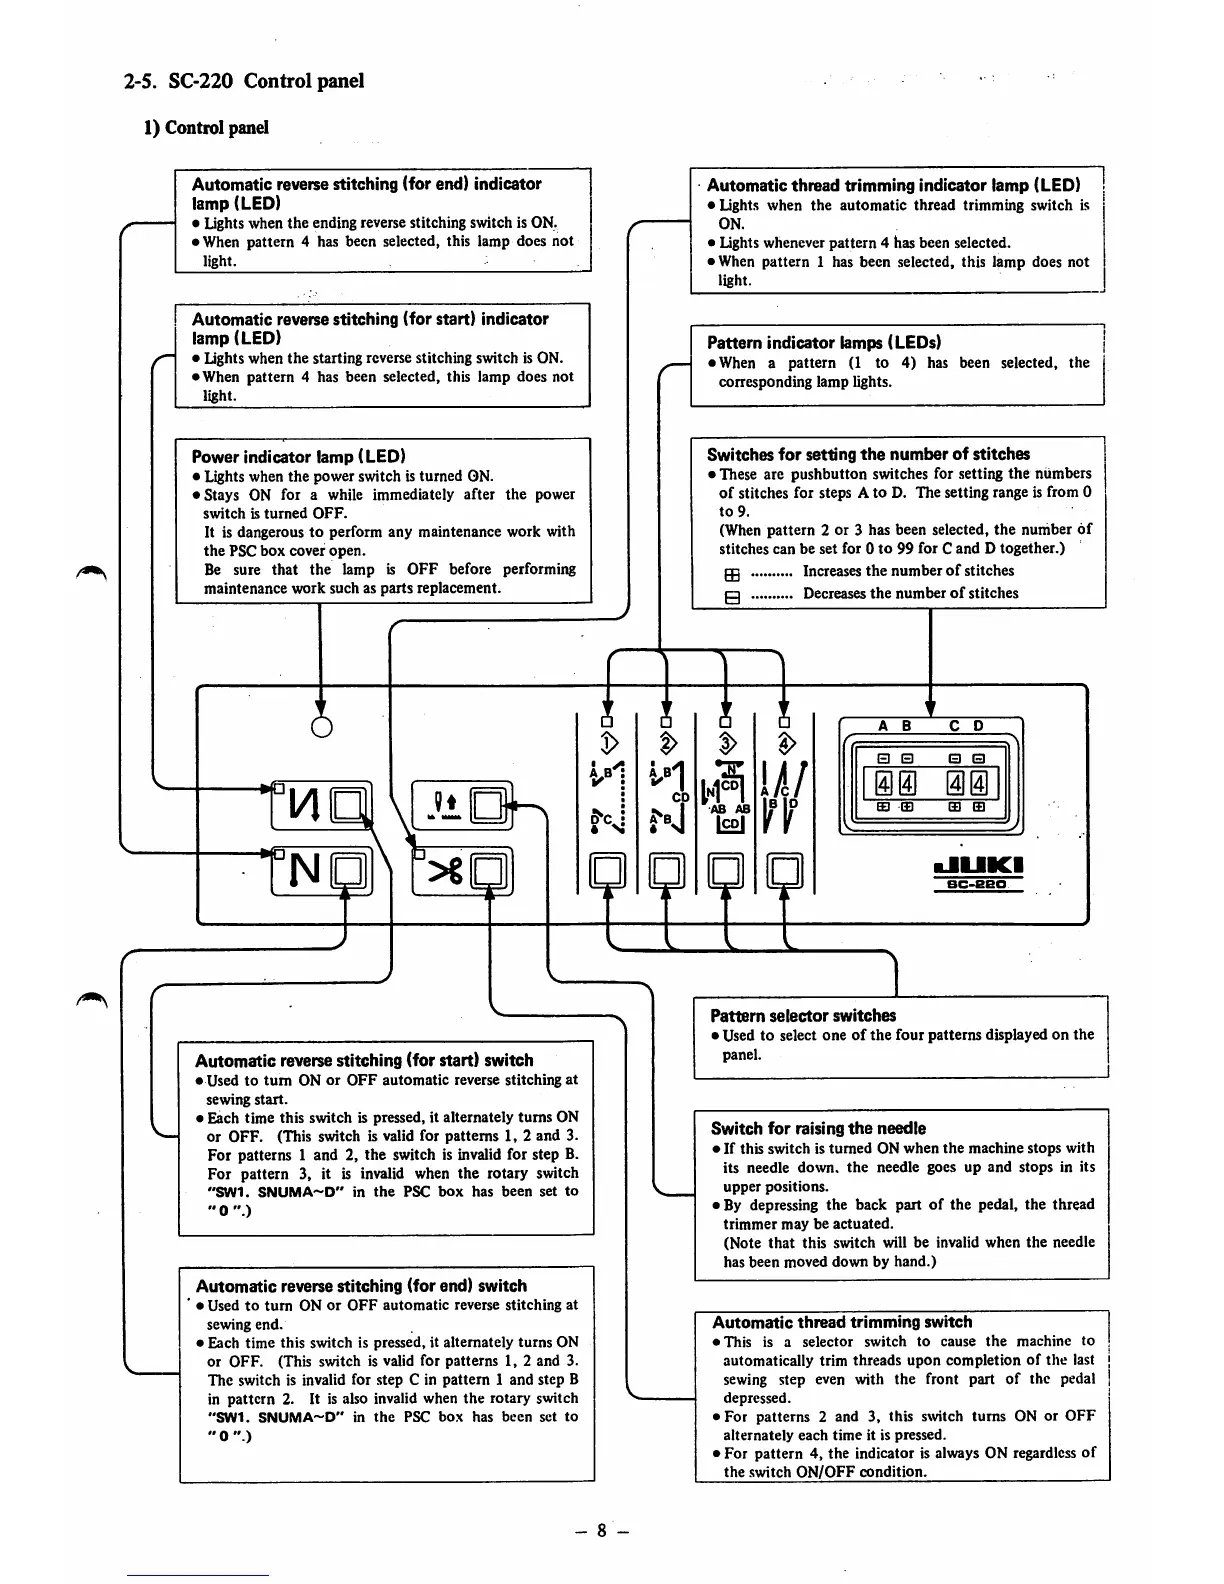
Automatic reverse stitching (for end) indicator
lamp (LED)
• Lights when
the
ending reverse stitching switch is ON.
• When pattern 4 has been selected, this lamp does not
light. ^
Automatic
reverse stitching (for start) indicator
lamp (LED)
• Lights when
the
starting reverse stitching switch is ON.
• When
pattern
4 has been selected, this lamp does not
light.
Power indicator lamp (LED)
• Lights when
the
power
switch is
turned
ON.
• Stays ON for a while immediately
after
the
power
switch
is
turned
OFF.
It is dangerous
to
perform any maintenance work with
the
PSC
box
cover
open.
Be sure
that
the
lamp is
OFF
before performing
maintenance
work
such
as
parts
replacement.
Automatic reverse stitching (for start) switch
•
Used
to
turn
ON
or
OFF
automatic
reverse
stitching
at
sewing
start.
• Each time this switch is pressed, it alternately
turns
ON
or OFF. (This switch is valid for patterns 1, 2
and
3.
For patterns 1 and 2, the switch is invalid for step B.
For pattern 3, it is invalid when the rotary switch
"SW1.
SNUMA—D"
in
the
PSC
box
has
been
set
to
"0".)
Automatic
reverse stitching (for end) switch
•
Used
to
turn
ON
or
OFF
automatic
reverse
stitching
at
sewing
end.
• Each
time
this
switch is pressed, it alternately
turns
ON
or
OFF.
(This switch is valid for
patterns
1, 2 and 3.
The
switch is invalid for step C in
pattern
1 and step B
in
pattern
2. It is also invalid when
the
rotary switch
"SWI.
SNUMA~D"
in
the
PSC
box
has
been
set
to
"0")
- 8 -
Automatic thread trimming indicator lamp (LED)
• Lights
when
the
automatic
thread
trimming
switch
is
ON.
• Ughts whenever pattern 4 has been selected.
• When
pattern
1 has been selected, this lamp does
not
light.
Pattern indicator lamps (LEDs)
• When a
pattern
(1 to 4) has
corresponding
lamp
lights.
been
selected,
the
Switches
for
setting
the
number
of
stitches
• These are pushbutton switches for setting
the
numbers
of
stitches for steps A to D. The setting range is from 0
to
9.
(When pattern 2 or 3 has been selected, the number
of
stitches
can
be
set
for
0
to
99
for
C
and
D
together.)
^
Increases
the numberof stitches
0
Decreases
the
number
of stitches
m
AB
AS
ICPj
B B B B
Pattern
selector
switches
• Used to select
one
of
the
four
patterns
displayed
on
the
panel.
Switch
for
raising
the
needle
• If
this
switch
is
turned
ON
when
the
machine
stops
with
its
needle
down,
the
needle
goes up
and
stops
in its
upper
positions.
• By depressing the back part
of
the pedal, the thread
trimmer
may
be
actuated.
(Note
that
this
switch
will be invalid
when
the
needle
has
been
moved
down
by
hand.)
Automatic
thread
trimming
switch
•
This
is a
selector
switch
to
cause
the
machine
to
automatically
trim
threads
upon
completion
of
the
last
sewing step even with
the
front part
of
the pedal
depressed.
• For patterns 2 and 3, this switch turns ON or
OFF
alternately
each
time
it is pressed.
• For pattern 4, the indicator is always ON regardless of
the switch
ON/OFF
condition.