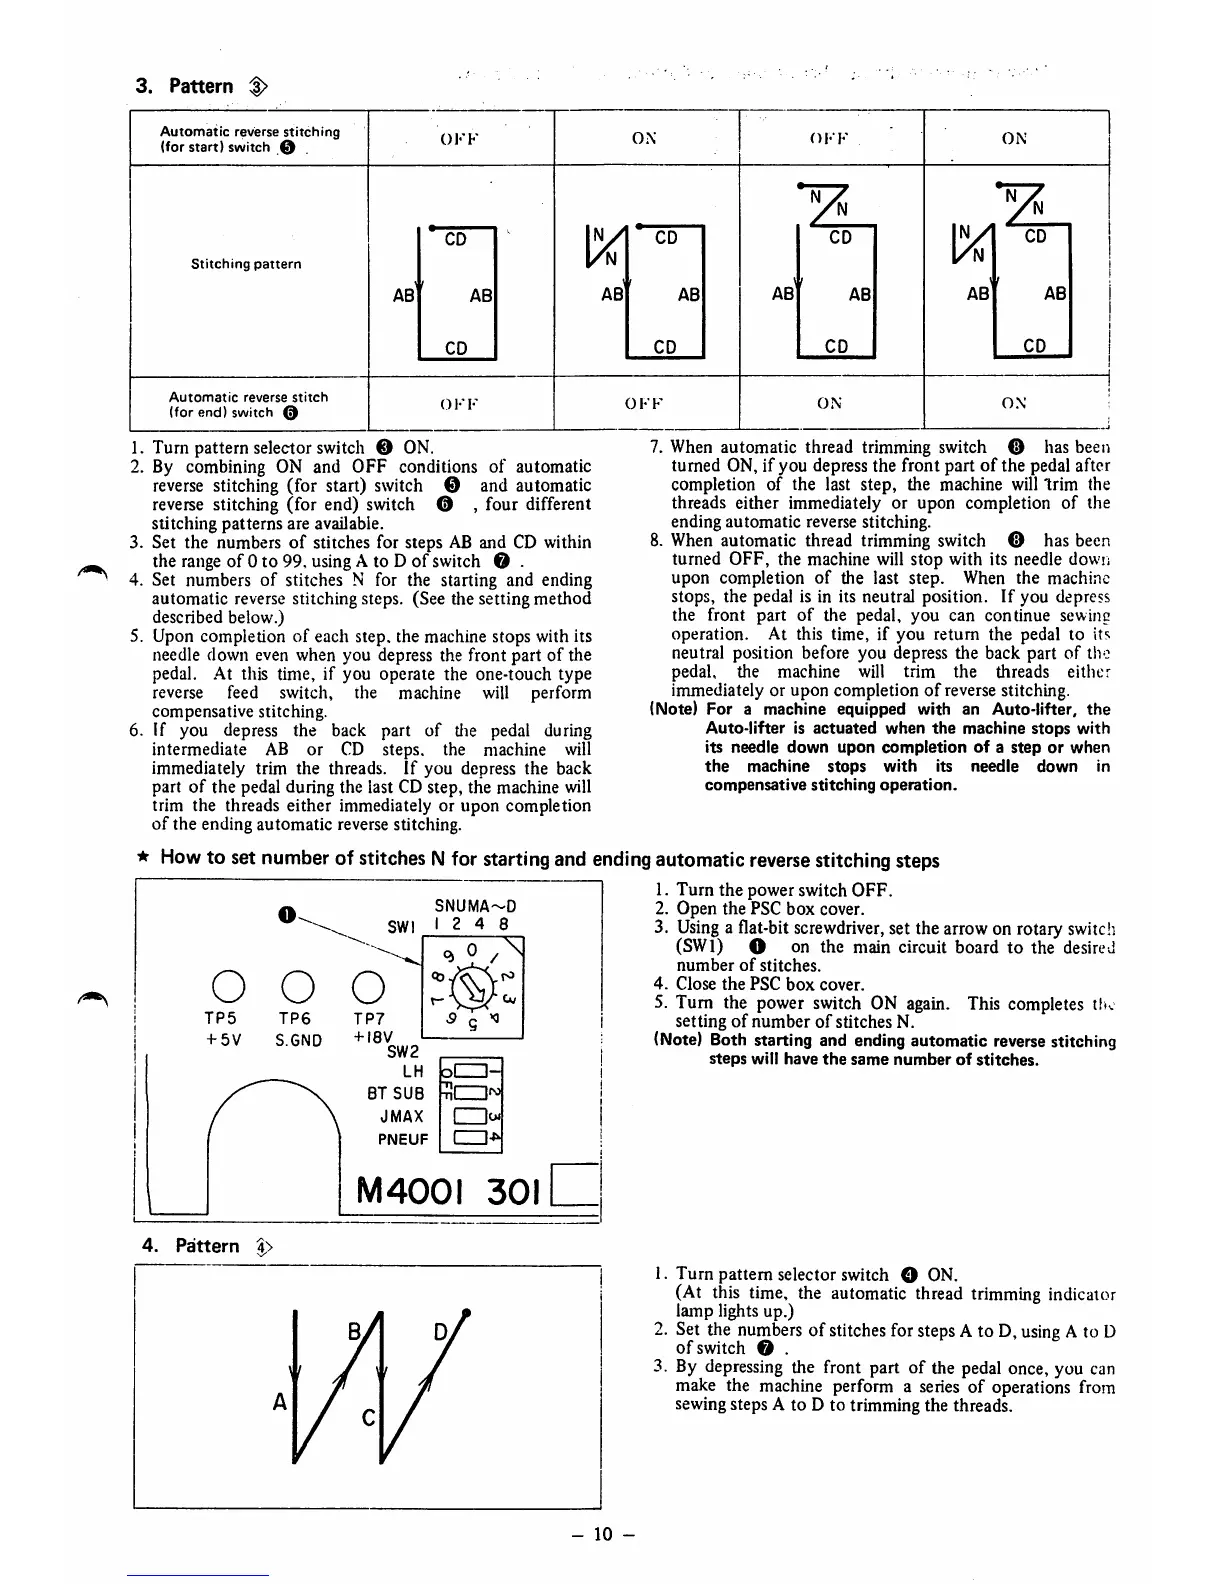
3. Pattern :|>
Automatic
reverse
stitching
(for start) switch ©
OFF
ON
OFF
ON
Yn
*
CD
ly
CD
CD
CD
Stitching
pattern
I/n
l/N
AB
AB
CD
AB
AB
CD
AB^
AB
CD
AB
AB
CD
Automatic
reverse
stitch
(for end) switch 0
OFF
OFF
ON
ON
1. Turn pattern selector switch © ON.
2. By combining ON and OFF conditions of automatic
reverse
stitching (for start) switch © and automatic
reverse
stitching (for end) switch 0 , four different
stitching patterns are available.
3. Set the numbers
of
stitches for steps AB and CD within
the
range
of 0 to 99, usingA to D of switch 0 .
4. Set numbers
of
stitches N for the starting and ending
automatic reverse stitching steps. (See the setting method
described below.)
5. Upon completion of each step, the machine stops with its
needle down even when you depress the front part of the
pedal. .At this time, if you operate the one-touch type
reverse feed switch, the machine will perform
compensative stitching.
6. If you depress the back part of tlie pedal during
intermediate AB or CD steps, the machine will
immediately trim the threads. If you depress the back
part of the pedal during the last CD step, the machine will
trim the threads either immediately or upon completion
of the ending automatic reversestitching.
7. When automatic thread trimming switch 0 has been
turned ON, if you depress the front part
of
the pedal after
completion of the last step, the machine will
trim
the
threads either immediately or upon completion
of
the
ending automatic reverse stitching.
8.
When
automatic thread trimming switch © has been
turned OFF, the machine will stop with its needle down
upon completion
of
the last step. When the machine
stops, the pedal is in its neutral position. If you depress
the front part
of
the pedal, you can continue sewing
operation. At this time, if you return the pedal to its
neutral position before you depress the back part of the
pedal, the machine will trim the threads either
immediately or upon completion
of
reverse stitching.
(Note) For a machine equipped with an Auto-lifter, the
Auto-lifter
is
actuated
when
the
machine
stops
with
its
needle
down
upon
completion
of
a
step
or
when
the
machine
stops
with
its
needle
down
in
compensative
stitching
operation.
★
How
to set numberof stitchesNfor startingand
ending
automatic
reverse
stitching steps
4.
Pattern
TP6
S.GND
SNUMA~D
BT
SUB
•nCZl'^
JMAX
PNEUF
M400I
301
-
10
-
1. Turn the power switch OFF.
2. Open the PSC box cover.
3.
Using
a flat-bit screwdriver, set the arrow on rotary switch
(SWl) O on the main circuit board
to
the desired
number
of
stitches.
4.
Close
the
PSC
box
cover.
5. Turn the power switch ON
again.
This completes the
setting
of
number
of
stitches N.
(Note) Both starting and ending automatic
reverse
stitching
steps
will
have
the
same
number
of
stitches.
1.
Turn
pattern selector switch O ON.
(At this
time,
the
automatic
thread
trimming
indicator
lamp lights up.)
2. Set the numbers of stitchesfor stepsA to D,
using
A to D
of
switch
0 .
3. By depressing the front part of the pedal once, you can
make the machine perform a
series
of operations from
sewing steps A to D to trimming the threads.
 Loading...


