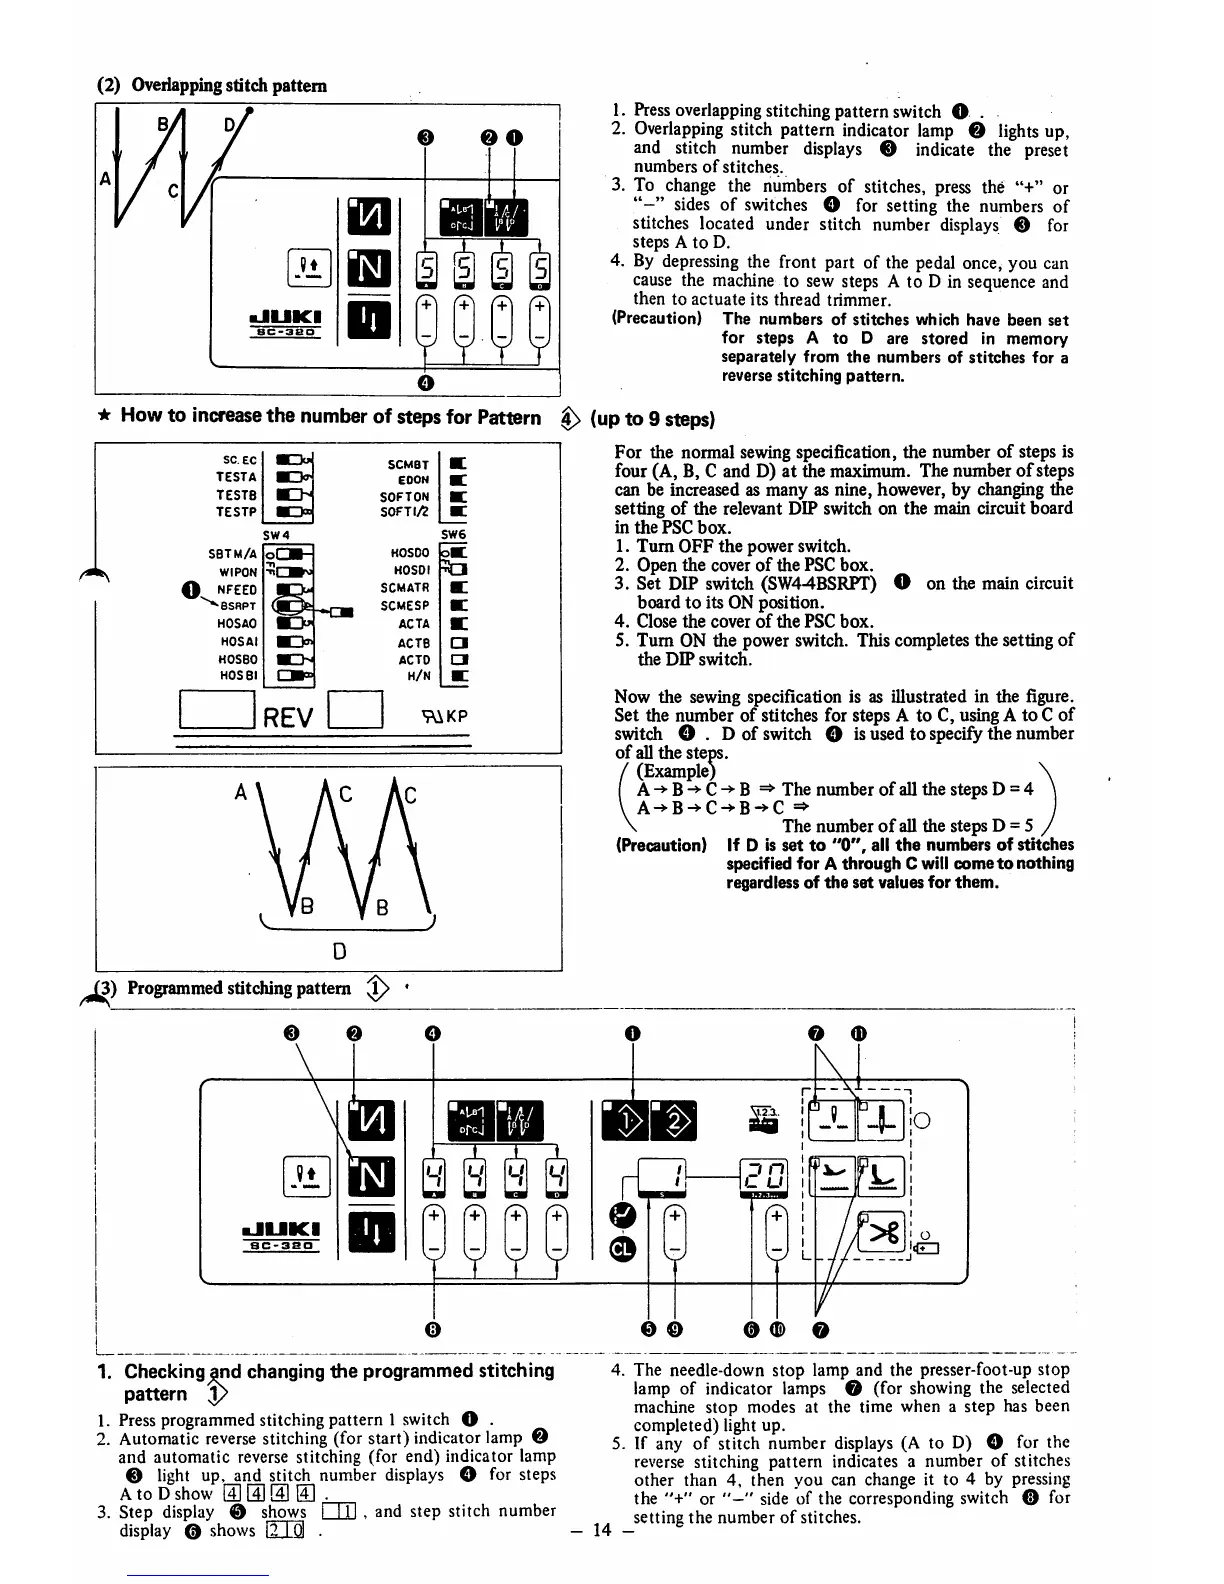
(2) Oveilapping stitch pattern
9«
•JUKI
8C-3eO
O
GO
5
1
f T Y
5
El
1. Pressoverlappingstitching pattern switch O .
2.
Overlapping
stitch pattern indicator
lamp
O
lights
up,
and stitch
number
displays
© indicate the
preset
numbers
of
stitches.
3. To
change
the numbers of stitches,
press
the "+" or
"
sides
of
switches
O for setting the
numbers
of
stitches located under stitch number
displays
© for
steps A
to
D.
4. By
depressing
the front part of the pedal once, you can
cause
the
machine
to sew steps A to D in sequence and
then
to
actuate
its
thread
trimmer.
(Precaution)
The
numbers
of
stitches
which have
been
set
for
steps A to D are stored In memory
separately
from
the
numbers
of
stitches
for
a
reverse
stitching
pattern.
★
How
to
increase
the
number
of stepsfor Pattern (upto 9
steps)
K>
mih
sc.
EC
TESTA
TESTS
TESTP
SBTM/A
WIPON
NFEEO
^eSRPT
HOSAO
MOSAI
HOSBO
HOSBI
SW4
O
REV
SCMBT
EOON
SOFTON
SOFT 1/2
KOSOO
HOSDI
SCMATR
SCMESP
ACTA
ACTB
ACTO
H/N
SW6
oK
a
a
WKP
^3)
Programmed
stitching
pattern
^
•JUKI
SC-38a
r+)
Y Y Y
For the normal sewing specification, the number of steps is
four (A, B, C and D) at the maximum. The number
of
steps
can be increased as many as nine, however, by changing the
setting
of
the relevant DIP switch on the main circuit board
in
the
PSC
box.
1. Turn OFF the power switch.
2. Open the cover
of
the PSC box.
3. Set DIP switch (SW44BSRPT)
board
to
its ON position.
4.
Close
the
cover
of
the
PSC
box.
5. Turn ON the power switch. This completesthe setting of
the
DIP
switch.
Now the sewing specification is as illustrated in the figure.
Set the number of stitches for steps A to C, usingA to C of
switch
O . Dof
switch
O is
used
to
specify
&e
number
of
all the steps.
(Example)
A-^-B-^-C^B
The number of all the steps D = 4
A^B-J-C-^B-^C
=>
The number
of
all the steps D = 5
(Precaution) if D is
set
to
"0",
all
the
numbers
of
stitches
specified
for
A
through
C will
come
to
nothing
regardless
of
the
set
values
for
them.
O
n
o
0
© ©
O
on
the
main
circuit
© ©
SjTi.
I
X
[-1
© ©
o
4. The needle-down stop lamp and the presser-foot-up stop
lamp of indicator lamps © (for showing the selected
machine stop modes at the time when a step has been
completed) light up.
5. If any of stitch number
displays
(A to D) O for the
reverse stitching pattern indicates a number of stitches
other than 4, then you can change it to 4 by pressing
the "+" or side of the corresponding switch © for
setting the number of stitches.
1.
Checkingchanging
the
programmed
stitching
pattern
5>
1. Pressprogrammedstitching pattern 1 switch O .
2.
Automatic
reverse
stitching (for start) indicator
lamp
©
and automatic reverse stitching (for end) indicator lamp
©
light
up, and stitch number
displays
O for steps
A to D show
S] S]
SI
m .
3. Step display © shows i
111
, and step stitch number
display © shows
12
I
01
.
-
14
-