Do you have a question about the Kässbohrer LOW-LOADER Series and is the answer not in the manual?
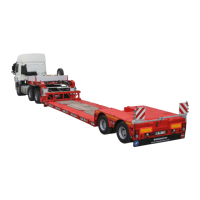
This document is a user manual for the Kässbohrer Low-Loader Series, providing comprehensive information on its operation, maintenance, and safety instructions.
The manual emphasizes safe and proper use of the vehicle, outlining restrictions such as exceeding maximum speed, permissible dimensions, and axle/king pin loads. It also prohibits carrying people, live animals, dangerous goods, or unsecured items. The manufacturer disclaims responsibility for issues arising from non-compliance with instructions. Personal protective equipment (PPE) is mandatory during operations, including lightweight helmets, hearing protection, goggles, masks, gloves, and appropriate overalls. Users are advised to keep the manual available in the vehicle at all times and to contact a service center immediately if problems occur. Modifications without manufacturer approval void the warranty, and only original spare parts should be used.
The vehicle features identification stickers, including a vehicle identification plate on the right side with type approval number, VIN, technical capacities (total, king pin, axle), and vehicle type. A brake data plate, present on EBS-equipped vehicles, provides information on empty/loaded vehicle status, axle lifting, brake chamber data, references, ABS sensor placement, and extra functions. The VIN (chassis) number is also located on the right side, marked in a different color.
The brake system includes air couplings (Brake Line - Yellow, Supply Line - Red) for connecting to the truck. Three types of air couplings are used: Standard (Palm), Duomatic, and C (UK) Couplings. When mounting/demounting couplings, the truck and trailer parking brakes must be engaged. Test points on the chassis or above the air couplings allow checking air pressure. If the vehicle has two different coupling types, only one should be used at a time. Damaged air supply parts can cause serious hazards and reduce braking performance. The EBS socket (electronically controlled brake system) provides automatic load sensing braking pressure regulation (ALB) and anti-skid systems (ABS/ABV). It requires an ISO 7638-1996 connector (ABS + CAN) or ISO 7638, 7-pin with CAN data line (EBS Truck). Driving without EBS connection or with a faulty EBS system is illegal and dangerous. The PREV (Park Release Emergency Valve) includes a black button for service brake and a red button for park brake. The service brake is not suitable for permanent braking; for longer stops, the spring-loaded park brake and wheel chocks must be used. Brake chambers, either disc or drum type, are used for braking. They can be manually deactivated in emergencies by removing and inserting a release rod.
The vehicle is equipped with an air suspension system. A manual control lever allows lowering or lifting the rear of the semi-trailer for loading operations. The middle position sets the driving level. The Electronic Controlled Air Suspension (ECAS) is an optional system that electronically sets driving height or defined different heights. The Dual Level ECAS works more sensitively and saves fuel compared to conventional systems. A manometer indicates the load on an axle in tons based on air bag pressure. A Smartboard (Info Center) displays failure codes, axle load, and controls the axle lifting system.
The lighting system is supplied via 15-pin (ISO 12098) and 2x7-pin (ISO 1185 (24N) / ISO 3731 (24S)) sockets. All electrical sockets must be connected when driving. The light system includes stop lamps, signal lamps, end outline markers, license plate lamps, and side position lamps, controlled by a modulator. Regular checks and immediate repair of electrical problems are essential, using only original parts.
The king pin connects the truck and trailer. Vehicles may have 2” or 3.5” diameter pins. If wearing on the king pin exceeds 2 mm, it must be replaced. The flanged king pin design allows for easy replacement by removing 8 bolts.
Axles with disc or drum brakes are used. Axle loads must not exceed legally permissible limits. Proper brake adjustment by an authorized service is crucial for warranty and safe operation. Hubodometers show the distance traveled, adjusted according to tire diameter.
For proper operation, all air couplings and electrical sockets must be connected. The battery supply socket (NATO / REMA) must be connected to the truck's battery. Parking lights must be on for the steering system to work. Mechanical alignment and sensor calibrations are necessary for automatic alignment. The system has semi-automatic and fully automatic alignment options, controlled via a remote control or control panel. Steering warning lights (yellow and red LED lamps) indicate various system statuses, such as alignment, emergency stop, and vehicle speed limits.
Tires must have a load capacity index suitable for the vehicle and road conditions. Low decibel and high fuel efficiency (Class A) tires are recommended. In dual/twin line wheeled vehicles, tires must be matched by diameter, with tread depths differing by no more than 5 mm. M+S (Mud and Snow) or 3PMSF (3 Peak Snowflake) labeled stickers may be mandatory in some countries. Unsuitable or worn tires can cause serious accidents.
SLL vehicles can be equipped with single, double, or triple spare wheel carriers.
An optional crane system is used to lower the spare tire. Safety precautions must be taken during tire changes due to the weight of tires.
Two wheel chocks and holders are provided. Wheel chocks must be used when parking on a slope, during loading/unloading, or without a tractor. They should only be placed on fixed axles, never on idle/steer axles. Pin type and pocket type wheel chock holders are described for removing and placing chocks.
Storage units must be properly closed and contents secured before driving. Gooseneck corner chamfered tool cabinets and fire extinguisher cabinets are available. Fire extinguishers must be regularly maintained and checked for expiry dates.
Kässbohrer Low-bed vehicles have a fixed bumper with reflectors, labels, spotlights, headlight assembly, horn lamps, and a mat for ramp use.
Hardwood flooring is used on the base, fixed to the chassis with base screws.
Maneuvers for extending/shortening the chassis must be performed on flat ground with a suitable tow truck and mechanical alignment. This involves raising the pool, making electrical connections, lowering the vehicle from the gooseneck, engaging the parking brake, removing safety pins, unlocking with a screw lever, extending/shortening the chassis, and closing the lock. Intermediate platform attachment and removal is an option, requiring careful disconnection and reconnection of electrical and hydraulic lines.
Optional side expansion brackets and woods are provided for transporting loads wider than 2550 mm, expanding the vehicle width to 3000 mm.
Vehicles may have an automatic lubrication system for axles, steering, and tail lift. Refer to the manufacturer's manual for details.
Warning signs are used for wider loads. Expansion labels can be extended and fixed using thumbscrews and wing bolts.
Rotating warning lamps warn other drivers of wide loads. They activate with parking lights and are available as bulb or LED.
The gooseneck area contains a control panel for hydraulic components, a step for climbing, and a tool cabinet. The tool cabinet may include a king pin, minimess measuring hose, steering system indicator lamps, remote control assembly, interconnection cable, and a rotating warning lamp. A screw lever on the left side of the gooseneck serves as a handle, pump handle for emergency use, and unlock lever for extending the vehicle. A spare wheel holder and spare tire are standard, with an optional second spare wheel.
Hydraulic cylinders on the back of the gooseneck allow it to move up and down. Separating the gooseneck involves making electrical connections, lowering the pool onto supports, separating hydraulic, electrical, and pneumatic connections, releasing steering system pressure, removing safety pins, and moving the truck forward. Connecting involves approaching the trailer, adjusting gooseneck height, centering holes, attaching safety pins, lifting the gooseneck, and reconnecting all lines.
The front panel area houses couplings, electrical sockets, a spare wheel holder, and a corner bevel tool cabinet.
The gooseneck area is surrounded by removable aluminum covers and pillars.
A gooseneck closing sheet is provided upon customer request.
Before driving, ensure all documentation is available, adjustments and loading conditions are correct, the vehicle is coupled and secured, pneumatic and electrical connections are made, the EBS system is operational, all structural hardware is in place, the load is evenly distributed and within limits, regulations are complied with, the lighting and signal system is operational, tire pressures are correct, and the parking brake is released.
Connecting the low-loader involves checking the top link plate and connections, ensuring sufficient grease, switching the 5th wheel lock system to "On," moving the tractor to align the king pin, performing automatic alignment and system pressurization, unplugging the electro pump power cord, removing aluminum supports and wheel chocks, and releasing the parking brake. Separating involves docking the truck and low-loader, pulling the parking brake, placing aluminum supports, disconnecting all lines, turning the 5th wheel lock system to "On," and slowly moving the truck forward.
During loading/unloading, activate the parking brake and use wheel chocks. Park on a flat, firm surface. Ensure proper load distribution within legal limits. Be aware that vehicle height may increase during suspension adjustments. Always set the trailer to driving position after operations and check height limits for tunnels.
Use the parking brake and wheel chocks. Use marking plates in public traffic areas.
Secure the load to prevent movement. Distribute the load low and centered. After loading/unloading, ensure all side structures are securely in place. Do not exceed technical and legal weight/dimension limits. Consider load distribution effects on stability and braking. Comply with all national/international laws and regulations.
Ensure roof lift or sliding roof systems are suitable for driving. Safely tension canvas/curtain connections. Be aware that side walls, partitions, and headboards may not withstand high forces. Secure the load with braces and holders.
Check fire extinguishers annually and refill after use. Avoid contact with liquid accumulations from burned sealing materials.
Keep wheel chocks in place and use them under wheels during parking. Remove them before setting off.
Only authorized services should perform repairs and modifications to avoid voiding the warranty.
If air pressure drops instantly, contact an authorized service. Air leakage affects braking safety and airbag load lifting capacity.
Dispose of waste materials, including used oil, hydraulic oil, and batteries, according to regulations. Recycle end-of-life tires and vehicles responsibly.
Before cleaning, check for leaks. Use pressurized water carefully, maintaining distance and angle to avoid damaging the vehicle. Lubricate greasing points after cleaning. Do not use flammable or toxic liquids for cleaning.
Waterproof LED work lamps are activated by the truck's reverse gear signal. Optional LED lamps in the gooseneck area are controlled by a button box.
Optional container locks are positioned on the platform. They are unlocked by turning a star, and locked by pushing the star upwards, turning, and locking.
Ensure heavy machinery is suitable for the trailer, correctly loaded with its center of gravity, and attached with correct lashing rings.
Improper loading and load securing can cause accidents. Distribute cargo according to laws and regulations, within weight and axle load limits. Place cargo as low and centered as possible. Ensure equal weight distribution for point loads using a rigid platform. Avoid standing under loads during crane/forklift operations. Do not exceed maximum height limits.
International Highways Regulations specify maximum loading capacities. Load distribution diagrams show permissible axle weights and driving characteristic change limits. Always use at least two lashing systems.
Lashing forces are defined for normal driving, emergency braking, and sudden steering. Forward lashing requires 0.8% or 80% of the load weight force. Backward and lateral fastening requires 0.5% or 50%.
Downward lashing applies horizontal connecting force to increase inertia. Lashing angle should be ~90° for maximum tension.
Apply the highest possible tension force. Use at least two lashing systems. Refer to plates for chain selection values. Ensure proper load distribution and comply with all laws. Request a suitable loading diagram from the company. Observe permissible axle loads from user or axle manufacturer manuals.
Lashing rings are on the platform and side to secure loads. Their capacities vary by vehicle configuration. Improperly fastened loads can cause serious damage.
An optional carrier stand (loading table) can be attached to the pool for loads longer than the pool, with a capacity of 15 tons.
An optional loading crane is used for pulling wheeled loads, with capacities varying by customer request. It requires electrical energy from a rema socket in the buffer zone.
All instructions apply to standard vehicle maintenance, lubrication, inspection, and settings. Refer to the "SPARE PARTS" manual for part identification.
Dispose of used oils, filters, and other polluting parts according to environmental regulations.
Only trained personnel should perform operations. Unauthorized persons are forbidden near the vehicle. Ensure adequate ventilation when the engine is running. Perform maintenance with the power unit off unless otherwise stated. Properly support the vehicle during hydraulic lift system maintenance. Use KÄSSBOHRER spare parts, suitable greases, and clean oil. Check oil levels and change as necessary. Wash the vehicle before periodic maintenance.
Refer to the warranty and maintenance manual for periodic maintenance and checks.
For new semi-trailers, check wheel nut tightness after delivery, 50 km, 200 km, and 1600 km. After 1600 km, check suspension nuts, axle nuts, and wheel hub space. For semi-trailers in normal use, special maintenance intervals should be determined by experience.
Weekly Maintenance Work: Check steering chock, fifth wheel pim, brake system, tire pressures, wheel nuts tightness, bleed air from tanks, lubricate vehicle (if no central lubrication), check central lubrication system, check hydraulic oil level, and antifreeze valve.
Monthly Maintenance Work: Change hydraulic oil after the first 1-2 months (can be reused if filtered), check brake pad wear, adjust brakes, check axle alignment, and check braking control pressure values.
One Time in Three Months Maintenance Work: Clean filter element of yellow/red coupling heads, check suspension system for wear/leaks/damage, check camshaft clearance, check brake system for leaks, check air leaks in air suspension, check air pillows for damage, check for contamination on roller surface, and check for wear/scratches/corrosion on parabolic springs. Check tire wear.
One Time in Six Months Maintenance Work: Check axles, bearing clearances, pneumatic system components, and hydraulic system components.
Annual Maintenance Work: Check suspension (gap adjustment) and brake chambers. Change hydraulic oil annually (or sooner if contamination is observed).
Check unions after the first month, then every 6 months, and whenever oil or air leaks. If oil leakage is detected, check tank levels. Replace hoses every three years.
Tighten bolts with a torque wrench to specified values. Refer to the "SPARE PARTS" manual for specific diagrams.
Lubricate the 5th wheel plate, counterplate, closing mechanism, and king pin generously with high-pressure grease every 5,000 km. Replace the king pin if wear exceeds the limit.
Maximum allowable clearance is 2 mm radial (horizontal) and 3 mm axial (vertical). For new vehicles, it's 1.5 mm in both directions. Replace the turntable if gaps exceed these values.
Check steering chock integrity, pin A, weld, and play daily. Replace rubber washers (B) annually or if alignment problems occur. A damaged steering chock can lead to loss of control.
Clean the filter element (a) at least monthly, replacing if excessively dirty. Ensure proper reassembly of components, especially the Seeger ring (b) and sealing ring (d).
Clean the filter element of yellow and red couplings frequently. Visually check the integrity and effectiveness of the braking system. Replace brake pads if thickness is less than 5 mm, using only original parts. Rectify any defects on drum braking surfaces. Regularly check and replace worn control levers, return springs, and support bushings. Lubricate joint and sliding points.
Clean filter element (a) frequently, replace if excessively dirty.
Check the telescopic frame weekly with full extension. Keep telescopic parts clean and oiled. Lubricate the male chassis every 15 days.
To change a tire: lower the semi-trailer, close air connection valves, attach the axle to the chassis with a chain, lift the semi-trailer until the tire is off the ground, change the tire, lower the semi-trailer, remove the chain, and open the tap to normal ground clearance. Driving with an isolating cock closed can damage the suspension. Using tires with different wear levels causes abnormal wear.
Check tightening torque after 50 km and 200 km. The torque for M 22 X 1.5 is 630-650 Nm.
After replacing a wheel, tighten nuts in three stages: flatten the wheel against the axle, tighten to half the required torque, then tighten all nuts in sequence (1-10) to the required torque.
Check tire pressure when tires are cold. For 245/70 R 17.5 tires, the pressure is 8.5 Bar. Insufficient pressure between dual tires causes abnormal wear and overheating.
Tightening torque for valve manufacturer specified values should be between 9-14 Nm.
Operating temperature: -20°C to 80°C, ideal 35°C-55°C. Use mineral-based hydraulic oil. Viscosity should be 12-100 cSt (mm²/s), ideal 20-40 cSt. Low viscosity for cold weather, high viscosity for hot weather.
Hydraulic oils should not be mixed unless conditionally. Mixing different types can cause malfunction and damage. Consult the mineral oil manufacturer for miscibility. Incompatible oils void warranties and can damage steering/lift cylinders. If oil type needs changing, clean the system carefully.
| Brand | Kässbohrer |
|---|---|
| Model | LOW-LOADER Series |
| Category | Industrial Equipment |
| Language | English |