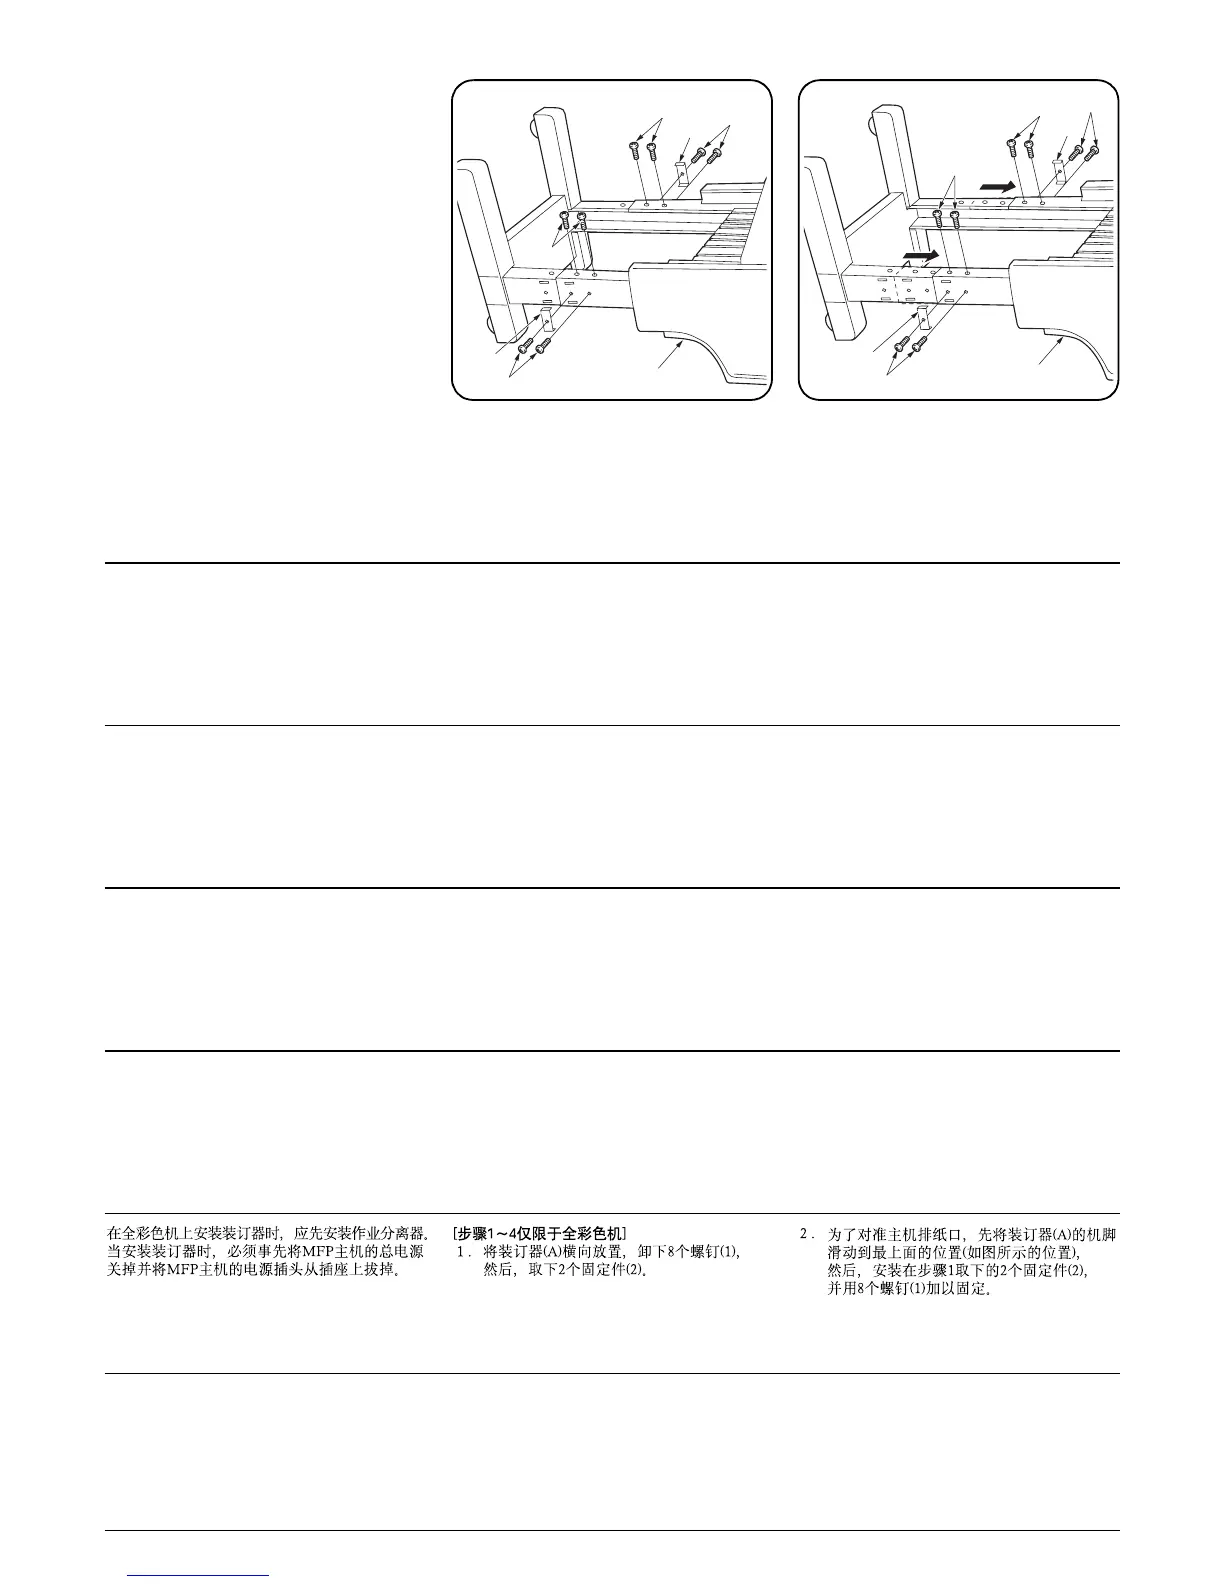
2
When installing the document finisher to a full-
color machine, install the job separator in
advance.
Be sure to turn the MFP main switch off and
disconnect the MFP power plug from the wall
outlet before starting to install the document
finisher.
[Steps 1 to 4 below are only for full-
color machines.]
1. Place the document finisher (A) sideways,
remove the eight screws (1), and remove the
two pieces of fittings (2).
2. To align the document finisher with the paper
outlet of the MFP, slide the legs of the
document finisher (A) to the uppermost
positions indicated in the illustration, attach
the two pieces of fittings (2) that have been
removed in step 1, and secure them using
the eight screws (1).
Pour installer le retoucheur de document sur
une machine entièrement en couleurs, installer
le séparateur de travaux préalablement.
Veiller à bien mettre l’interrupteur principal du
MFP hors tension et à débrancher la fiche
d’alimentation du MFP de la prise murale avant
de commencer l’installation du retoucheur de
document.
[Les étapes 1 à 4 ci-dessous
concernent les machines entièrement
en couleurs seulement.]
1. Placer le retoucheur de document (A) sur le
côté, retirer les huit vis (1), et retirer les deux
pièces de fixation (2).
2. Pour aligner le retoucheur de document sur
la sortie de papier du MFP, faire glisser les
pieds du retoucheur de document (A)
jusqu’aux positions les plus hautes
indiquées sur l’illustration, fixer les deux
pièces de fixation (2) qui avaient été retirées
auparavant à l’étape 1, et les fixer à l’aide
des huit vis (1).
Cuando instale el finalizador de documentos en
una máquina a todo color, instale el separador
de trabajos por adelantado.
Asegúrese de apagar el interruptor principal del
MFP y de desconectar la clavija de alimentación
del MFP de la toma de corriente de la pared,
antes de empezar a instalar el finalizador de
documentos.
[Los pasos 1 a 4 a continuación son
solo para máquinas a todo color.]
1. Apoye el finalizador de documentos (A)
sobre un lado, saque los ocho tornillos (1) y
saque dos piezas de herrajes (2).
2. Para alinear el finalizador de documentos
con la salida de papel del MFP, deslice las
patas del finalizador de documentos (A) a
las posiciones superiores indicadas en la
figura, instale las dos piezas de herrajes (2)
desmontadas en el paso 1 y asegúrelos con
los ocho tornillos (1).
Wenn Sie den Dokument Finisher an einer
Vollfarbenmaschine installieren wollen, muss
der Jobtrenner vorher installiert werden.
Schalten Sie den MFP-Hauptschalter aus, und
ziehen Sie den MFP-Netzstecker von der
Netzsteckdose ab, bevor Sie mit der Installation
des Dokument Finishers beginnen.
[Die folgenden Schritte 1 bis 4 gelten
nur für Vollfarbenmaschinen.]
1. Den Dokument Finisher (A) auf die Seite
legen, die acht Schrauben (1) entfernen, und
die zwei Befestigungsteile (2) abnehmen.
2. Um den Dokument Finisher auf den
Papierauslass des MFP auszurichten, die
Beine des Dokument Finishers (A) auf die in
der Abbildung gezeigte oberste Position
schieben, dann die zwei in Schritt 1
entfernten Befestigungsteile (2) anbringen
und mit den acht Schrauben (1) befestigen.
Quando si installa la finitrice di documenti su
una macchina a colori, installare prima il
separatore dei lavori.
Prima di dare inizio alla procedura di
installazione della finitrice di documenti, non
mancare di spegnere l’MFP usando l’interruttore
principale di alimentazione e disinserire la spina
dell’MFP dalla presa a muro della rete elettrica.
[I seguenti passi da 1 a 4 sono solo
per le macchine a colori.]
1. Collocare la finitrice di documenti (A)
lateralmente, rimuovere le otto viti (1) e
rimuovere i due pezzi di raccordo (2).
2. Per allineare la finitrice di documenti con
l’uscita della carta dell’MFP, fare scivolare i
piedini della finitrice di documenti (A) sulle
posizioni più in alto indicate nel disegno,
montare i due pezzi di raccordo (2) che sono
stati rimossi nel passo 1 e fissarli utilizzando
le otto viti (1).
フルカラー機にドキュメントフィニッシャを取
り付ける際には、先にジョブセパレータを装着
すること。
ドキュメントフィニッシャを取り付ける際は、
必ず MFP 本体のメインスイッチを OFF にし、MFP
本体の電源プラグを外して作業をおこなうこ
と。
[ 手順 1 ~ 4 はフルカラー機のみ ]
1. ドキュメントフィニッシャ(A) を横向きにお
き、ビス (1)8 本を外し、固定金具 (2)2 個を
取り外す。
2. 本体用紙排出口に合わせる為、ドキュメント
フィニッシャ(A) の脚を最上の位置(図の位
置)までスライドさせ、手順1で取り外した
固定金具 (2)2 個を取り付け、ビス (1)8 本で
固定する。
1
2
1
A
1
1
2
1
2
A
1
1
2
1

 Loading...