LUMIPro 2017
32
Managing Poses - Cataloging Poses
Filtering Poses
You may have a HUD that’s loaded with your favorite poses, but don’t want to ip through all of them every time you have a shoot. ere are a couple ways LUMIPro 2017 makes your
job simpler, and we’ll cover those next. e rst method is cataloging your poses. Simply put, it lets you assign poses to Group 1 or Group 2. If, for example, you have a HUD that’s loaded
with a similar number of male and female poses, assign the female poses to Group 1, and the male poses to Group 2. Similarly, if your poses are evenly split between standing poses and
sitting or laying poses, assign the standing poses to Group 1, and the other poses to Group 2. Here’s how to do that:
Caution: while the LUMIPro HUD can hold a massive number of poses, the catalog is only good for a couple hundred poses. Also, the catalog is cleared when you perform a backup,
restore, or deleting even a single animation.
You can also at a pose to a catalog at any time. If you’re in a pose, and decide to place it in Group 1, click on the Options... button on the LCD Control Panel, then click Make
Group 1 (or the group of your choice) to assign the current pose to that group.
New for LUMIPro 2017! Long hidden away in the arcane, command-line interface of LUMIPro, it’s nally time for the Pose Filter’s closeup! Right up front
on the LCD panel is the Pose Filter button, and one click pops up an entry eld that lets you type in tags such as “sitting,” “standing,” “kneeling,” or the names
of any pose makers you’ve installed in that HUD (presuming their name is part of the pose name). Enter the tag and hit the Return key, and instantly nd
all poses that have that word or part of word in their name. To maximize the power of this feature, consider spending some time renaming poses to give all
your poses tags that match what you personally search for. is can be “male” or “female,” “adult,” “pg,” “Del May,” “Purple,” etc.
Of course, you can always do it the old-fashioned way: in the Nearby Chat window, and type /43 followed by your tag word, then press the Enter key. By the
way, lter searches are not case sensitive.
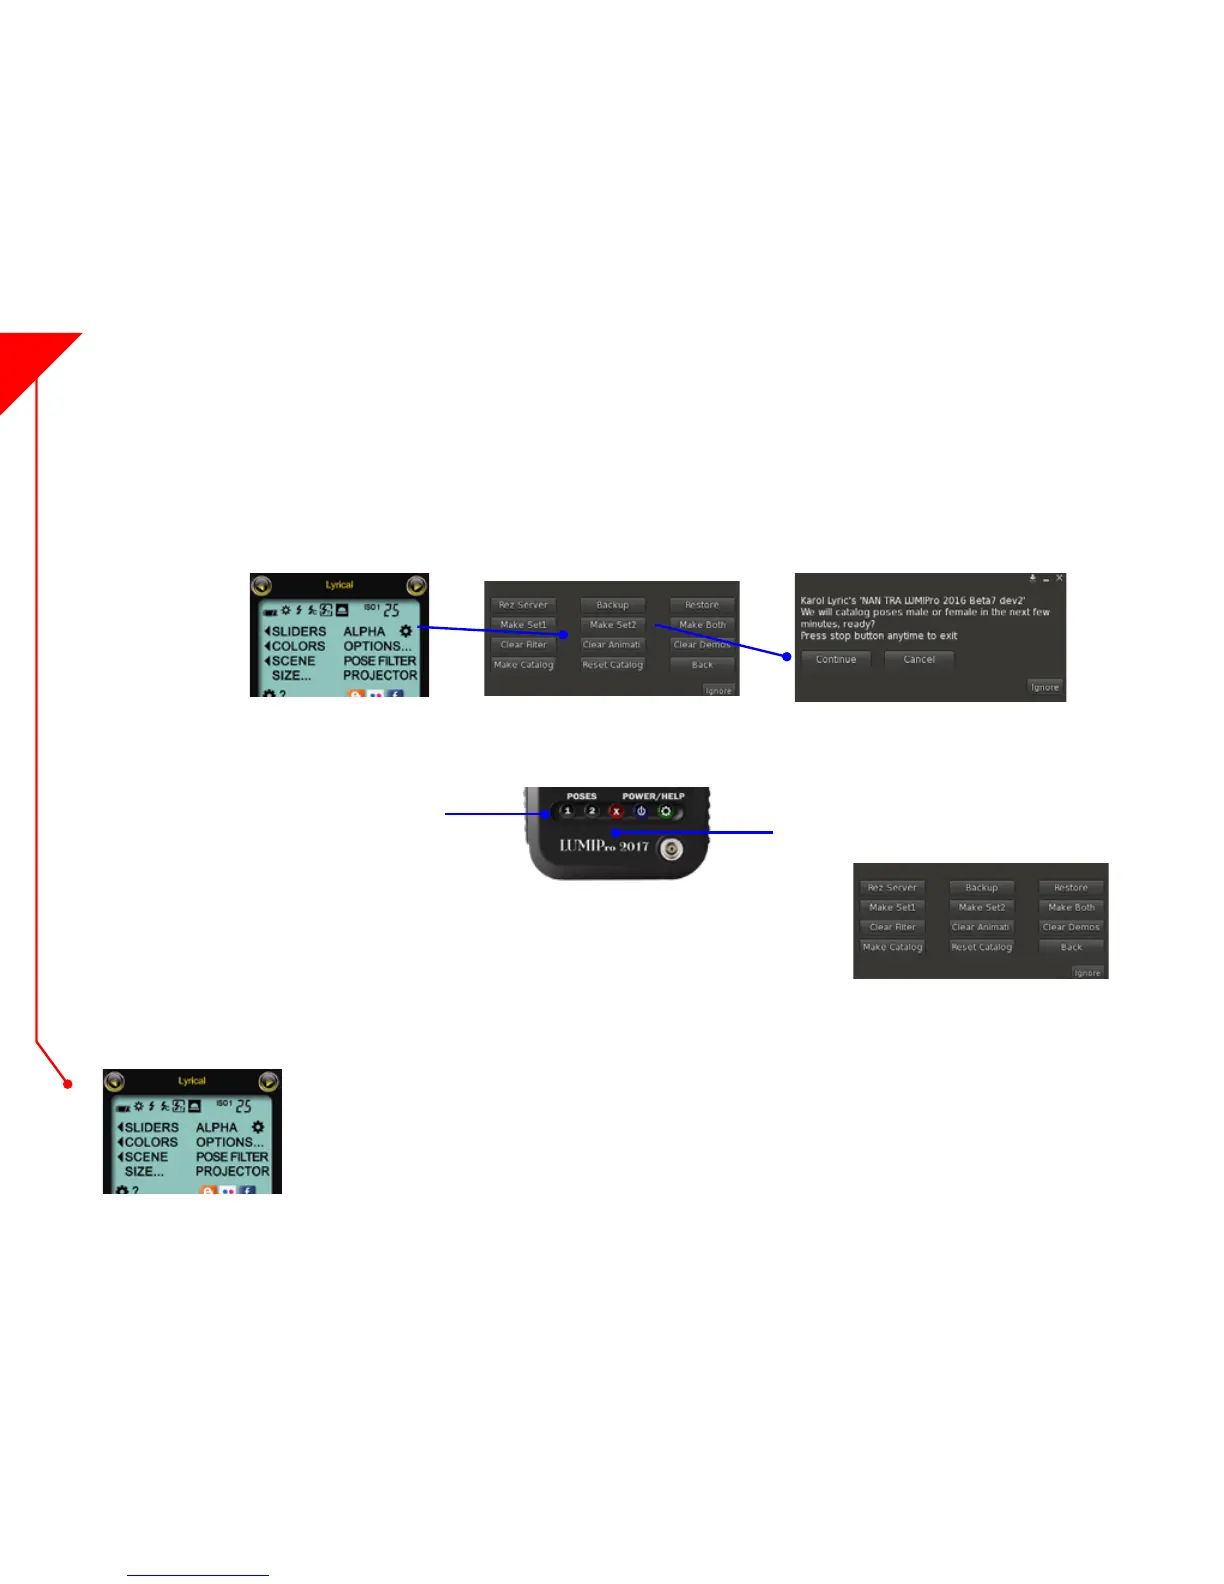
1. Click on Options... in the LCD Control Panel, then click on Catalog. is will open the conrmation dialog. Open a local chat window before clicking Continue, as all
messages will be coming in that way. When ready, click Continue. You will be placed in the rst pose in your HUD - generally, the **AdjLights pose. In the chat window
there will be something similar to the following message: “Pose 1 of 84: **AdjLights. Touch Group1 or Group2.” Decide which group you want this pose to belong to by
clicking either Group 1, Group 2, or click between the two buttons to assign that pose to both groups.
2. As you assign each pose, you will automatically be placed in the next pose and again asked to assign the pose to the de-
sired group. is will continue for all your poses, until at the end, the Pose menu will pop up for you to review your poses.
at’s it! Your poses are now cataloged. To use only Group 1, click the 1 button, and as you cycle through your poses, only
those from Group 1 will appear. You can switch to Group 2 or Both at any time by clicking the Group 2 button, or between
Group 1 and Group 2.
Click “1” to assign to Group 1
Click “2” to assign to Group 2
Click between “1” and “2” to assign to both
To halt the cataloging process, click the red
Stop button on the Power Strip
NEW!