120 M32 - Digital Console User Manual 121
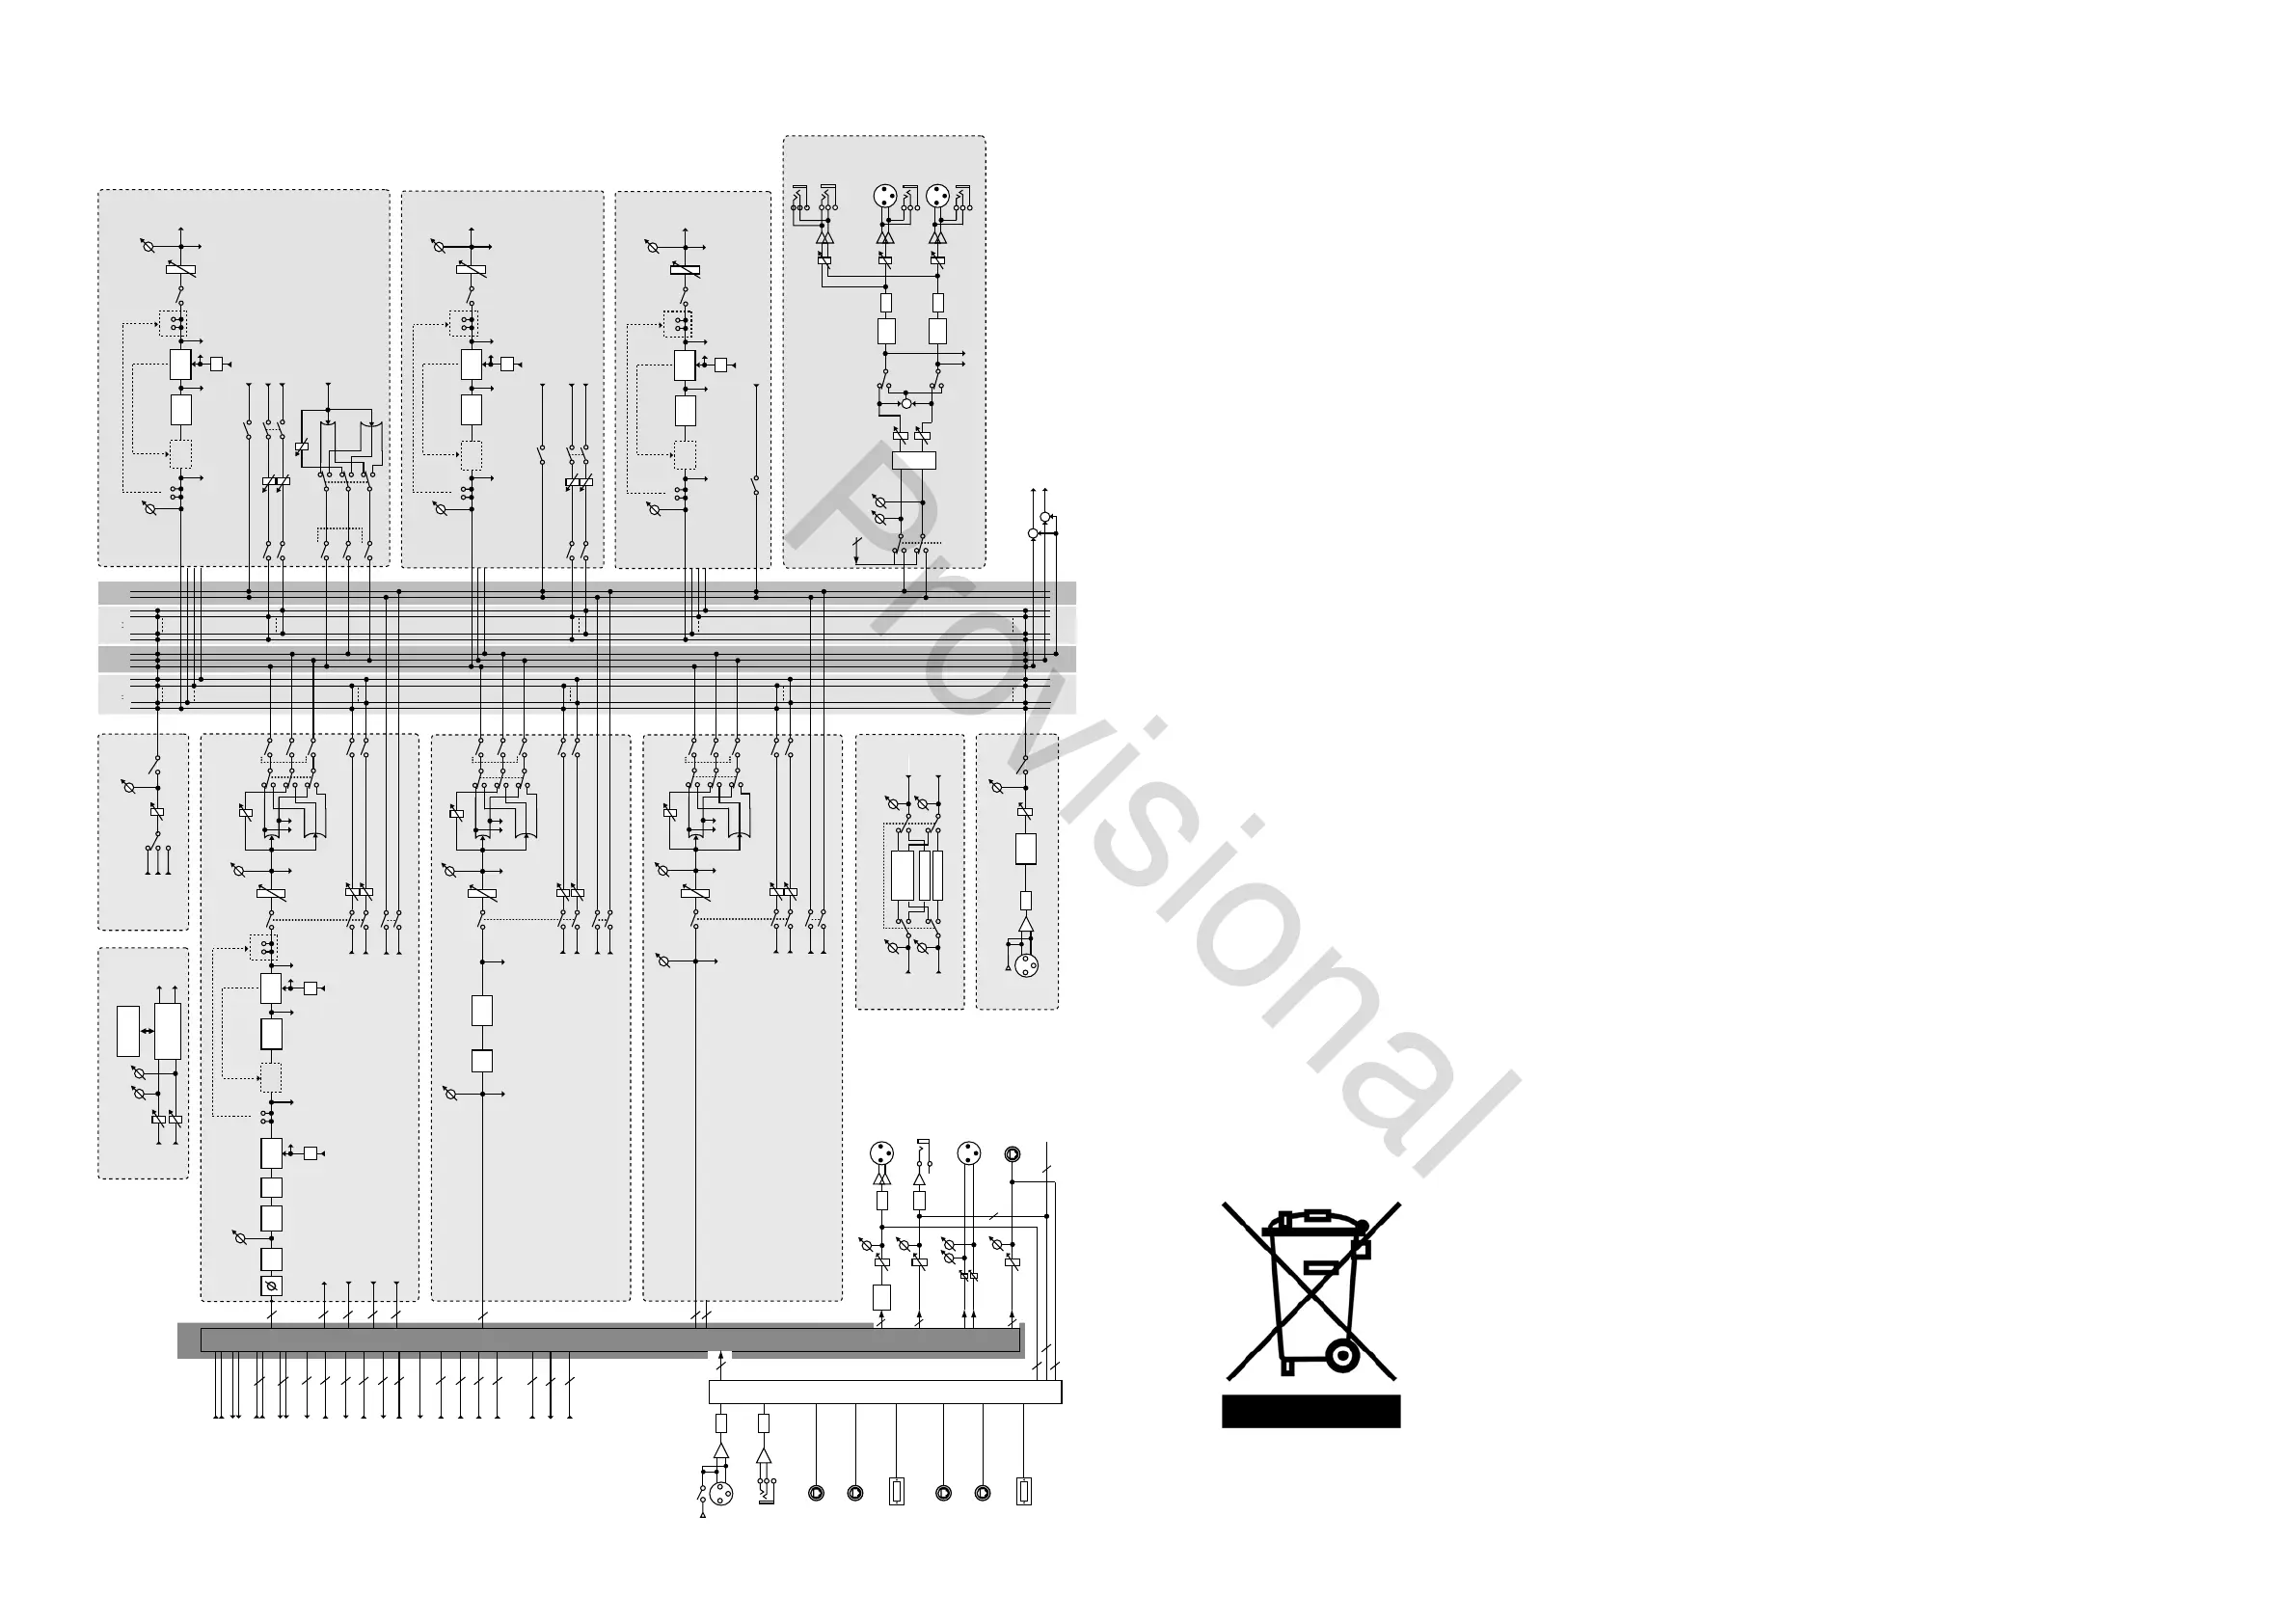
Appendix C: Block Diagram
MAIN
L R C L R
SOLOMATRIX
1 2 5 6
MIX BUS
1 2 15 16
FADER
MIX 1–16
INSERT
6-BAND
EQ
INSERT
COMP/
EXPAN
KEY-IN
Pre EQ Post EQ
EQ
Pre Fader
Post Fader
Matrix 1,3,5
MUTE
MUTE
SOLO
Post Fader
Post Fader
Post Fader
Post Fader
Matrix 2,4,6
MIX 1-16
OUT
EFFECTS 1-8
EFFECT
31 BAND GEQ
31 BAND GEQ
FX OUT L
FX OUT R
FX IN L
FX IN R
USB
PLAY
USB
REC
USB RECORDER
REC
LEVEL
USB
MEMORY
USB MEMORY
RECORDER
L+C/R+C MIX
L+C OUT
R+C OUT
+
+
DSP
PATCH
USB
PLAY
USB
REC
FX 1-8 OUT (L / R)
FX 1-8 IN (L / R)
6
16
8 x 2
8 x 2
16
16
MIX 1-16 OUT
MAIN LRC INSERT RETURN
MATRIX 1-6 INSERT RETURN
6
6
MATRIX 1-6 OUT
3
3
3
MAIN LRC OUT
3
MAIN LRC PRE EQ OUT
PATCH CUE
MONITOR LR OUT
2
2
2
MONITOR SOURCE IN
8
AUX Returns 1–8
AUX Returns 7–8 by default on USB Play
Pre EQ
Pre EQ/Pre Fader/Post Fader/Post Pan L
Pre EQ/Pre Fader/Post Fader/Post Pan R
Pre Fader
Mix 1,3...15
Mix 2,4...16
SOLO
4BAND
EQ
ATT
Pre EQ/Pre Fader/Post Fader/Post Pan L
Pre EQ/Pre Fader/Post Fader/Post Pan R
MUTE
MUTE
FADER
LCR
PAN (LR)
PAN (LCR)
GAIN
Post Fader
Post Pan
GAIN
32
32
32
32
32
ATT
CH 1–32
LOW
CUT
GATE/
DUCK
INSERT
4-BAND
EQ
INSERT
COMP/
EXPAN
DELAY
KEY-IN
Pre EQ Post EQ
EQ
Pre Fader
Mix 1,3...15
Mix 2,4...16
Pre HP/Pre Gate/Post Gate/Pre EQ/Post EQ/Pre Fader/Post Fader/Post Pan L
Pre HP/Pre Gate/Post Gate/Pre EQ/Post EQ/Pre Fader/Post Fader/Post Pan R
KEY-IN
EQ
Pre HP/Pre Gate/Post Gate/Pre EQ/Post EQ/Pre Fader/Post Fader/Post Pan L
Pre HP/Pre Gate/Post Gate/Pre EQ/Post EQ/Pre Fader/Post Fader/Post Pan R
SOLO
INSERT RETURN
INSERT SEND
PRE LOW CUT OUT
POST FADER OUT
MUTE
MUTE
FADER
LCR
PAN (LR)
PAN (LCR)
GAIN
Post Fader
Post Pan
GAIN
COMP/
EXPAN
8 x 2
STEREO FX RETURNS 1 L/R – 8 L/R
Pre Fader/Post Fader/Post Pan L
Pre Fader/Post Fader/Post Pan R
Pre Fader
Mix 1,3...15
Mix 2,4...16
SOLO
Pre Fader/Post Fader/Post Pan L
Pre Fader/Post Fader/Post Pan R
MUTE
MUTE
FADER
LCR
PAN (LR)
PAN (LCR)
GAIN
Post Fader
Post Pan
GAIN
WHITE NOISE
PINK NOISE
OSCILLATOR
SINE WAVE
GENERATE
GAIN
COMP/
EXPAN
LCR
PAN (LR)
PAN (LCR)
GAIN
GAIN
FADER
MATRIX
1-6
INSERT
INSERT
KEY-IN
Pre EQ Post EQ
EQ
Pre Fader
Post Fader
MUTE
SOLO
MATRIX 1-6
OUT
Post Fader
COMP/
EXPAN
EQ
6BAND
COMP/
EXPAN
FADER
MAIN LRC
INSERT
6BAND
EQ
INSERT
COMP/
EXPAN
KEY-IN
Pre EQ Post EQ
EQ
GAIN
Pre Fader
Post Fader
Matrix 1,3,5
MUTE
MUTE
SOLO
Post Fader
Post Fader
Post Fader
Matrix 2,4,6
MAIN LRC
OUT
COMP/
EXPAN
mute
mute
mute
mute
mute
mute
mute
mute
mute
stereo
mono
stereo
mute
stereo
mono
stereo
stereo
mono
stereo
stereo
mono
stereo
TALKBACK
COMP
ON
GAIN
+48V
A/D
GAIN
+
MONO
MONITOR LR OUT
DELAY
DELAY
MONITOR
D/A
PHONES
OUT
MONITOR L
OUT
D/A
MONITOR R
OUT
SOLO / SOURCE
MONITOR SOURCE IN
DIM
2
GAIN
GAIN
GAIN
PHONES
OUT
Revision 1, 2014-06-27, JD
Midas M32 Block Diagram
P16 BUS
(16ch)
D/A
OUT 1-16
D/A
AUX OUT 1-6
DELAY
GAIN
GAIN
GAIN
AES/EBU OUT
GAIN
16
6
16
6
MONITOR LR OUT
2
16
16
8
I/O
PATCH
A/D
(1-32)
AES-50 A
(48ch IN)
AES-50 B
(48ch IN)
SLOT
(32ch IN)
AES-50 A
(48ch OUT)
AES-50 B
(48ch OUT)
SLOT
40
+48V
PHANTOM
A/D
Appendix D: Service Information
This appendix contains routine service information for the M32 Digital Console.
Routine Maintenance
To help keep your M32 Digital Console unit in good working order and to make sure it gives you optimum performance, we
recommend that you carry out the following about once every month.
• Clean the control centre, as detailed in ‘Cleaning the control centre’ (below)
• Check controls for freedom of operation. As the controls are ‘self-cleaning’, this operation will help to prevent
them from sticking
• Check the functionality of all controls, that is, control knobs, faders, pushbuttons, LEDs, etc.
• Check the functionality of equipment.
Cleaning The Control Centre
Switch o the control centre and electrically isolate it from the mains before cleaning.
Clean the control centre using a dry, lint-free cloth. Do not use harsh abrasives or solvents. When cleaning the equipment,
take great care not to damage faders, pushbuttons etc.
Cleaning a GUI Screen
Switch o the control centre and electrically isolate it from the mains before cleaning.
Carefully wipe the surface of the GUI screen with a soft, lint-free cloth or screen wipe specially designed for the purpose.
When cleaning the GUI screen, observe the following precautions:
• Avoid putting pressure on the screen
• Don’t use harsh abrasives, for example, paper towels
• Don’t apply liquids directly to the screen
• Don’t use ammonia-based cleaners and solvents, such as acetone.
If you are in doubt or have any queries about cleaning the GUI screens, contact MIDAS Technical Support.
Equipment Disposal
When this equipment has come to the end of it useful life, its disposal may come under the DIRECTIVE 2012/19/EU OF THE
EUROPEAN PARLIAMENT AND OF THE COUNCIL of 27 January 2003 on waste electrical and electronic equipment (WEEE).
Hazardous substances in WEEE contaminate water, soil and air and ultimately put at risk our
environment and health. The directive aims to minimize the impacts of WEEE on the environment
during their lifetimes and when they become waste.
The WEEE directive addresses the disposal of products when they have reached the end of their life
and contributes to the reduction of wasteful consumption of natural resources. This will help to
reduce pollution, and protect the environment and ourselves.
If this equipment carries a ‘crossed-out wheelie bin’ (shown left), please do not dispose of WEEE
as unsorted municipal waste but collect and dispose of in accordance with local WEEE legislation. The horizontal bar
underneath indicates that the product was placed on the EU market after 13th August 2005.
For WEEE disposal see our website at midasconsoles.com for information.
www.theaudiospecialists.eu