5Maintenance and Inspection
Maintenance and inspection procedures 5-71
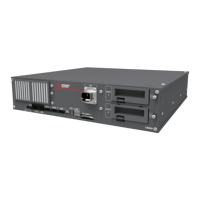
(1) The battery exchange method of the CR750 controller
Fig. 5-2 : Exchange of the battery (CR750 controller)
1) Turn the controller power ON once. (For approx. one minute.)
2) Turn OFF the power supply of the controller and open the interface cover on the front of the controller. The
battery is in the interface cover.
3) Pick and pull up the connector of the old battery and remove from battery holder.
4) Fix the new battery into the battery holder. Install so that the lead may come out to the front.
5) Connect the connector of the new battery cable. Connect so that the red lead may become left-hand side.
Complete the work within 3 minutes after removing the old battery.
6) Close the interface cover of the operation panel certainly.
7) Refer to the separate manual "Detailed Explanation of Functions and Operations", and reset the battery
cumulative time over alarm.
[Caution] If the old battery is replaced because it has been used up, it is necessary to set the origin again. Refer
to the separate "Robot arm setup, basic operation, and maintenance" and reset the origin.
This completes the replacement of the controller battery.
バッテリ
USBインタフェース
バッテリコネクタ
バッテリホルダ
操作パネル
インタフェースカバー
Interface cover
Operation panel
Battery connector
Battery
Battery holder
USB interface
 Loading...