Do you have a question about the Mitsubishi CR751-D and is the answer not in the manual?
Provides an overview of controller setup, basic operation procedures, and maintenance guidelines for the robot.
Ensures operators receive training and prepare work plans for safe operation.
Guidelines for installing emergency stop switches and safety fences to prevent accidents.
Procedures for safe operation signaling and indications during teaching or maintenance.
Safe usage within specified environments and proper transportation postures.
Safe wiring practices, grounding requirements, and indicating robot operation status.
Secure handling of workpieces and tools, and safety during teaching operations.
Caution against unauthorized modifications and use of designated parts only.
Ensuring priority control during teaching and maintaining safe jog speeds.
Verifying program operation and ensuring safety fence door interlocks.
Safety measures for hand placement during robot arm movement.
Avoid turning off main power during operation or data rewriting.
Use manufacturer-confirmed network equipment and implement noise measures.
Install an earth leakage breaker for leakage protection of the controller.
Explains the purpose and usage of various manuals included with the product.
Guidance on installing an emergency stop switch for immediate robot halting.
Synchronizing additional axis servo ON/OFF status with the robot arm.
Signals for controlling program start, stop, and error reset.
Signals for program selection (PRGSEL) and speed override (OVRDSEL).
Signals for outputting current line number (LINEOUT) and error number (ERROUT).
Signals for turning the servo power ON (SRVON) and OFF (SRVOFF).
Defines hazard symbols (DANGER, WARNING, CAUTION) and their safety implications.
Explains notation for key combinations and special operation symbols.
Ensures operators receive training and prepare work plans for safe operation.
Guidelines for installing emergency stop switches and safety fences to prevent accidents.
Procedures for safe operation signaling and indications during teaching or maintenance.
Safe usage within specified environments and proper transportation postures.
Safe wiring practices, grounding requirements, and indicating robot operation status.
Secure handling of workpieces and tools, and safety during teaching operations.
Caution against unauthorized modifications and use of designated parts only.
Ensuring priority control during teaching and maintaining safe jog speeds.
Verifying program operation and ensuring safety fence door interlocks.
Safety measures for hand placement during robot arm movement.
Avoid turning off main power during operation or data rewriting.
Proper handling of SSCNETIII cable, including cap installation and light exposure.
Verify that all standard configuration parts are included with the product.
Information on how the controller is shipped from the factory.
Instructions on how to safely lift and transport the controller.
Specifies required clearances for horizontal and vertical controller installation.
Measures to prevent toppling and ensure adequate ventilation for heat dissipation.
Specifies required clearances for horizontal and vertical controller installation.
Measures to prevent toppling and ensure adequate ventilation for heat dissipation.
Connecting the primary power supply to the ACIN terminal for single/three phase.
CE specification requirements for noise filter and cable fixing notes.
Using an earth leakage breaker and connecting the ACIN terminal with noise filter.
Connecting secondary power and grounding cables to controller terminals.
Mandates using a double contact-type switch for duplicated emergency stop circuits.
Details terminal connections for external emergency stop, door, and enabling devices.
Guidance on using shield cables and installing ferrite cores for noise reduction.
Ensures wiring accuracy and checks emergency stop functionality without AND conditions.
Connects peripheral emergency stop switch using controller power supply.
Uses controller's 24V power for peripheral emergency stop input.
Connects E-stop, door switch, and enabling device using peripheral power.
Interlocks emergency stop states between two controllers.
Connects controller's E-stop command as input to a safety relay.
Connects peripheral emergency stop switch using controller power supply.
Uses controller's 24V power for peripheral emergency stop input.
Connects E-stop, door switch, and enabling device using peripheral power.
Interlocks emergency stop states between two controllers.
Interlocks emergency stop states between two controllers.
Connects controller's E-stop command as input to a safety relay.
Specifies 2-contact switches and limit switch installation for safety.
Classifies faults into minor/major and provides corresponding wiring.
Details switch contact capacity, cable length limits, and noise mitigation.
Specifies recommended wire gauges (AWG) for various controller connectors.
Specifies maximum relay coil current and potential fuse activation.
Specifies maximum relay coil current and potential fuse activation.
Lists part numbers for consumable items like batteries and filters.
Lists the part number for the controller's spare fuse.
Provides a schedule for daily, monthly, and yearly maintenance inspections.
Lists daily inspection points and corresponding remedies for the controller.
Lists periodic inspection points and remedies, including monthly and yearly checks.
Guidelines for periodic battery replacement and related error codes.
Step-by-step instructions for replacing the battery in the CR750 controller.
Cautions during replacement, including time limits and resetting the origin.
Locating the battery within the filter cover and handling precautions.
Step-by-step instructions for replacing the battery in the CR751 controller.
Procedure for removing, cleaning, or replacing the filter cover and filter in CR750.
Procedure for removing and re-attaching the filter cover and filter in CR751.
Lists part numbers for consumable items like batteries and filters.
Lists the part number for the controller's spare fuse.
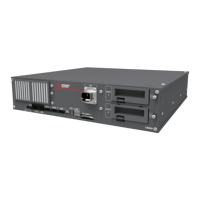
Identifies controller parts and explains their functions.
Covers T/B installation, removal, and key functions.
Details on how to safely turn the controller power on and off.
Manual robot arm movement using the teaching pendant's jog functions.
Controlling the robot hand and the process of creating programs.
Identification of connectors, switches, and indicators on the CR750 controller.
Details on ACIN terminals for power input and PE terminals for grounding.
Description of the layout and function of the operation panel buttons.
Detailed explanation of ACIN and PE terminal connections.
Description of various connectors (Machine, T/B, CNUSR) and mode key switch.
Details on option slots, interface cover, and operation panel components.
Information on USB, LAN, and ExtOPT connectors for connectivity.
Explains operation rights and how control is managed among connected devices.
Identification of front panel elements including connectors, lamps, and controls.
Identification of rear panel components like exhaust fan and motor connectors.
Information on USB, LAN, ExtOPT, and RIO connectors for connectivity.
Cautions for network equipment, including compatibility and noise reduction.
Step-by-step guide for installing and removing the teaching pendant on CR750.
Precautions for handling the T/B cable and using the dummy connector.
Procedure for connecting and securely fastening the T/B on the CR751 controller.
Procedure for removing the T/B and using the dummy connector on CR751.
Functions of the emergency stop and enable/disable switches on the pendant.
Explanation of the LCD display, function keys (F1-F4), and operation keys.
Functions of character input, editing, and reset keys.
Essential safety checks to perform before turning on controller power.
Procedure for turning on the controller power using the POWER switch.
Procedure for turning on the controller power using an external breaker.
Addresses issues like unlit operation panel or non-functional T/B.
Explains main, control, and servo power supply functions.
Procedure to input the robot arm serial number to resolve C0150 error.
Detailed steps for entering the robot arm serial number into the RBSERIAL parameter.
Procedures for stopping the robot and shutting off the controller's control power.
Steps to turn on the robot's servo power, including confirmation checks.
Steps to turn off the robot's servo power after stopping operation.
Explains different robot arm movement modes for precise positioning.
How to use the teaching pendant to open and close the robot's hand.
Determining the order of robot movements and actions for a task.
Understanding path planning for joint and linear movements to avoid interference.
Guidelines for naming robot positions using variable names like PWAIT.
Using jog operation to set and teach robot positions.
Translating robot operations into executable commands like Mov, Mvs, Hopen.
Details the structure of program commands, including step numbers and parameters.
Specifies how to designate direction (+/- signs) along the Z-axis for movements.
Setting controller mode and enabling the teaching pendant for input.
Steps to access menus and display the new program creation screen.
Entering sequential step numbers and robot commands into the program.
Switching between number and character input modes for program entry.
Entering defined position variable names into the program.
Moving between program lines using T/B navigation keys.
Using jog modes to precisely set and teach robot positions.
Accessing position edit screen and registering taught coordinates.
Running the program one line at a time to verify movements and positions.
How to stop the robot immediately and resume operation safely.
Example of changing a joint movement command to a linear movement command.
Utilizing the jump function to navigate to specific program lines for editing.
Modifying parameters such as position values or delays within commands.
Example procedure for correcting the robot's standby position.
How to navigate and select saved position variables using T/B keys.
Confirming and registering changes made to robot positions.
How the program is saved upon completion of editing or correction.
Essential checks before automatic operation to prevent damage or injury.
Setting controller to AUTOMATIC mode and adjusting operation speed.
Using the CHNG DISP button to select the correct program for automatic operation.
Steps to start automatic operation, turn servo on, and execute a single cycle.
Provides a schedule for daily, monthly, and yearly maintenance inspections.
Lists daily inspection points and corresponding remedies for the controller.
Lists periodic inspection points and remedies, including monthly and yearly checks.
Guidelines for periodic battery replacement and related error codes.
Step-by-step instructions for replacing the battery in the CR750 controller.
Cautions during replacement, including time limits and resetting the origin.
Locating the battery within the filter cover and handling precautions.
Step-by-step instructions for replacing the battery in the CR751 controller.
Procedure for removing, cleaning, or replacing the filter cover and filter in CR750.
Procedure for removing and re-attaching the filter cover and filter in CR751.
Lists part numbers for consumable items like batteries and filters.
Lists the part number for the controller's spare fuse.
| Model | CR751-D |
|---|---|
| Manufacturer | Mitsubishi |
| Type | Controller |
| Input/Output | Digital I/O |
| Power Supply | AC 200-230V |
| Control Axes | 8 |