Do you have a question about the Pixsys ATR144 and is the answer not in the manual?
Lists general specifications like display type, operating conditions, sealing, materials, and weight.
Details the controller's hardware specifications, including analogue inputs, relay/SSR outputs, and power supply.
Describes software-related features such as regulation algorithms, proportional band, integral/derivative time, and controller functions.
Explains the different methods available for programming the controller, including keyboard, software, and app.
Illustrates wiring for ATR144-ABC and ATR144-ABC-T models, showing connections for inputs and outputs.
Details the power supply connection specifications for the controller, including voltage range and insulation.
Explains the connection procedures for various analogue input types, including thermocouples and thermoresistances.
Provides visual examples for connecting linear inputs, covering 0..10V, 0/4..20mA three-wire, and two-wire sensors.
Describes how to enable and connect digital input 1, specifying the pin connections.
Explains the configuration and connection for digital input 2, noting its availability constraints.
Details the RS485 serial communication setup for the ATR144-ABC-T model, including protocol and cable recommendations.
Explains the configuration and function of the digital output, including its voltage and current range.
Describes the specifications and capacity of the Q1 relay output, including electrical endurance.
Outlines the specifications and capacity of the Q2 relay output (specific to the ABC model) and its life expectancy.
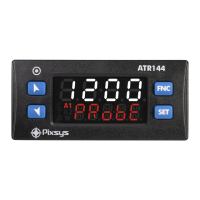
Describes the purpose and display behavior of the numeric indicators (Display 1 and Display 2) during normal operation and configuration.
Explains the meaning of each status LED indicator (C, A1, A2, T, M, R) on the controller.
Details the function of each key (Up, Down, SET, FNC) for navigation and operation.
Explains how to modify the main and alarm setpoint values using the keyboard.
Describes the automatic tuning procedure for optimizing PID parameters and the associated LED indication.
Details the manual tuning procedure, its activation methods (keyboard, digital input, serial), and how to avoid overshoot.
Explains the configuration for executing autotuning only once at the next controller restart.
Describes synchronized tuning for multi-zone systems and its operation via Modbus word 1210.
Lists and explains various functions that can be enabled via digital inputs, such as setpoint modification and start/stop control.
Explains how to switch between automatic and manual control of the output percentage, including two selection modes and behavior on power failure or sensor break.
Describes the Loop Break function for detecting control loop failures, including alarm generation and parameter settings.
Details how to configure the controller for combined heating and cooling actions, including parameter settings for PID control.
Explains the LATCH ON function for associating scale values with sensor positions and setting a virtual zero point.
Describes the two types of soft-start functions (gradient and percentage) and their configuration parameters.
Details the pre-programmed cycle function, its activation, and the sequence of setpoints and maintenance times.
Explains how to configure the controller as a Modbus RTU Slave for supervisory systems, including addressing and baud rate.
Explains how the device operates in Master mode for serial communication.
Details the master mode for retransmitting values to slaves, including target address, baud rate, and variable selection.
Describes enabling remote process reading and rescaling of values.
Explains how to use the master mode for reading current transformer data and displaying RMS current.
Details configuring the device as an ammeter using a current transformer.
Describes the procedure for restoring the device to its factory default settings.
Explains how the dynamic parameter list works and how to view parameter descriptions and switch between mnemonic/numeric views.
Lists configuration parameters related to Analogue Input 1, covering sensor selection and input types.
Lists parameters for controlling outputs and regulation of Process 1, including command output types.
Lists parameters related to autotuning and PID control for Process 1, including tune types and PID settings.
Details parameters for Alarm 1, covering its function, state, hysteresis, limits, and reset types.
Lists parameters for Alarm 2, including its function, state output, hysteresis, limits, and reset.
Lists parameters for configuring Digital Input 1, including its functioning modes and contact types.
Details parameters for Digital Input 2, covering its functioning modes and contact types.
Lists parameters for soft-start and pre-programmed cycle functions, including gradient and percentage settings.
Covers parameters related to display filters, visualization modes, and timeout settings.
Details parameters for the Loop Break function, including state, time, and band settings.
Lists parameters for serial communication in Slave mode, including Modbus Slave, address, baud rate, and port format.
Details parameters for Master Serial Port operation, including Modbus Master and target address.
Lists parameters related to Timer 1 and Timer 2, covering their enabling, time base, and action types.
Describes absolute alarms that activate when the process value exceeds or falls below a set threshold.
Explains absolute alarms that are referred to the command setpoint and activate based on deviation.
Details band alarms, where activation occurs when the process value falls within or outside a defined band.
Describes asymmetric band alarms, which have different activation thresholds for the upper and lower bands.
Explains upper deviation alarms that trigger based on the difference between process value and setpoint.
Details lower deviation alarms, which trigger when the process value deviates below a specified limit.
Lists predefined messages displayed for different alarm selections, allowing user personalization.
| Brand | Pixsys |
|---|---|
| Model | ATR144 |
| Category | Controller |
| Language | English |