13.2 Replacing the diaphragm
WARNING!
A few cubic centimetres of feed chemical may have accumu‐
lated behind the metering diaphragm in the backplate fol‐
lowing a leak - depending on the design!
– Take this feed chemical into consideration when you are
planning a repair - especially if it is hazardous!
Personnel:
n
Technical personnel
n If necessary take protective measures.
n Adhere to the safety data sheet for the feed chemical.
n Ensure that the system is at atmospheric pressure.
1. Empty the liquid end (turn the liquid end upside down and allow the
feed chemical to run out; flush out with a suitable medium; flush the
liquid end thoroughly when using hazardous feed chemicals!)
2. Turn the stroke adjustment dial up to the stop below 0 % stroke
length if the pump is running (the drive axle is then difficult to turn).
3. Switch off the pump.
4. Unscrew the hydraulic connectors on the discharge and suction
side.
5. For types with coarse/fine bleed valve: Firstly remove the coarse/
fine bleed valve (knob), then lift off the cover of the liquid end with a
screwdriver.
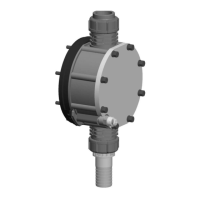
Fig. 32: Partially exploded view of liquid end
1 Screws
2 Dosing head
3 Diaphragm
4 Backplate
5 Safety diaphragm
6 Pump housing
6. Remove the screws (1).
7. Take the dosing head (2) plus screws (1) off from the pump - see
figure Fig. 32
8. Replace the dosing head (2) and screws - the screws (1) should still
extend into the holes in the diaphragm (3), but not into the pump
housing!
9. Hold the pump housing (6) with one hand and clamp the diaphragm
(3) with the other hand between the dosing head (2) and the back‐
plate (4).
10. Loosen the diaphragm (3) from the drive axle with a gentle back‐
wards turn of the dosing head (2), diaphragm (3) and backplate (4)
in an anticlockwise direction.
Repairs
77
 Loading...
