Do you have a question about the Samsung ML-451 Series and is the answer not in the manual?
Covers general safety, electrical, handling, assembly, and ESD precautions to prevent injury and damage.
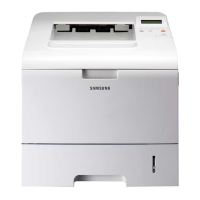
Overview of printer specifications including speed, resolution, processor, memory, and interfaces.
Overview of printer specifications including speed, resolution, processor, memory, and interfaces.
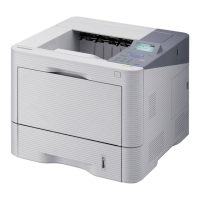
Comprehensive technical specifications covering general, print, paper handling, software, and network details.
Comparison table of Samsung ML-5010ND, ML-4551ND, and HP LJ-P4014 models.
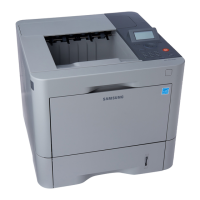
Diagrams and labels identifying the front and rear components of the printer.
Diagrams and labels identifying the front and rear components of the printer.
Illustrations of the paper path and internal layout of major printer components.
Details on paper feeding mechanisms, trays, pickup, registration, and multi-purpose feeder.
Details on paper feeding mechanisms, trays, pickup, registration, and multi-purpose feeder.
Overview diagrams of the paper feeding system for ML-451x/501x series.
Detailed diagram and list of main paper feeding components and their functions.
Description and specifications of the main and optional paper trays.
Explanation of the pick-up unit's mechanism for transporting paper.
Details on the registration unit, its function, and variance specifications.
Specifications and function of the multi-purpose feeder unit for specialty media.
Explanation of the printer's image creation process and imaging unit.
Overview of the printing process steps from charging to quenching.
Detailed overview of the imaging unit components and their functions.
Overview, components, drive, and temperature control of the fuser unit.
Overview of the fuser unit, its instant fusing system, and temperature control components.
Description of the main components of the fuser unit, including lamps, rollers, and sensors.
Explanation of the drive mechanism that powers the fuser unit's components.
Details on how the fuser unit's temperature is controlled and overheat protection mechanisms.
Overview of the LSU's components, function, and optical path.
Overview of the LSU's components and function in forming a latent image.
Diagram and explanation of the laser beam's path within the LSU.
Description of drive motors, main drive unit, exit drive, and tray lifting drive.
Diagrams showing the locations of the printer's drive motors.
Diagrams of the main drive unit components and their couplings.
Diagram and power train explanation for the exit drive unit.
Diagram and power train explanation for the tray lifting drive unit.
Overview of the printer's electrical circuit system, major boards, and their configurations.
Details on the main controller's architecture, memory, and connectivity.
Description of the OPE controller types and their interfaces.
Information on the SMPS and FDB boards, including specifications and connections.
Details of the HVPS board and its connections for generating high voltages.
Information on Eraser PBA, Cover-Open PBA, Joint PBA, and Crum Joint PBAs.
Description of the finisher unit, its configuration, layout, electrical parts, and main board.
Overview of the finisher's 6 main units and their functions.
Diagram showing the cross-sectional view and paper path within the finisher.
Diagrams showing the location of electrical parts like sensors and motors in the finisher.
Diagram and connection information for the finisher's main board.
Description of the mailbox unit, its layout, electrical parts, and main board.
Diagram showing the cross-sectional view of the mailbox and its numbered components.
Diagrams showing the location of electrical parts like sensors and motors in the mailbox.
Diagram and connection information for the mailbox's main board.
Essential precautions for handling parts, PBAs, screws, and for safe disassembly/assembly.
Guidelines for safely disassembling and assembling the printer, noting screw types and parts.
Precautions for handling Printed Circuit Board Assemblies (PBAs) to prevent damage.
Instructions on how to carefully release parts held by plastic latches.
A comprehensive list of screws used in the printer, detailing part code, location, and quantity.
Step-by-step instructions for replacing the fuser unit, including safety cautions.
Step-by-step instructions for replacing the fuser unit, including safety cautions.
Procedure for removing the pick-up and forward rollers.
Procedure for removing the transfer roller after opening the front cover.
Step-by-step guide to removing the printer covers for accessing internal components.
Step-by-step guide to removing the printer covers for accessing internal components.
Procedure for removing and replacing the main board.
Procedure for removing the SMPS and FDB boards.
Procedure for removing the HVPS board.
Procedure for removing the Laser Scanning Unit (LSU).
Step-by-step guide to disassembling the pick-up assembly, including its sub-parts.
Procedure for removing the finisher covers and staple cartridge.
Procedure for removing the finisher covers and staple cartridge.
Instructions for removing the stapler assembly.
Instructions for removing the tamper assembly and related sensors/motors.
Step-by-step guide to disassembling the mailbox unit.
Describes functions for service, maintenance methods, and test outputs.
Overview of the printer's control panel buttons and their functions for different models.
Explanation of the meaning of different LED colors and patterns to indicate machine status.
Detailed instructions for removing paper jams from various locations in the printer.
Procedure for clearing paper jams from Tray 1.
Procedure for clearing paper jams from optional trays.
Steps for removing paper jams located inside the printer, with cautions for the imaging unit.
Steps to clear paper jams located in front of the finisher.
Procedure for clearing paper jams located inside the finisher.
Procedure for clearing paper jams in front of the multi-bin mailbox.
Steps to clear paper jams located inside the multi-bin mailbox.
Information on accessing menu items for monitoring supplies and setting toner low alerts.
Guide to identifying and resolving image defects caused by faulty or damaged rollers.
Instructions for using Samsung Easy Printer Manager and Samsung Printer Status.
Guide to using the Easy Printer Manager application for managing printer settings.
Instructions for using the Samsung Printer Status application to monitor machine status.
Guide to using the Smart Panel application for monitoring and customizing settings.
Instructions for updating the printer firmware using USB or network methods.
Step-by-step guide for updating printer firmware via a USB connection.
Instructions for updating printer firmware using the network via web browser.
Information on entering and using the printer's service (Tech) mode.
Steps to enter the Tech Mode for ML-451x/5010/5012 and ML-5015/5017 series.
Overview of the Tech Mode menu structure for different printer models.
Detailed descriptions of the functions and options available within the Tech Mode menu.
A comprehensive list of error codes, messages, and corresponding troubleshooting pages.
Flowchart for diagnosing printer issues starting from power on and print quality checks.
A checklist of basic steps to perform when troubleshooting printer problems.
A comprehensive list of error codes, messages, and corresponding troubleshooting pages.
Guide to identifying and resolving various image quality issues like lines, bands, and spots.
Description and solutions for vertical black lines or bands in the printed image.
Description and solutions for white vertical lines or voids in the printed image.
Description and solutions for horizontal black bands or stripes in the printing.
Description and solutions for dark or blurry black spots in the printing.
Description and solutions for a light printed image with no ghost.
Description and solutions for a dark or completely black printed page.
Description and solutions for uneven print density between the left and right sides.
Description and solutions for light dark background appearing in the entire print area.
Description and solutions for ghosting occurring at specific intervals in the printing.
Description and solutions for stains appearing on the back of the printed page.
Description and solutions for a blank printed page.
Description and solutions for partial image voids in the printed page.
Troubleshooting for common errors like multi-feeding and no power.
Troubleshooting for the error where multiple sheets of paper are fed at once.
Troubleshooting steps when no lamps on the operator panel illuminate upon power-on.
A block diagram illustrating the main controller and its connected units and interfaces.
Detailed connection diagram showing interconnections between the main board and various components.
Detailed connection diagram showing interconnections between the main board and various components.
Detailed connection diagram illustrating SMPS, FDB, and fan connections.
Detailed connection diagram showing main board connections to USB, JTAG, and other modules.
List of recommended tools for safe and easy troubleshooting of the printer.
Glossary of common printing and networking terminologies used in the manual.
Sample test pattern used for measuring toner cartridge life and printing speed.
Guidelines for selecting an appropriate and safe location for installing the printer.
List of document revisions, including version, date, page, and description of changes.