EasyManua.ls Logo

Scanreco RC400 G3B - User Manual

Scanreco RC400 G3B
48 pages
Print Icon
To Next Page IconTo Next Page
Loading...
Document number
S071
Revision
C
Date
2011-10-17
Document type
Manual
SERVICE MANUAL
Remote Control
System RC400 G2B/G3B

Table of Contents

Question and Answer IconNeed help?

Do you have a question about the Scanreco RC400 G3B and is the answer not in the manual?

Scanreco RC400 G3B Specifications

General IconGeneral
BrandScanreco
ModelRC400 G3B
CategoryRemote Control
LanguageEnglish

Summary

1 General

1.1 Synopsis

Scanreco Remote Control System RC400 G2B/G3B Service Manual, complementing the Instruction Manual for service and fault findings.

1.2 Distribution

Document distribution rule: Internal - Only within own organization.

1.3 Terminology

1.4 Applicable products

1.5 Product identification

2 Preface

2.1 General information

Manual complements crane/machine book for Scanreco RC 400 G2B/G3B, emphasizing safety and system operation.

3 General system description

3.1 General description

Scanreco RC 400 G2B/G3B remote control system for hydraulically driven cranes; digital system with microprocessor technology.

3.2 Schematic overview of Scanreco RC-400 G2 B

3.3 Schematic overview of Scanreco RC400 G3 B

4 Getting started

4.1 Portable Control Unit definition

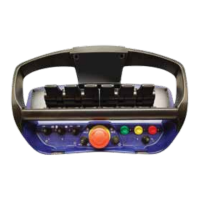
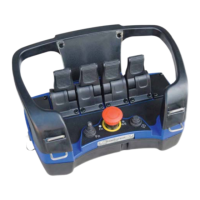
Illustrations defining entities of the Portable Control Unit and how to activate it using the On-button and Stop-button.

4.2 Central Unit G2 B definition

4.3 Central Unit G3 B definition

4.4 Cable or radio communication

4.5 Cable connection schematics

5 Inputs & Outputs

5.1 Analogue functions

Details standard analogue input assignments for MAXI and MINI platforms on the Central Unit, illustrated with diagrams.

5.2 Portable Control Unit MAXI digital inputs

5.3 Portable Control Unit MINI digital inputs

5.4 Digital functions

5.5 Terminal schematics for current controlled Central Unit G2 B

5.6 Terminal schematics for voltage controlled Central Unit G2 B

5.7 Terminal schematics for Central Unit G2 B CAN interface

5.8 Connection schematics for Central Unit G3 B

6 Operational indications

6.1 Central Unit status and operational indications

Explains status indications for Central Unit G2B (external LEDs, LED-display) and G3B (LED-display).

6.2 Central Unit LED-display

6.3 Portable Control Unit status indications

7 Error code indications

7.1 General description

Both PCU and CU have fault monitoring; errors interrupt commands. Errors are indicated by LED Status and LED-display.

7.2 Central Unit error codes

Central Unit outputs are fault monitored. Errors trigger alerts via LED Status and display error codes on LED-display.

7.3 Portable Control Unit error codes

8 Radio

8.1 General description

Radio communication is used as a bus link for data packages between transmitter and receiver, ensuring secure data transfer.

8.2 Determining radio quality

Radio quality determined by external status LED and first 7-segment on LED-display; irregular flashes indicate interruptions.

9 Diagnostics mode

9.1 General description

Diagnostics mode available to diagnose and manage the system, monitor LED-display for error codes, output characteristics and program information.

9.2 Activating diagnostics mode

Step-by-step guide to activate diagnostics mode via PCU, involving battery removal, R/M switch, and toggle actions.

9.3 Table; diagnostics data

9.3.1 Position 1 - Analogue output status

Allows viewing of current status for all analogue outputs, including lever assignments, output start/stop, and ramp values.

9.3.2 Position 2 - Digital output status

9.3.3 Position 3 - Digital input status

9.3.4 Position 4 - Error code log

9.3.5 Position 5 - Program save

9.3.6 Position 6 - Program load

9.3.7 Position 7 - Central Unit program version

9.3.8 Position 8 - Portable Control Unit program version

10 Online Programming mode

10.1 General description

Explains Scanreco RC 400's comprehensive programming possibilities for system constructors, done via the Portable Control Unit.

10.2 Activating online programming mode

10.3 Table; Programming options

10.3.1 Position 01 - Direction

Allows adjustment of lever movement direction (0 or 1). Indicates active output and its direction when a lever is actuated.

10.3.2 Position 02 - Start speed SET1

Adjusts start speed (1-100). Indicates active output and its corresponding start speed when lever is actuated.

10.3.3 Position 03 - Stop speed SET1

Adjusts stop speed (1-100). Indicates active output and its corresponding speed when lever is actuated.

10.3.4 Position 04 - Micro speed SET1

10.3.5 Position 05 - Start ramp SET1

10.3.6 Position 06 - Stop ramp SET1

10.3.7 Position 07 - Start speed SET2

10.3.8 Position 08 - Stop speed SET2

10.3.9 Position 09 - Micro speed SET2

10.3.10 Position 10 - Start ramp SET2

10.3.11 Position 11 - Stop ramp SET2

10.3.12 Position 12 - Start speed SET3

10.3.13 Position 13 - Stop speed SET3

10.3.14 Position 14 - Micro speed SET3

10.3.15 Position 15 - Dump valve delay time

11 Portable Control Unit self test mode

11.1 General description

Enables internal self-test of PCU switches and levers without opening the unit. Beep signals confirm functionality.

11.2 Activating Portable Control Unit Self Test Mode

Step-by-step guide to activate self-test mode using Stop-button and On-button sequence, confirming function with beep signals.

12 ID-code programming

12.1 General description

Explains the unique ID-code required for radio communication between PCU and CU, and how it can be overwritten.

12.2 Procedure

Step-by-step guide for programming the ID-code via cable connection, including activation and verification steps.

13 G2 B Standard Cable Kits

13.1 General description

Describes various standard cable kits for system configurations and valves/coils, typically two sets for power/digital and analogue functions.

13.2 Standard Supply cable kits

13.3 Standard valve cable kits for Sauer-Danfoss PVG-32

13.3 Standard valve cable kits for HAWE

13.3 Standard valve cable kits for PWM solenoids

Related product manuals