Do you have a question about the Servomex SERVOPRO 4900 and is the answer not in the manual?
Provides an overview of the manual's content for installation, operation, and configuration.
Defines key terms and acronyms used throughout the document, such as FSD, DV, and VARS.
Explains the xentra chassis as a platform for gas sensor modules and its measurement capabilities.
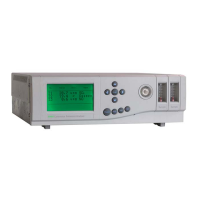
Identifies the key features and their physical locations on the xentra 4900 analyser.
Describes the keypad and LCD display, and how users interact with the analyser's interface.
Explains how internal transducers are assigned site locations (I1, I2, I3) for different analyser models.
Details the two-digit identification format for analyser outputs, indicating card number and output type.
Defines Full Scale Deflection (FSD) as the maximum measurable concentration and its relation to 'OVER' indication.
Provides information on obtaining technical support and ordering spare parts from Servomex or local agents.
Provides all necessary information for installing the xentra 4900 Continuous Emissions Analyser.
Details the process of unpacking the analyser, inspecting for damage, and checking accessories.
Describes how to mount the analyser using brackets onto a panel, requiring additional rear support.
Explains the installation of the 19" rack slide mount version using a mounting kit.
Covers connecting the analyser to a power supply, including safety precautions and voltage settings.
Guides the user on connecting signals to the analyser via plugs PL1 to PL5, including EMC standards.
Details the serial data output via a 9-pin 'D' type connector for RS232 communication.
Describes the connector for external autocalibration, providing relay contacts for valve control.
Explains how sample and calibration gases connect via a gland plate, detailing different versions.
Specifies the required conditions for sample gas, including pressure, temperature, and particulate filtering.
Guides on connecting calibration gases, recommending mixtures and concentrations for transducers.
Explains how to read flowmeters which control and measure sample gas flow through the analyser.
Details the power-up sequence and initial messages displayed by the xentra analyser.
Explains the two types of passwords (operator, supervisor) and the procedure for changing them.
Describes how to set the analyser's time, date, and date format for accurate history logging.
Explains that calibration can be manual or automatic, with entries logged in the calibration history.
Recommends regular checks for gas sensor modules and recalibration if needed, based on sensor type.
Describes setting limits for calibration parameter changes to prevent errors during auto-calibration.
Details the procedure for manual calibration of paramagnetic transducers using low and high calibration gases.
Outlines the manual calibration process for Gfx gas sensor modules with low and high calibration gases.
Explains how to perform manual calibration checks using the same samples as calibration adjustment.
Describes the auto-calibration facility for updating or checking instrument calibration without user intervention.
Explains how to monitor auto-calibration progress using icons displayed on the screen.
Details the required calibration parameters that must be set up before using auto-calibration or auto-check features.
Provides the procedure for starting auto-calibration or auto-check directly from the instrument's keypad.
Explains how to initiate auto-calibration or auto-check using an external contact closure.
Describes how to stop an ongoing auto-calibration process by pressing any key.
Provides steps to disable the auto-calibration and auto-check functions.
Explains how to re-enable auto-calibration or auto-check functions after they have been disabled.
Details the procedure for scaling external analogue inputs by defining variable values for minimum and maximum analogue inputs.
Configures four software alarm settings per sensor, including freeze state, type, level, and hysteresis.
Sets up conditions (fault, calibration, alarms) under which each relay will operate.
Configures analogue outputs, including range, zero/live settings, and span based on transducer limits.
Allows changing the measurement name (up to six characters) for display, using a defined character set.
Configures external analogue inputs (E1, E2) for naming and engineering units, similar to internal variables.
Enables definition of up to five measurement display screens, each with up to four measurements.
Allows selection of decimal places for measurements, from 0 to 3 digits.
Adjusts the analyser's response time by setting a time constant between 0 and 60 seconds.
Selects display units for each measurement, with primary and user-defined options available.
Details the calculation of total NOx concentration based on measured NO levels using linear and quadratic coefficients.
Configures serial output communications via RS232, including data frame format and transmission frequency.
Describes procedures for reviewing analyser configuration without making changes.
Explains how to view the number and nature of present alarms using the 'ALARM' icon.
Guides on determining the number and nature of faults using the 'FAULT' icon.
Allows determination of conditions under which each relay operates, based on its configuration.
Describes how to determine the configuration of each analogue output based on its settings.
Explains how to determine the operating conditions for each alarm based on its configuration.
Shows how to display the analyser identity, which appears during the start-up message sequence.
Explains how to view the alarm history buffer, which contains the most recent 20 alarm events.
Guides on viewing the fault history buffer, containing the most recent 20 fault occasions.
Explains how to view the calibration history, which records data for the most recent 20 calibration occasions.
Describes how to display signals from gas sensors, useful for diagnosing problems.
Details the procedure for checking and replacing the external fan filter element, noting it is washable.
Explains the replacement of the sample filter element every six months or as needed, with safety warnings.
Provides instructions for cleaning the exterior of the analyser using a damp cloth and keeping ventilation clear.
Introduces faults indicated by gas sensors and the chassis, and how to access diagnostic information.
Lists fault conditions for the 1156 paramagnetic transducer and their possible causes and recommended actions.
Lists fault conditions for the Gfx 1210 transducer, including possible causes and recommended actions.
Describes checks for blank or unlit displays, and possible causes and recommended actions.
Guides on ordering spare parts by providing model and serial numbers and contact addresses.
Lists common spare parts for all xentra 4900 models, rack mounting kits, and sample filter parts.
| Accuracy | ±1% of full scale |
|---|---|
| Measurement Range | 0 to 100% volume |
| Gas Types | O2, CO2, CH4 |
| Operating Temperature | -20°C to +50°C |
| Power Supply | 24 VDC or 100-240 VAC |
| Technology | Infrared |
| Applications | emission monitoring |
| Mounting | Panel or rack mount |
| Outputs | 4-20 mA |