HCD-AZ33D
9
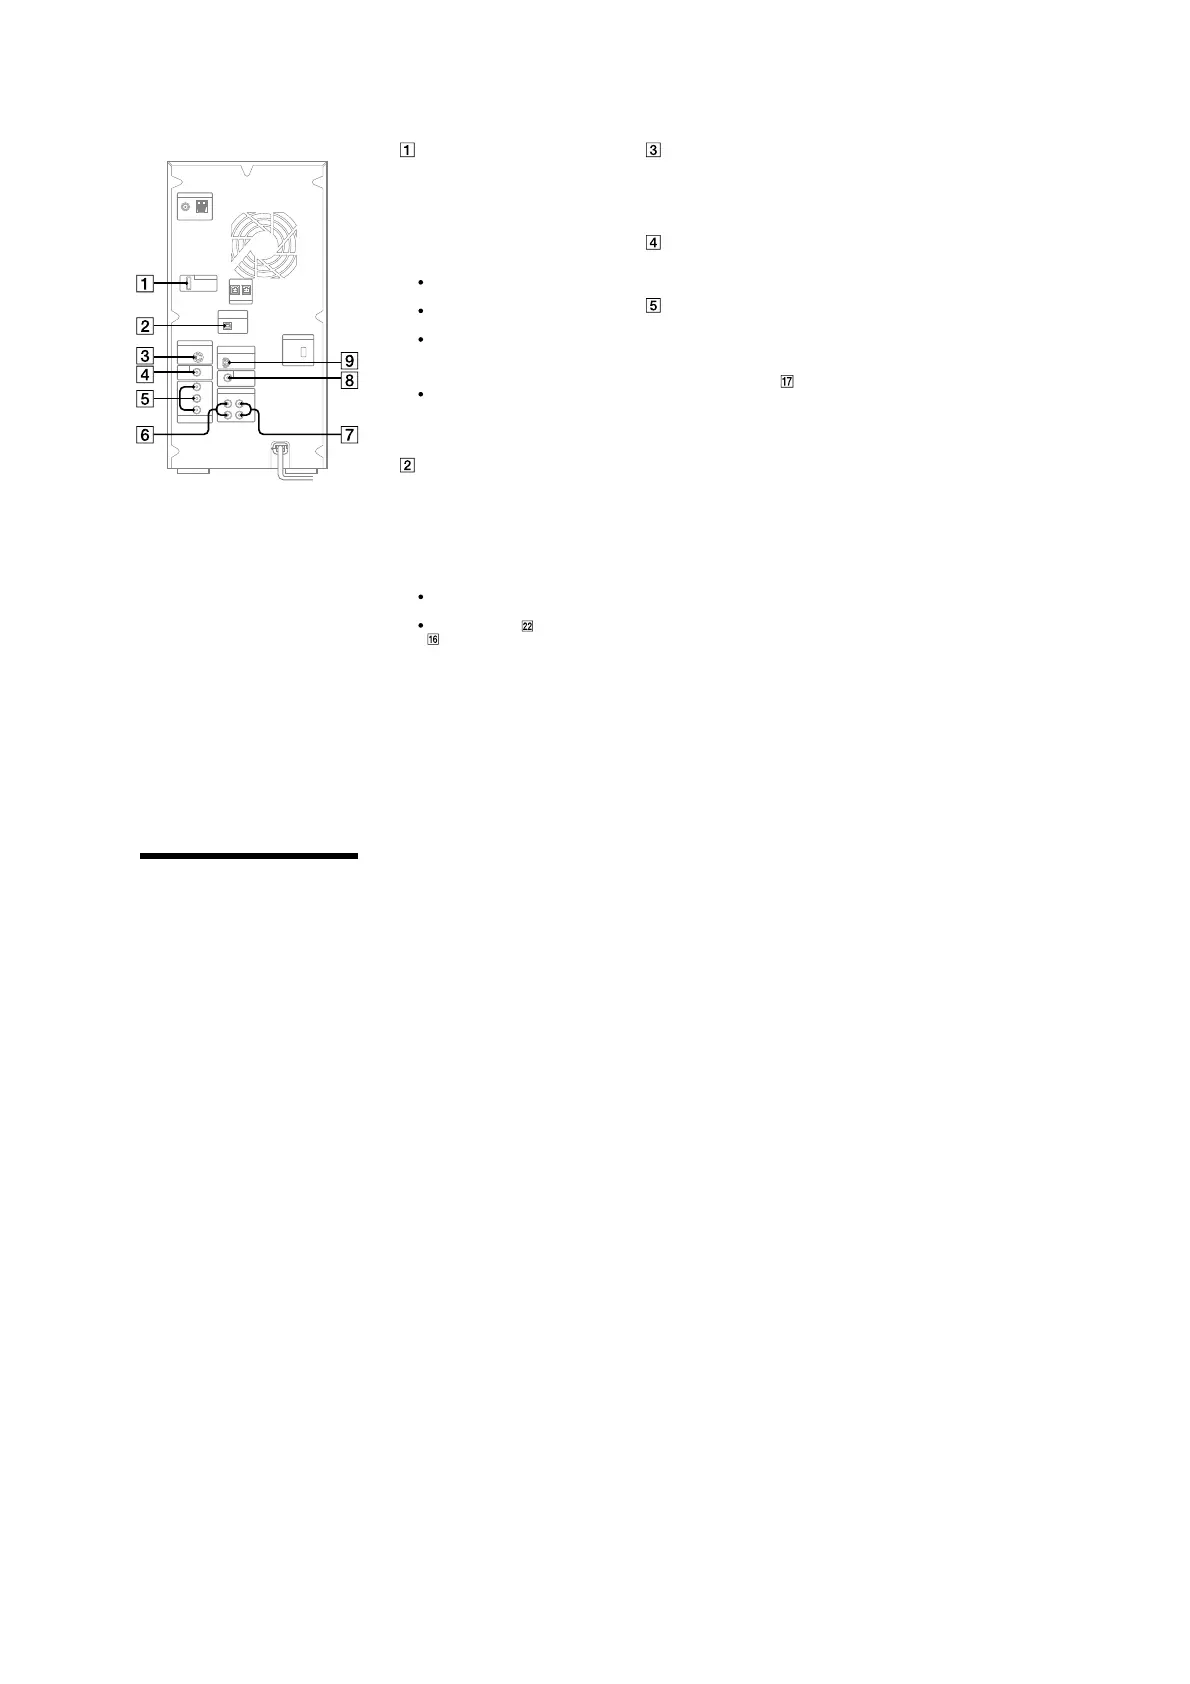
Rear panel
DMPORT (DIGITAL MEDIA
PORT)
Connect the DIGITAL MEDIA PORT
adaptor (not supplied). You need to
connect the DIGITAL MEDIA PORT
adaptor to an optional audio device
(portable audio player, etc.).
Notes
Available DIGITAL MEDIA PORT
adaptors vary in each area.
Do not connect an adaptor other than
the DIGITAL MEDIA PORT adaptor.
Do not connect or disconnect the
DIGITAL MEDIA PORT adaptor
to/from the DMPORT while the system
is on.
When using a DIGITAL MEDIA PORT
adaptor (not supplied) that has video
output function, connect the adaptor
directly to the TV.
DVD/USB DIGITAL OUT jack
Connect the digital optical input jack
of an optional digital component
(such as amplier). You can enjoy
5.1 channel sound, if the connected
amplier equipped with Dolby Digital
or DTS decoder.
Notes
Sound is output only when the system
function is set to “DVD” or “USB.”
If you press AUDIO , SOUND FIELD
or the buttons related to Karaoke
Mode, or if you connect or disconnect
microphones or headphones, the sound
cuts o for a moment.
S VIDEO OUT jack
Connect the S Video input jack of
the TV. You can enjoy higher quality
video images when you select the
S VIDEO.
VIDEO OUT jack
Connect the video input jack of the
TV or projector.
COMPONENT VIDEO OUT jacks
Connect the component video input
jacks of the TV or projector. If your
TV accept progressive format signals,
you must use this connection and
press PROGRESSIVE on the unit
repeatedly to select “P AUTO” or “P
VIDEO.” You can enjoy higher quality
video images.
VIDEO/SAT OUT L/R jacks
Connect the audio input jacks of an
optional component (such as VCR or
MD deck).
VIDEO/SAT IN L/R jacks
Connect the audio output jacks of an
optional component (such as VCR or
satellite tuner).
SUBWOOFER OUT jack
Connect the audio input jack of an
optional subwoofer*.
* SA-GNV111D is recommended. In some
areas, the SA-GNV111D may not yet be
available.
Note
e eect may be limited or noise may
occur depending on the connected
subwoofer or the type of music being
played back.
Setting the clock
Use buttons on the remote to set the
clock.
1
Press /
to turn on the
system.
2
Press TIMER MENU
.
e hour indication ashes in the
display.
If “PLAY SET?” ashes in the display,
press
or
repeatedly to select
“CLOCK SET?,” then press ENTER
.
3
Press
or
repeatedly to set
the hour.
4
Press ENTER
.
e minute indication ashes in the
display.
5
Press
or
repeatedly to set
the minutes.
6
Press ENTER
.
e clock starts functioning.
Note
e clock settings are canceled when you
disconnect the power cord or if a power failure
occurs.
To display the clock when the system
is o
Press DISPLAY
.
e clock is displayed for about 8
seconds.
D-LIGHT SYNC OUT jack
(Except for European and
Australian models)
Connect the D-LIGHT SYNC
controller (not supplied). You need
to connect the D-LIGHT SYNC
controller to the lighting device* (not
supplied). e lighting device will
react according to control signals
transmitted by the D-LIGHT SYNC
controller upon receiving music
source from the system. For details
on the use of D-LIGHT SYNC
controller and lighting device, refer to
the respective operating instructions
supplied with the respective device.
* Refer to the D-LIGHT SYNC
controller operating instruction for the
recommended lighting device.
Note
e lighting eect may be dierent
depending on the connected lighting
device or the type of music being played
back.