Home
VERITAS
Storage
NetBackup 5230
VERITAS NetBackup 5230 Hardware Installation Guide
5
of 1
of 1 rating
140 pages
Give review
Manual
Specs
To Next Page
To Next Page
To Previous Page
To Previous Page
Loading...
4
In
the
existing
shelf,
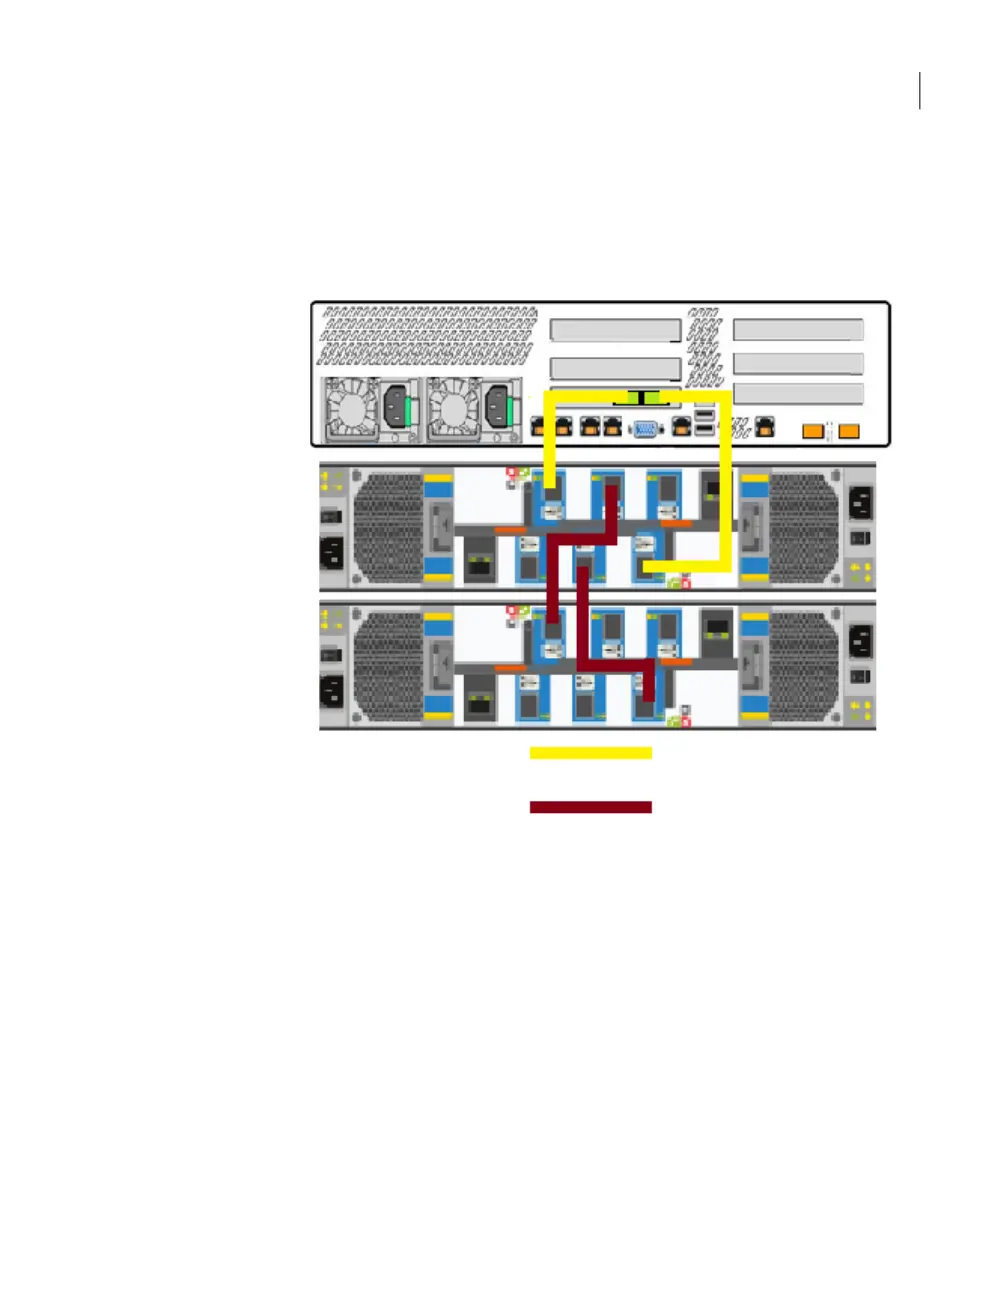
connect
port
B
in
the
top
canister
to
port
A
in
the
top
canister
of
the
new
shelf.
In
the
existing
shelf,
connect
port
B
in
the
bottom
canister
to
port
A
in
the
bottom
canister
of
the
new
shelf.
SAS2-SAS3
cable
SAS3
cable
105
Adding
2U12
storage
shelves
to
an
operational
NetBackup
5230
Appliance
Connecting
the
2U12
shelves
to
an
appliance
or
other
storage
shelves
104
106
Table of Contents
Default Chapter
2
Default Chapter
2
Legal Notice
2
Documentation Feedback
3
Technical Support
3
Table of Contents
4
Chapter 1 Overview
7
Overview
7
Product Overview
7
Appliance Front Panel
8
Appliance Rear Panel
9
Pcie Riser Assemblies and Slots
9
2U12 Storage Shelf
10
3U16 Storage Shelf
10
Product Documentation
11
Chapter 2 Preparing for Hardware Installation
12
Tools
12
Hardware Installation Flow
13
3U16 Storage Shelf Weights and Dimensions
14
Rack Guidelines
14
Power Supply Overview
15
Checking the Shipping Packages
16
Electrical Safety
16
Heat Dissipation
16
Removing the Protective Film from the 3U16 Storage Shelf
17
Locating Hardware Serial Numbers
18
Prerequisites for IPMI Configuration
19
Chapter 3 Installing Hardware into Racks
20
Precautions - Heavy Equipment
20
Installing the 3U16 Storage Shelf Guide Rails
21
Installing the 3U16 Storage Shelf into a Rack
23
Installing the Appliance Guide Rails
23
Installing the Appliance into a Rack
25
About the Cables
27
Cables
27
Chapter 4 Cables
27
Connecting the Network Cables
28
Connecting the VGA Cable
28
Connecting the Appliance to One or more 3U16 Storage Shelves
29
Connecting the Small Form-Factor Pluggable (SFP+) Transceivers
33
Connecting the Power Cables
34
Chapter 5 Verifying Hardware Operation and Configuring IPMI
35
Turning on the Storage Shelves
36
Turning on the Appliance
40
Configuring the IPMI from the Netbackup Appliance Shell Menu
42
Accessing and Using the Veritas Remote Management Interface
44
Appendix A Adding 3U16 Storage Shelves to an Operational Netbackup 5230 Appliance
48
About Adding 3U16 Storage Shelves to an Operational Appliance
49
Shutting down the Appliance
50
Preparing the Appliance to Install the Additional Hardware
51
Installing the Additional Memory
52
Installing the Additional Maintenance-Free Backup Unit (MFBU)
55
Installing the External RAID Controller Card
58
Installing 3U16 Storage Shelves into the Rack
63
Removing the Protective Film from the Storage Shelf
63
Connecting the 3U16 Shelves to an Appliance or to Other 3U16 Shelves
66
Connecting the 3U16 Shelves to an Appliance or to Other 3U16 Shelves
68
Connecting the 3U16 Shelves to an Appliance or to Other 3U16 Shelves
69
Connecting the 3U16 Shelves to an Appliance or to Other 3U16 Shelves
70
Connecting the 3U16 Shelves to an Appliance or to Other 3U16 Shelves
71
Connecting the 3U16 Storage Shelf and Appliance Power Cords
72
Turning on the Hardware and Verifying Operation
74
Appendix B Adding 2U12 Storage Shelves to an Operational Netbackup 5230 Appliance
80
About Adding 2U12 Storage Shelves to an Operational Appliance
81
Hardware Requirements
82
Preparing the Appliance to Install the Additional Hardware
85
Shutting down the Appliance
85
Installing the Additional Memory
87
Installing the Additional Maintenance Free Backup Unit (MFBU)
90
Installing the External RAID Controller Card
93
Installing 2U12 Storage Shelves into the Rack
99
Connecting the 2U12 Shelves to an Appliance or Other Storage Shelves
101
Connecting the 2U12 Shelves to an Appliance or Other Storage Shelves
102
Connecting the 2U12 Shelves to an Appliance or Other Storage Shelves
103
Connecting the 2U12 Shelves to an Appliance or Other Storage Shelves
105
Connecting the 2U12 Shelves to an Appliance or Other Storage Shelves
106
Connecting the 2U12 Shelves to an Appliance or Other Storage Shelves
107
Connecting the 2U12 Shelves to an Appliance or Other Storage Shelves
108
Connecting the 2U12 Shelves to an Appliance or Other Storage Shelves
109
Connecting the 2U12 Shelves to an Appliance or Other Storage Shelves
110
Connecting the 2U12 Shelves to an Appliance or Other Storage Shelves
111
Connecting the 2U12 Shelves to an Appliance or Other Storage Shelves
112
Connecting the 2U12 Shelves to an Appliance or Other Storage Shelves
113
Connecting the 2U12 Shelves to an Appliance or Other Storage Shelves
114
Connecting the 2U12 Shelves to an Appliance or Other Storage Shelves
115
Connecting the 2U12 Shelves to an Appliance or Other Storage Shelves
116
Connecting the 2U12 Shelves to an Appliance or Other Storage Shelves
117
Connecting the 2U12 Shelves to an Appliance or Other Storage Shelves
118
Connecting the 2U12 Shelves to an Appliance or Other Storage Shelves
119
Connecting the 2U12 Shelves to an Appliance or Other Storage Shelves
120
Connecting the 2U12 Storage Shelf and Appliance Power Cords
121
Turning on the Hardware and Verifying Operation
122
Adding the Disk Space of Additional Storage Shelves from the Netbackup Appliance Web Console
135
Appendix C Adding New Disk Space to the Appliance Configuration
135
Adding the Disk Space of Additional Storage Shelves from the Netbackup Appliance Shell Menu
136
Index
138
Hardware Verification
35
Other manuals for VERITAS NetBackup 5230
Configuration Guide
77 pages
Hardware Service Procedure
7 pages
5
Based on 1 rating
Ask a question
Give review
Questions and Answers:
Need help?
Do you have a question about the VERITAS NetBackup 5230 and is the answer not in the manual?
Ask a question
VERITAS NetBackup 5230 Specifications
General
Language version
-
License type
Corporate
License quantity
- license(s)
License term in years
1 year(s)
Related product manuals
VERITAS NetBackup 5240
38 pages
VERITAS 5230
213 pages
VERITAS 5250
213 pages
VERITAS 5350
3 pages
VERITAS 5360
76 pages
VERITAS 5240
213 pages
VERITAS 2U12
213 pages
VERITAS 3340
213 pages

 Loading...


