ALPINE iLX-F509E 68-41657Z84-A (EN)ALPINE iLX-F509E 68-41657Z84-A (EN)
27-EN
Installation Setup
[Installation Status] is selected on the System S
screen.
Vehicle Setup enables you to check the installa
Camera 1, Camera 2, Dash Cam*, GNSS Ant
Information, Parking, Vehicle Speed, Reverse, Batt
Voltage.
∗ Dash Cam is displayed in the Installation Setup
unit does not support it.
Setting item:
Installation Status
The Installation check screen is displayed.
• Depending on your vehicle, some installation statu
be checked via this function.
About iLX-507E/iLX-F509E/iLX
[About] is selected on the System Setup M
By using [About], the Serial Number and M
be checked, the Firmware Version can be updat
various settings can be initialized.
Displaying the Product Informa
You can view the version information of this pr
note of this information and refer to it whenev
contact Alpine Tech Support or an Alpine-author
Setting contents:
Serial Number / Model Name
Updating Firmware Version
Download the firmware from the Alpine websit
update the product using the USB flash drive.
1 Plug the USB flash drive with the up
stored into the unit.
2 Touch [Update] of “Firmware Version”.
3 After the confirmation message app
touch [OK].
• Do not turn on/off the power, change the ignition k
until system restart is completed.
Dedicated Tuning According to Your
Car (Car by Car Update)
For some car models, you can perform settings by
downloading the data of the car model from the Alpine
website. Install the data to the unit by using the USB flash
drive.
• Introduction animation, sound dedicated to the car model,
camera connection setting and camera guide line can be set
with the data of the car model.
1 Plug the USB flash drive with the update file
stored into the unit.
2 Touch [Update] of “Car by Car Update”.
3 After the confirmation message appears,
touch [OK].
• Do not turn on/off the power, change the ignition key position,
until system restart is completed.
Displaying Software License
Setting contents:
Open-Source Software License
Initializing the Sound Settings
You can restore the EQ Setting*/X-OVER*/Time Correction*/
Media Xpander (MX)/bass engine/Subwoofer to factory
settings.
1 Touch [Set] of “Default Sound Settings”.
2 After the confirmation message appears,
touch [OK].
The system starts initialization.
∗ The setting values that are stored in Preset 1 to Preset
3 cannot be initialised.
Initializing the System
You can initialize all data, to restore the factory settings.
Remove the USB flash drive, etc. from the system before
operation.
1 Touch [Reset] of “Clear All Settings”.
2 After the confirmation message appears,
touch [OK].
The confirmation screen appears.
3 Touch [OK].
The system starts initialization.
• Do not turn on/off the power, change the ignition key position,
until system restart is completed.
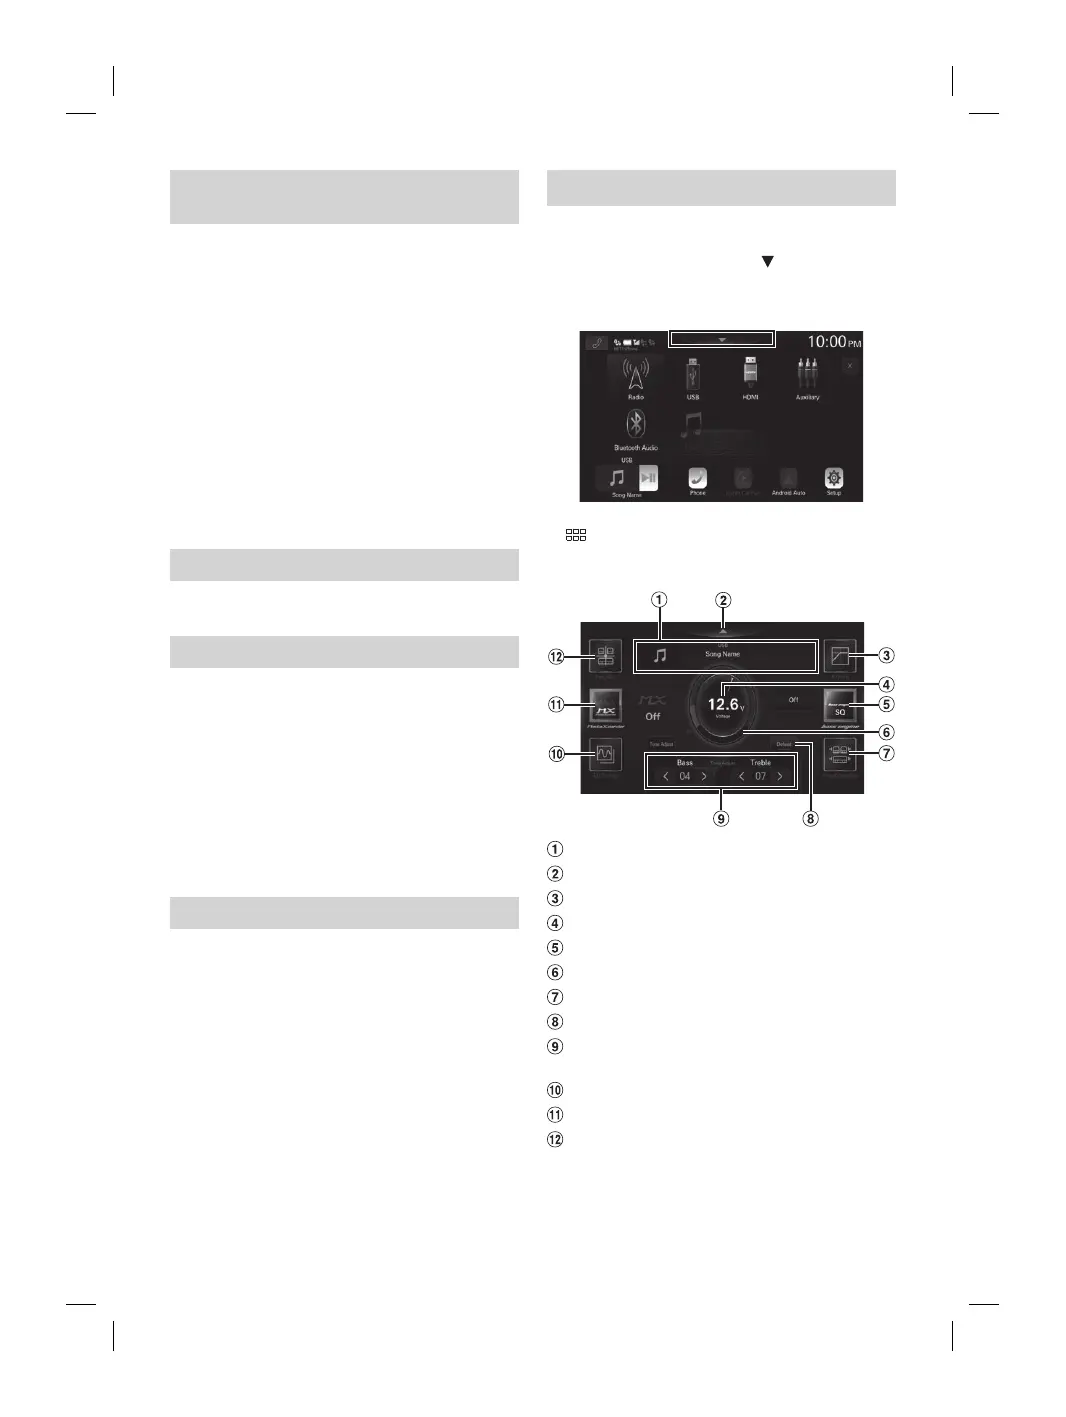
Sound Setup
You can set up items related to the sound quality.
Touch the upper central area [ ] of the Home
screen.
The Sound Setup screen is displayed.
• The Sound Setup screen can also be displayed by touching
[
] (HOME) while displaying the Home screen.
■
Sound Setup Menu screen
Current source information display.
Touch this to change to the Home screen.
X-OVER (page 30)
Voltage display.
bass engine (page 31)
Volume level indicator
Time Correction (page 30)
Defeat (page 31)
Tone Adjust (Bass/Treble) (page 31), Sub
Woofer Level (page 31)
EQ Setting (page 28)
Media Xpander (page 28)
Fader/Balance/Rear Speaker/Subwoofer (page
29)