Setup Pages and Descriptions
46
NXD-500i 5" Modero Wall/Flush Mount Touch Panel with Intercom
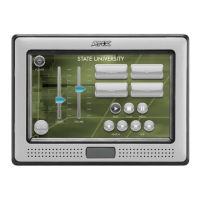
Audio Settings Page
The Audio Settings page (FIG. 44), accessed by pressing the Audio button on the Setup page, allows adjustment of the
master volume parameters and default panel sounds on the panel.
The elements of the Audio Settings page are as follows:
Time & Date Settings Page (Cont.)
Connection Status icon: This visual display of the connection status allows the user to have a current visual update of
the panel’s connection status regardless of what page is currently active.
A Lock only appears on the icon if the panel has established a connection with a currently
secured target Master (requiring a username and password).
Time Date Refresh/Set: This section provides two options:
•The Get Time/Date button retrieves the Time and Date information from the Master.
•The Set Time/Date button sets the Master to retain and save any time/date modifications
made on the Time & Date Setup page.
Time Display fields: • These fields display the time in three formats: STANDARD, STANDARD
AM/PM, and 24 HOUR.
Date Display fields: • These fields display the calendar date information in several different formats.
Set Date/Time: This section provides a user with both UP/DN arrow buttons to alter the Master’s calendar date
and time. The blue circle indicates which field is currently selected.
• Select the Year field and use the UP/DN buttons to alter the year value
(range = 2000 - 2037).
• Select the Month field and use the UP/DN buttons to alter the month value
(range = 1 - 12).
• Select the Day field and use the UP/DN buttons to alter the day value
(range = 1 - 31).
• Select the Hour field and use the UP/DN buttons to alter the hour value
(24-hour military).
• Select the Minute field and use the UP/DN buttons to alter the minute value
(range = 0 - 59).
• Select the Second field and use the UP/DN buttons to alter the second value
(range = 0 - 59).
NXD-500i touch panels do not have an onboard clock. This page both receives and
sets the time and date of the NetLinx Master.
FIG. 44 Audio Settings page
Audio Settings Page
Back: Saves the changes and returns to the previously active touch panel page.
Wired icon: The icon to the left of the Connection Status Icon displays that the current connection to the
Master is Wired (image of three networked computers).
 Loading...


