17
LED. Charging is complete any time after the
“TRICKLE” indicator is lit.
CAUTION To achieve optimal charge and ensure
long battery life of the NIMH battery, make sure that
charging takes place in an area where the ambient
air temperature is between 40 and 86 degrees
Fahrenheit (5 and 30 degrees Celsius). Charging
the battery in temperatures above or below this
range can damage the battery and will drastically
affect battery life.
2.4.3 Low battery alarms
Note: The voltage figures given below are for PhD
Lite instruments with firmware version 3.18 and may
be slightly different for units with other versions of
instrument firmware.
The PhD Lite includes low battery alarms that are
activated whenever battery voltage approaches a level
that will soon lead to instrument shut down. When the
battery voltage is reduced to approximately 3.23 volts,
an audible alarm will sound and the display will indicate
that a low battery condition exists. At this stage, the low
battery alarms may be silenced for a fifteen-minute
period by pressing the MODE button. After the first low
battery alarm, the alarm will sound again every fifteen
minutes until the voltage drops to the “Very Low Battery”
level.
The “Very Low Battery” level occurs when the battery
voltage drops to 3.13 volts. Due to the risk of imminent
shut down, when the battery voltage reaches the “Very
Low Battery” level it is no longer possible to silence the
low battery alarms. At this point, it is necessary to
immediately leave the hazardous area in which the
instrument is being used.
When the voltage drops to 3.10 volts, the PhD Lite will
display a "Dead Battery" message to warn the user of
imminent shut down. The instrument will then
automatically turn itself off.
After any low battery alarm the batteries should be
replaced if the PhD Lite is equipped with alkaline
batteries or the battery should be recharged if the PhD
Lite is equipped with a NiMH rechargeable battery.
Use only Duracell MN1500 or
Ultra MX1500, Eveready Energizer E91-LR6,
Eveready EN91, Radio Shack 23-874 (not ATEX
approved)size AA, 1.5V Alkaline batteries, Eveready
CH15 (not ATEX approved) or Radio Shack 23-149
(not ATEX approved) size AA 1.2V NiCad batteries,
or Eveready L91 size AA 1.5V Lithium batteries (not
CSA or ATEX approved). Substitution of batteries
may impair intrinsic safety.
2.5 Methods of sampling
The PhD Lite may be used to sample the immediate
vicinity in diffusion mode, or it may be used to sample
remote locations. Sampling remote locations requires
the use of either the manual sample draw kit that is
included with the PhD Lite at purchase, or the PhD Lite
motorized sample pump that is available separately.
In normal operation, the PhD Lite functions as a
diffusion-style gas detector. The atmosphere reaches
the sensors by diffusing through the vents in the sensor
compartment cover. Normal air movements are enough
to carry the sample to the sensors. Once turned on, the
PhD Lite monitors continuously. The sensors react
quickly to changes in the concentrations of the gases
being measured. This type of "diffusion" operation
monitors only the atmosphere immediately surrounding
the detector.
To sample more remote locations. It is necessary to use
one of the two sample-draw kits that are available for
the PhD Lite. A manual sample draw kit comes as a
standard accessory with every PhD Lite and includes a
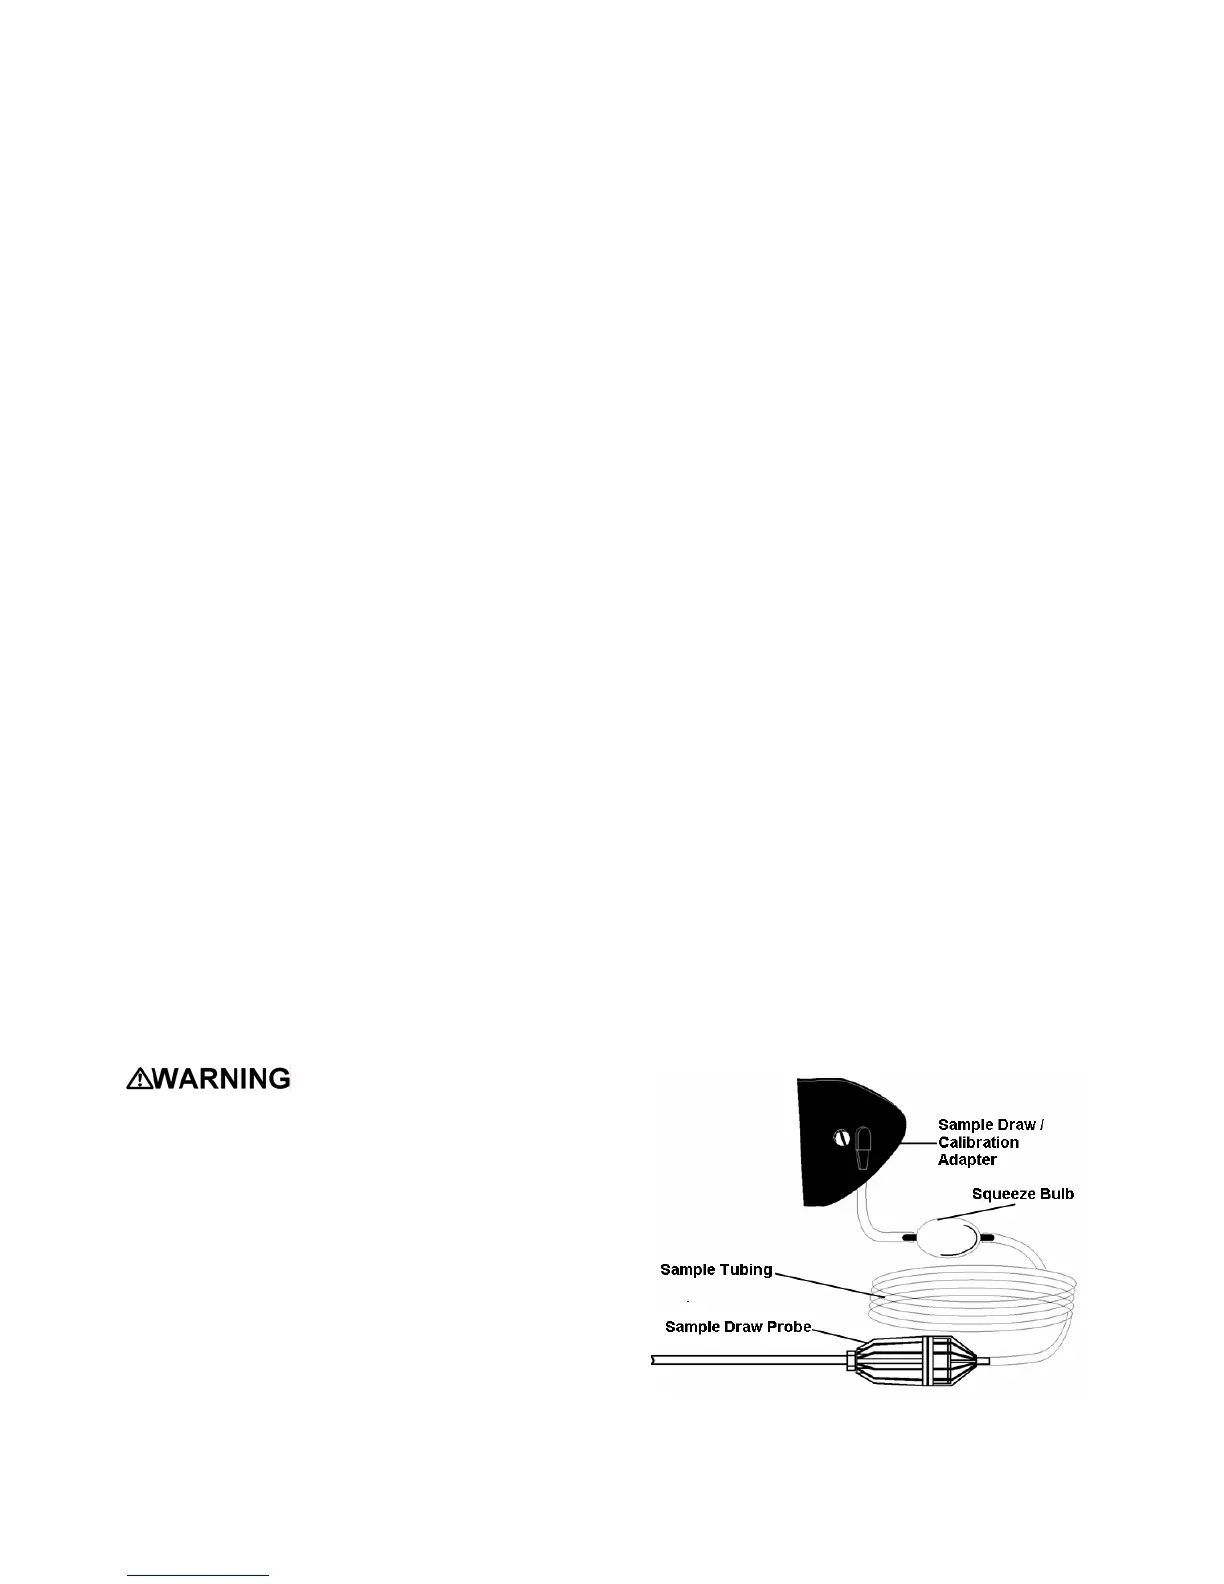
sample draw probe, squeeze bulb and ten feet of tubing.
A motorized sample draw pump is also available. In
either case the sample is drawn in through a sample
draw probe, and then proceeds through a length of hose
back to the sensor compartment.
2.5.1 Using the hand-aspirated sample draw kit
1. Connect the end of the hose that is closer to the
squeeze bulb to the sample draw adapter. Then
connect the other end of the hose to the sample
probe as shown in Figure 2.5.1.1.
2. Attach the sample draw adapter to the PhD Lite as
shown in Figure 2.5.1.2.
3. Cover the end of the sample draw probe assembly
with a finger, and squeeze the aspirator bulb. If
there are no leaks in the sample draw kit
components, the bulb should stay deflated for a few
seconds.
4. Insert the end of the sample probe into the location
to be sampled.
5. Squeeze the aspirator bulb several times to draw
the sample from the remote location to the sensor
compartment. Allow one squeeze of the bulb for
every one foot of sampling hose for the sample to
reach the sensors. Continue to squeeze the bulb
for an additional 45 seconds or until readings
stabilize.
6. Note the gas measurement readings.
Figure 2.5.1.1. Hand-aspirated sample draw kit