7. ADJUSTMENT
106
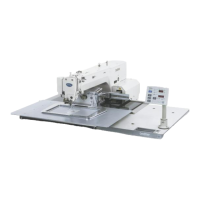
BAS-342G
7-21. Adjusting the needle up stop home position
NOTE:
If the four bolts (1) of the sewing machine motor and the
bolt (3) of the magnet are loosened, it may disrupt the feed
timing.
Do not loosen these bolts at the time of shipment from the
factory or after the needle up stop home position has been
adjusted.
1. Remove the needle and the needle bar thread guide.
2. Turn the pulley to move the needle bar (4) to its lowest
position.
3. Remove the rubber cap (5) from the face plate, and then
loosen the screw (6) of the needle bar clamp.
4. Adjust so that the lowest needle bar position is at the
distance h.
5. Tighten the screw (6) and then install the rubber cap (5).
6. While pressing the
key (7), turn on the power switch.
* Keep pressing the key (7) until the model name is
displayed and the buzzer beeps once.
7. Press the
key (7) or the key (8) to select check
code “ 8”. (Refer to “2-7. Input checking method” for
details.
8. Remove the flywheels, and then loosen the bolt (3) of the
magnet (2) 1/4 of a turn.
9. Turn the pulley to lower the needle bar (4) to a distance H
from the highest position.
10. Move the magnet (2) to the precise point where the
menu display switches from “ on” to “ oFF”, and then
tighten the bolt (3).
11. Turn the pulley to move the needle bar (4) to the position
of H and check that the menu display switches from “
on” to “ oFF”
Needle DP x 17 DP x 5
Distance H 55.5 mm 50.4 mm
Distance h 18.0 mm 12.9 mm
1420B
1384B
Needle
plate
1421B
 Loading...